05/04/2018 windows | for beginners
After installing Windows (or after updating Windows 10), some novice users discover an impressively sized folder on the C drive, which is not completely deleted if they try to do this using conventional methods. This raises the question of how to remove the Windows.old folder from the disk. If something in the instructions was not clear, then at the end there is a video guide about deleting this folder (shown on Windows 10, but also suitable for previous versions of the OS).
The Windows.old folder contains files from the previous installation of Windows 10, 8.1 or Windows 7. By the way, in it, you can find some user files from the desktop and from the “My Documents” folders and similar ones, if suddenly after reinstallation you did not find them . In these instructions we will remove Windows.old correctly (the instructions consist of three sections from newer to older versions of the system). You may also find it useful: How to clean up the C drive from unnecessary files.
How to delete the Windows.old folder in Windows 10 1803 April Update and 1809 October Update
The latest version of Windows 10 has a new way to delete the Windows.old folder from a previous OS installation (although the old method described later in the guide still works). Please note that after deleting a folder, automatic rollback to the previous version of the system will become impossible.
The update has improved automatic disk cleanup and now you can do it manually, including deleting an unnecessary folder.
The steps will be as follows:
- Go to Start - Settings (or press Win+I keys).
- Go to the “System” - “Device Memory” section.
- Under Storage Control, click Free up space now.
- After some period of searching for optional files, Fr.
- Click the "Delete Files" button at the top of the window.
- Wait for the cleaning process to complete. The files you selected, including the Windows.old folder, will be deleted from drive C.
In some ways, the new method is more convenient than the one described below; for example, it does not require administrator rights on the computer (although I do not exclude that it may not work if they are absent). Next is a video demonstrating the new method, and after that - methods for previous versions of the OS.
If you have one of the previous versions of the system - Windows 10 before 1803, Windows 7 or 8, use the following option.
EasyBSD
A convenient, easy-to-use program that allows you to edit the download list without calling “System Configuration”. A user who wants to remove the old Windows after installing a new one does not need to know how to enter the BIOS, and does not have to use the command line - the whole process is completed in a few mouse clicks:
- After downloading (link - techspot.com), installing and launching the program, you need to switch to the “Edit boot menu” tab.
- Select the old OS with a mouse click and click on the “Delete” button located at the top right.
- Confirm that you want to remove the entry from the download list.
- Click on the “Save” button and close the program.
Tip: if the wrong entry about Windows startup was deleted by mistake, you can restore the list to its original form by going to the “Add entry” tab and checking the appropriate option in the top field.
Deleting the Windows.old folder in Windows 10 and 8
If you upgraded to Windows 10 from a previous version of the system or used a clean installation of Windows 10 or 8 (8.1), but without formatting the system partition of your hard drive, you will find the Windows.old folder on it, sometimes occupying impressive gigabytes.
The process of deleting this folder is described below, however, it should be borne in mind that in the case where Windows.old appeared after installing a free update to Windows 10, the files located in it can serve to quickly return to the previous version of the OS in case of problems. Therefore, I would not recommend deleting it for those who updated, at least within a month after the update.
So, in order to delete the Windows.old folder, follow these steps in order.
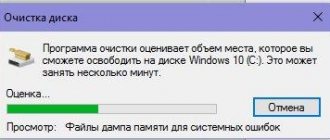
- Press the Windows key (OS logo key) + R on your keyboard and type cleanmgr and then press Enter.
- Wait for the built-in Windows Disk Cleanup program to start.
- Click the "Clean up system files" button (you must have administrator rights on the computer).
- After searching for the files, find the “Previous Windows installations” item and check it. Click OK.
- Wait for the disk cleanup to complete.
As a result of this, the Windows.old folder will be deleted, or at least its contents. If something remains unclear, then at the end of the article there is a video instruction that shows the entire removal process in Windows 10.
If for some reason this does not happen, right-click on the Start button, select the “Command Prompt (Administrator)” menu item and enter the command RD /S /QC:\windows.old (provided that the folder is located on drive C) then press Enter.
Another option was also suggested in the comments:
- Launch the task scheduler (you can search for Windows 10 in the taskbar)
- Find the SetupCleanupTask task and double-click on it.
- Right-click on the task name and select Execute.
As a result of these steps, the Windows.old folder should be deleted.
Method number 3. Windows Scheduler
Another method to delete a folder is to run a task in the system scheduler . You can find it in the \Microsoft\Windows\Setup folder under the name SetupCleanupTask . It will need to be launched manually. To do this you need to do the following:
- Open the scheduler from the OS start menu.
- Find the task SetupCleanupTask, and start its execution from its context menu.
How to remove Windows.old in Windows 7
The very first step, which will now be described, may fail if you have already tried to delete the windows.old folder simply through Explorer. If this happens, do not despair and continue reading the guide.
So, let's begin:
- Go to “My Computer” or Windows Explorer, right-click on drive C and select “Properties”. Then click the Disk Cleanup button.
- After a short analysis of the system, the Disk Cleanup dialog box will open. Click the "Clean up system files" button. You'll have to wait again.
- You will see that new items have appeared in the list of files to be deleted. We are interested in “Previous Windows installations”; they are stored in the Windows.old folder. Check the box and click OK. Wait for the operation to complete.
Perhaps the steps already described above will be enough to make the folder we don’t need disappear. Or perhaps not: empty folders may remain, causing a “Not Found” message when you try to delete them. In this case, run Command Prompt as an administrator and enter the command:
rd /s /qc:\windows.old
Then press Enter. After executing the command, the Windows.old folder will be completely removed from the computer.
Method 2: Disk Cleanup Utility
You can delete unnecessary data by following the following action plan:
- Press the Win+R combination, in the “Run” window that opens, type the cleanmgr command and press Enter (or click on the OK button).
- In the Disk Cleanup window that appears, click the “Clean up system files” button.
- We wait until the cleaning program evaluates the possible amount of space that it can free up on the disk, after which a window will open in which we check the box next to the “Previous Windows installations” option and click OK.
- Since this operation is not an ordinary one, the system will ask for confirmation to complete it. Click on the appropriate button or click “Cancel” if you change your mind.
- The entire directory will probably not be deleted, but most of the files in it will be erased.
There is another way to get to the disk cleanup window.
- In My Computer, right-click on the system disk, open the context menu and select “Properties” from it.
- In the window that appears, find and click the “Disk Cleanup” button.
Live CD
Another almost 100% way to remove old Windows that has become unnecessary after installing a new one is to use a product for deploying the operating system without the need for installation. Using C9PE as an example, the process looks like this:
- The user starts from the Live CD and selects one of the available methods to boot the desktop.
- Waits for the information to load.
- And by opening the “My Computer” menu.
- Right-clicks on the title of the folder with unnecessary data.
- Selects the “Become an owner” option.
- Then it deletes the directory in the standard way.
Important: Depending on the file system and other settings of the system drive, it may not appear in the My Computer menu. In this case, the user should try other ways to remove the old Windows or download and run a Live CD from another developer.
Source