Android developer - who is he?
In short, this is a specialist in creating products for the Android operating system for various devices - from smartphones, tablets, e-readers and game consoles to refrigerators and vacuum cleaners. Contrary to popular belief, a developer's responsibilities are not limited to writing code. The range of tasks extends from analyzing the technical specifications, briefs and prototypes of the customer to uploading the finished product to the store and website, searching for new solutions to improve an already launched application.
The wide range of tasks of an Android developer is compensated by decent earnings: (the average salary of a specialist with 1-2 years of experience is 120,000 rubles) and high demand (more than 37 thousand vacancies on Headhunter). How this profession has become so promising is not difficult to understand. Indeed, in modern realities, almost every company, even a start-up, strives to launch its own corporate application for clients, which is often associated with the opportunity to increase profits several times.
Black list
Blacklisting of numbers has always been a stumbling block for Android users. The system itself does not provide such capabilities, and the applications available on the market implement blocking of numbers through dirty hacks and not always correctly (most of these applications simply pretend to be a third-party dialer who picks up the phone and immediately hangs up).
However, you can also get blocked in stock Android; to do this, you just need to send unwanted callers to voicemail. To do this, tap on the desired contact, then click the edit icon (“pencil”), then the menu and select the “Voice only” item. mail". There, by the way, you can set a separate ringtone for the subscriber.
Sending a contact to the blacklist
What is developer mode in android and why is it needed?
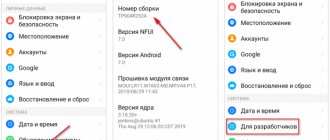
In the settings of your device there is one interesting item “For Developers”. With its help, users can customize the behavior of the system, activate any functions, and developers can debug the operation of the desired application/game. For example, in this instruction we will tell you how to enable “USB Debugging Mode”
(see point 4 in the description of the functions of the developer menu), it views the error report, enables factory unlocking of the bootloader and much more.
Despite the fact that all Android devices have the same developer settings, device manufacturers may place this option in different sub-items of the Settings menu. Now we will look at exactly how and where to enable/disable developer mode on an Android smartphone or tablet.
, and then we’ll tell you what functions and under what circumstances you can use it.
Enabling Developer Options
Developer options became available with Android 4.2 and have been hidden in roughly the same place ever since. The good news is that these options are easy to enable and work the same on almost every Android smartphone or tablet. The following steps should work on any device running the Green Robot version of KitKat or later. The process may vary slightly from device to device, but know that you just need to look for the "Build Number".
- Go to Settings > About Phone/Tablet
- (Some phones have an extra step here. Click "Software Information")
- Find the item with the build number and tap on it several times
- Stop tapping when it says “you are now a developer”
- Return to the main settings page
- You should see a new Developer Options option at the bottom of the list of settings or in Advanced settings (Advanced).
For Android Oreo and higher:
- Go to Settings > System > About Phone
- Find the build number and tap on it several times
- Stop tapping when it says “you are now a developer”
- Go back to Settings > System
- You should now see "Developer Options"
Change application permissions
Any application can access some of your personal information. You can see exactly what permissions have been granted to apps by going to Settings , tapping Apps & notifications , and selecting the app you're interested in (or tap See all to see the full list). Then, to view and edit access to this application, click Permissions . For example, you can allow an app to access your contacts list but not your location.
Why enable developer mode
Developer mode adds a section for developers to the Android device settings with a large number of new features, many of which will be useful not only to application developers, but also to ordinary users. Below we will briefly look at the most popular of them.
- USB debugging is a function that allows you to debug when connecting an Android device to a computer via USB. Used to run many programs that interact with the Android device.
- Fake location – a function to change the real location of the device. Using this function, you can make applications “think” that the device is located in another location.
- USB configuration – a function for selecting the operating mode when connecting via USB.
- GPU acceleration is a feature that enables 2D graphics processing using the GPU.
Developer Mode Settings
This section is divided into thematic subsections. We will tell you about all the features and capabilities that the creators of the Android operating system offer.
- Bug Report: Interactive - allows you to track the status of the report, provide additional information about the problem, and take a screenshot. Some sections may be excluded to reduce report preparation time.
- Detailed - used if the device does not respond to user actions or is too slow.
Where are the developer mode settings?
Step 1: Open Android Settings again and go to Advanced Settings.
Step 5. Find the “For Developers” item. It's at the very bottom.
Step 6: Make sure the Developer Mode switch is turned on. This is also where most of the hidden Android settings are located.
Developer mode on other smartphones
On other smartphones, you can enter developer mode in the same way:
Step 1: Open Android Settings.
Step 2. Find the "About phone" item. Usually located at the very bottom.
Step 3: Scroll down and find Build Number. Click on it several times. An inscription will appear on the screen indicating that you have become a developer.
Step 4: Return to the main Android settings menu and select the System section.
Step 5: Click on the "Advanced" option to open additional options.
Step 6. Click on the “For Developers” button to open the hidden settings menu.
Step 7: The switch at the top of the screen indicates that Developer Mode is available. Just click on it if you need to remove hidden settings from the menu.
Open the BIOS. BIOS Setup and Dynamic CMOS Memory
To open BIOS
After pressing the power button on the PC case, you need to press the DEL, F2 or F10 key on the keyboard.
After this, the BIOS Setup
. She looks like this.
Or like this.
This is a program with which you can change settings in the BIOS. After making changes, everything is saved not in the BIOS itself, but in a special CMOS dynamic memory chip. In general, it is impossible to make changes to the BIOS itself without special hardware. These hardware, programmers, do the so-called “flashing”. And for some older motherboards this is basically impossible.
After the computer is turned on, hardware testing compares the current configuration with the one stored in CMOS memory. If differences are detected, the CMOS is either automatically updated or BIOS Setup is called to change the settings.
In the BIOS chip, all data is saved even when the PC is turned off. But CMOS memory requires power so that all changes are saved even when the computer is disconnected from electricity. This is done using a rechargeable battery, which is located on the motherboard. Its charge usually lasts for several years.
Sometimes it is necessary to return to the factory BIOS settings, if some changes were made to the CMOS before, this is done simply, remove the battery for a few seconds and the entire contents of the CMOS memory are cleared. After the battery runs out, the message “ CMOS-checksum”
" or "
Batteru Low Level
". Don't be afraid. You just need to replace it and set the settings again, if they were made, of course.
How to enable developer mode on Android
To enable developer mode on your smartphone, follow these steps:
- Open your phone Settings and find the About phone item. Typically this block is located at the very end of the list of available options. The name of the setting may also be different: Phone Details, Information or something similar
- Now we need to find the line in which the Build Number of our firmware will be written. This item can be directly in the About phone menu, or it can be placed in one of the sub-menus, such as About firmware, Advanced and others
- It's a small matter. We need to quickly tap (click) on the item several times (usually 7 touches) in a row Build number. We simply start “tapping” with our finger on the screen above the desired item. After 4-5 clicks, a warning will pop up with content like: You're almost there. 3 steps left - or something like that. This means that we are doing everything right. We do not stop and continue to tap the screen a few more times. Don’t be afraid to miss the notification that the developer mode activation was successful, even if you don’t have time to stop, extra clicks will not affect the operation of the system in any way and will not turn off the Developer Features. Finally, we will see a notification: You have become a developer!
- Actually, that's all that needed to be done. To make sure that functions for Android developers are now available to us, open Settings and look for the corresponding menu item there. It will probably also be located somewhere at the bottom, next to the About phone section
Up to Android 4.2
- Go to “Settings” of your phone and click on “Developer Mode”;
- If such an item is missing, you can try to find the “Hidden Settings” tab and activate it;
- Once you activate the option, you will be able to use all the additional features available in this mode.
For Android above 4.2
All versions of Android operating systems that came out after 4.2 hide the developer mode on the phone by default, so you need to activate it in another way. In most cases, these instructions will be universal for all subsequent versions, up to 9.0. The procedure is as follows:
- Go to “Settings” of your device and click on “About phone”;
- Next, scroll to the “Build Number” or “Kernel Version” tab and click on it;
- You need to quickly click on the tab about 5-7 times until a notification appears that “You have become a developer”;
- In most cases, the system will notify you about how many steps (clicks) are left before the mode is activated;
- Now go back to the “Settings” of your phone and click on “Advanced settings;
- In this section, find the “For Developers” item and use the options that you need. And there really are a lot of them. You can read more in our separate article.
In Android 8, 9 and 10
1. Go to settings and open the “System” section. Next, go to “About phone/tablet/device” and click on “Build number” seven times in a row.
2. A new menu item will appear in the settings - “System”; to see it, expand additional parameters.
In Android 7 and earlier
1. Open the phone settings and scroll the menu list to the very bottom, we need a section - “About phone / tablet / device”. Open it.
2. Scroll to “Build Number” and click on it seven times in a row until a message appears indicating that you have become a developer.
The corresponding item will appear in the main settings menu.
Developer mode in MIUI on Xiaomi
In MIUI firmware on Xiaomi, the developer menu is activated in a similar way. The “ About phone ” item is the first one in the settings menu. Go into it and find the “ MIUI Version ” parameter. By quickly tapping on it 7 times in a row, the notification “ You have become a developer!” "
After activating the mode, go to the main settings menu and find the “ Advanced settings ” item there (in the “ System and device ” group). The “ For Developers ” menu is at the end of the list, it is the third item from the bottom.
Unlock your phone with your voice
You don't need to touch your phone to access Google Assistant. This can be done by voice, for this you need to make some settings.
Open the Google , tap the menu button (three horizontal lines at the bottom right), then Settings , followed by Voice . Select "Voice Match" and activate the "OK Google" function. Now it will work at any time, even when your device is locked. In fact, you can use voice recognition to unlock your phone this way.
How to disable developer mode in Android and remove it from the menu
Disabling developer mode is extremely simple, just go to the “For Developers” menu item in the settings and move the switch in the upper right corner to the “Off” position.
But this will only disable this mode, while the section itself will remain in the settings. To completely remove it from the menu, you will need to do the following:
- Go to “Settings” and go to the “All applications” section;
- Next, find a program called “Settings” in the list of all applications. Select it;
- Information about the settings program will open. If there is an option in the Storage menu, go to it and then click Erase Data. In some cases, you do not need to go into the “Storage” and you can immediately click “Erase data” (or “Clear data”);
- A message will appear that if you perform these steps, your Google account information will be deleted, but in fact this is not the case, so you can safely confirm the action.
After completing the manipulations described above, the “For Developers” section will disappear from the settings menu.
Up to version 4.2
- Go to the “Settings” of the device, find the “For Developer” item and set the slider to “Off”;
- Also, if there is no item with the developer, you can look for “Hidden settings” and disable it there.
After version 4.2
Again, there are a few different methods you can use here, depending on the make and model of your device.
Fictitious locations
If you are a very important person, if you are constantly imagining surveillance or “conning” friends on Foursquare (I still can’t come to terms with the fact that the check-in app is now called Swarm) is your hobby, then the ability to replace real location coordinates with fake ones is something just what the doctor ordered. To do this, you need to download any application on Google Play designed for these purposes (for example, Location Spoofer, it will be quite enough), and turn on the “Fictitious locations” item in the menu for developers. After this, you can safely lie on the couch all summer and just occasionally upload photos from the Internet of some wonderful resort to Instagram.
How to enable USB debugging on Android
To enable usb debugging mode on your Android device, go to the “For Developers” menu, find the “USB debugging” or “USB Debugging” item and activate it!
Naturally, no one can deny the usefulness of this parameter, but for security, it is worth disabling USB debugging mode when you are not using it.
- Fake location
It's no secret that Android phones and tablets can track by learning your current location. But probably few people know that Android has a function that allows you to report the device’s fake location to services and applications. In other words, you should activate the function and then select a program for which the incorrect location of your device will be displayed. - Disable absolute level
If you search, you can come across many questions on the Internet regarding changing the volume of Bluetooth speakers, headsets and other devices using an Android smartphone. For unknown reasons, this does not always work; the sound becomes louder or quieter. If you encounter a similar problem and would like to get rid of it, then do not forget to activate the “disable absolute level” function. Otherwise, you should not touch this parameter to continue normal operation of the device. - Visual feedback
By activating this function, you will see small dots on the screen that allow you to find out exactly where you pressed. Useful in several cases: for developers, for people who have problems with point movements, and also when recording video from the device screen for greater clarity.
In this article, we tried to explain what “Developer Mode” is, how to enable and disable it, and what useful functions you can use without fear of damaging your smartphone/tablet. Of course, there are a lot of other parameters in the developer settings, but most of them are of no practical importance for ordinary users, but are intended primarily for people involved in program development.
Background process limit
Another really useful feature in the menu for developers. Thanks to this parameter, you can control the number of background processes (set from 0 to 4). Purely theoretically, changing the number of applications that the device should keep in memory can improve autonomy and also speed up the system (relevant for devices with a small amount of RAM). Of course, you need to be extremely careful not to “break anything,” but limiting processes does not affect standard services, so you can be more or less calm.
What is 4x MSAA mode on Xiaomi (Redmi) and how to enable it
On a Xiaomi (Redmi) smartphone, it is possible to additionally enable pixel smoothing mode in applications and games; by default, this method is disabled. Let's figure out what MSAA is and how it can be useful to us on Xiaomi?
MSAA (Multisample anti-aliasing) is a method for smoothing aliasing in a computer image, which replaced the SSAA (Supersample anti-aliasing) method, differing from it for the better in the requirement for video card speed and only slightly inferior performance results.
How to enable 4x MSAA on Xiaomi
You need to activate the developer mode, this is easy to do, open the phone settings, find the item “About phone” , inside which click 8 times on the line “MIUI Version” . A message will appear on the screen stating that you have become a developer.
Now go back to the settings, find the item
“Advanced settings” . Click on the line "For Developers" . In the "Hardware rendering acceleration" , enable the "Enable 4x MSAA" .
GPU acceleration
Some applications are designed to not use 2D rendering by default. Based on this, it becomes clear that by activating the “GPU acceleration” item you can improve the performance of some programs (usually this applies to games). But here everything is like in that joke about the blonde and the possibility of meeting a dinosaur on the street right now - 50/50 - the application will either work better or stop running altogether. In short, you can’t do without experiments here.
How to install iOS 14 beta
Download the beta profile and install it on your iPhone or iPad
- Install the downloaded beta profile;
- Go to the Software Update section and search for updates.
However, before you start installing the iOS 14 beta, we strongly recommend that you save a backup copy in case something goes wrong. Considering that the update is in the early stages of testing, the likelihood of problems occurring is quite high. And having a backup copy with all important data will allow you to return to a stable build of the operating system without any losses. True, if the copy turns out to be broken, like my colleague Alexander Bogdanov’s, there is a risk of being left without any data at all.
iOS 14 beta 3 is, as follows from the test build number, the third version of the updated OS. Obviously, in terms of content, it will be different from the second beta build, but it will take some time to reveal all the innovations. If there are many changes or some of them are very significant, we will definitely write a separate post about it. After all, last time Apple added support for payments using QR codes via Apple Pay in iOS 14.
What's new in iOS 14
iOS 14 has a lot of innovations, but you definitely shouldn’t rush to install it
- Desktop widgets
- CarKey Interface
- Updated Siri
- Extensions in Safari
- Run demo applications without installation
- Increasing camera performance
In general, there are quite a lot of innovations in iOS 14, and all of them are significant in their own way. Just look at the desktop widgets, which seem to have been copied from Android, but on the other hand, are implemented in a very original way. What about the CarKey interface, which turns your iPhone into a car key? Yes, no other manufacturer would have thought of such a thing. Yes, there are applications on Android with a similar purpose, but they are produced directly by automakers and have a very limited range of functionality.
Change notification priorities
Android Oreo also allows you to set priorities for different types of notifications. For example, in Gmail , you can choose a noisy alert for important emails and a less intrusive alert for regular updates.
Open Settings , tap Apps & notifications , select a specific app, or tap See all to see the full list. Different apps will offer different categories of notifications, so select App notifications to view them and set different sounds for each.
Disable synchronization
By default, Android enables auto-sync (push notifications) with all services added to the “Settings -> Accounts” section. First of all, this is a Google account, as well as Skype and other services. You may not need most types of synchronization (for example, Google+ synchronization), so it’s better to disable them, you can do it all at once by clicking on the three dots at the top and unchecking the “Auto-sync data” option. But only certain types of data are possible: click on one of the accounts, select the account and remove (or check) the checkboxes.
Disable synchronization
Engineering menu functions
The service menu almost does not limit the user's options. For this reason, it is not worth using the functionality without the appropriate knowledge and, guided by the principle “I come in for the sake of interest to see what is hidden here.” Random actions, as well as deliberate experiments with settings, can later be costly, so we go to the extended Android menu only when necessary and change the parameters only if we are absolutely sure of our actions.
The interface includes six tabs containing a set of specific functions:
- Telephony. Here you will find mobile network settings, for example, you can select a frequency range for the GSM module, turn off data transmission in the background, set up a connection to the mobile Internet, etc.
- Connectivity. The “Connections” section involves setting up and testing wireless transmission modules (Wi-Fi, Bluetooth, FM).
- Hardware Testing. The “Hardware Tests” category contains settings and tests of mobile device components. Here you can change the sound parameters of speakers, headphones, microphone, camera, touchscreen, sensor operation, check the processor status, etc.
- Location. GPS capabilities, testing the navigation system.
- Log and Debugging. On the “Log and Debugging” tab you can find information about the battery (charge level, operating time, temperature, voltage), smartphone memory, settings for managing data from logs (logs).
- Other. Font configurations, options for root users.
Mobile traffic consumption control
On Android, you can monitor Internet traffic without third-party programs. For this purpose, there is a special “Data transfer” item in the settings. There you can set a traffic limit, upon reaching which a notification will appear, as well as a limit, after which data transfer will be automatically turned off. For each application, separate statistics are kept on data in background and active modes, and a graph is built. Starting from Android 5.0, this interface is also available in quick settings (blind), by tapping on the mobile network icon.
We control traffic consumption without launching applications