08/16/2018 Category: Windows 10 Modes Author: Ekaterina Vasilyeva
Many people working on PCs with Windows 10 are wondering why “Developer Mode” was introduced - an option that can be enabled in the settings of the popular operating system. If this is a mode for users who create various utilities, how can it be useful for ordinary users? How to activate it?
- Activate “Developer Mode” on Windows 10
In System Settings - Through the "Registry Editor"
- In the “Local Group Policy Editor” system window
- Video: three methods for enabling “Developer Mode”
- Changing Windows Explorer settings
- Inactive option to enable the mode in the “For Developers” tab
What is “Developer Mode” in Windows 10 and how is it useful?
Developer Mode is a 10s environment where programmers can create apps and debug them through Visual Studio to end up with a program that runs smoothly on Windows 10. However, this new 10s feature can be used to great advantage and ordinary users for certain purposes. With an activated environment, the system gives OS clients more freedom and capabilities. The main ones are the following:
- installation of utilities not from the Windows Store, that is, those applications with the appx extension that do not have a Microsoft signature;
- launching applications with extended rights;
- displaying hidden folders and files, etc.
Windows 7
In Windows 7, this mode is often called “God Mode” (apparently from the name of the “God Mode” folder). But first things first. The primary action to switch to this mode is to create a new folder on the desktop. Enter the name for it as follows: “GodMode.{ED7BA470-8E54-465E-825C-99712043E01C}”
Pressing “Enter” will make a lasting impression on you - your new directory will look like this:
This is what the new opportunities that have opened up to you in Windows 7 look like:
To disable it, simply delete the folder.
It remains to add that “God Mode” is translated from English as “God Mode”. It is not recommended to enter this state on Windows 7 x 64. Be extremely careful when using developer mode. Careless actions may result in the impossibility of further operation of the system.
Now you know how to switch to developer mode in Windows 10 and Windows 7. We hope our instructions were useful to you. Read our new articles, share your experience in the comments.
Activating "Developer Mode" on Windows 10
There are several methods for turning on the environment in question: they differ in degree of complexity. For beginners, we recommend using the first one - enabling it in the system settings. For more experienced users, activation methods in Windows system editors are suitable.
In system settings
The fastest and easiest activation of the environment for developers is through the “Settings” menu, which contains all the basic system settings available to any PC user. We will describe in detail how to get to the desired point in this window in the instructions:
- The Settings window is launched very easily - using the Win + I key combination. If suddenly the combination does not work on your device, open the Start panel, through which you turn off the PC, and click on the gear (it leads to the same window ).
In the Start menu, click on the gear to open the Windows Settings window. - There will be several tiles on the opening page of the window. Let's look at the end of the list. We immediately click on the “Update and Security” section.
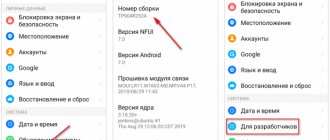
In the Windows Settings window, click on the Update and Security tile. - On the next page we will need the second tab from the end “For Developers”. Here you need to already activate our “Developer Mode” with one click on the corresponding value.
In the “For Developers” tab, click on the corresponding value to enable the mode - The system will display a warning message. In it you need to click “Yes” to confirm your intention to activate the environment for programmers.
Click on “Yes” to confirm that you want to enable the mode - We are waiting for the OS to load all components for stable operation of the mode. As a result, a notification about successful activation will appear under the item.
- After this, you can restart the PC. This is mandatory, since without a reboot, not all parameters will be available for change. This will be stated in the message under the item: “Some functions may not work until the device is restarted.”
Be sure to restart your computer after activating the mode so that all its functions become available to you
Through the "Registry Editor"
Editing the Windows registry is not the easiest task and one that novice PC users may not be able to handle. Nevertheless, you need to know about the method and, if possible, learn how to use it, since it works for all versions of Ten, including Home. To make the task a little easier, we will describe all the steps in detail and clearly:
- The fastest way to launch the editor is through the Run window. We call it with two keys Win + R: simultaneously hold them down. In the “Open” line, write or paste the previously copied regedit code.
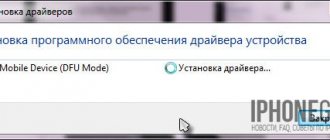
In the “Run” window, write the command regedit - In the next window that opens the OS, we allow the editor to make changes on your device: click on the “Yes” button.
Allow the editor to make changes on your device by clicking “Yes” - In the left column of the editor we are interested in the third branch HKEY_LOCAL_MACHINE. Launch it by double clicking.
Open the third main branch on the left side of the window - Next, you need to go one by one to the following sections in the same left side of the window: SOFTWARE - Microsoft - Windows - CurrentVersion - AppModelUnlock.
The last open folder on the left side of the window should be AppModelUnlock - The last folder you started will have two entries. Double-click on the first one with the name AllowAllTrustedApps and put the number 1 as the value in the small gray window (this activates the entry). To save all changes, click OK.
In the “Value” field, write 1 and click on OK to save the changes - Repeat the same action for another entry.
- Now close all windows running on the PC and reboot the device.
You can also change the value of the same registry settings using the Command Line console. How to launch it and what codes to enter in it?
- Open the console through the “Search” panel. Click on the icon in the form of a magnifying glass, and in the line below write the request “Command line” or cmd.
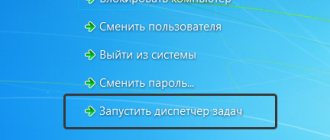
Enter the prompt “Command Prompt” - In the search results, right-click on the item and select “Run as administrator” from the gray menu.
Click on "Run as administrator" in the gray menu - In the black editor, insert the command reg add ″HKEY_LOCAL_MACHINE\SOFTWARE\Microsoft\Windows\CurrentVersion\AppModelUnlock″ /t REG_DWORD /f /v ″AllowAllTrustedApps″ /d ″1″ and press Enter.
In the “Command Prompt” we execute two codes in turn to enable the registry settings associated with “Developer Mode” - After its execution, insert another code: reg add ″HKEY_LOCAL_MACHINE\SOFTWARE\Microsoft\Windows\CurrentVersion\AppModelUnlock″ /t REG_DWORD /f /v ″AllowDevelopmentWithoutDevLicense″ /d ″1″. Also, press Enter.
- Close all windows and restart the PC.
In the “Local Group Policy Editor” system window
The activation method in this editor is quite simple. We will tell you in the instructions how to get to the necessary parameters in it:
- The window of this editor is called up by analogy with launching the “Registry Editor”, that is, through the “Run” window. However, in this case we insert the code gpedit.msc. Then, press Enter on the keyboard or OK in the window so that the entered command is executed.
Paste the command gpedit.msc into the “Open” line and click OK - In the editor, immediately double-click on the “Computer Configuration” block.
Open the first large section “Computer Configuration” - Now you need to launch three menus one after another with the following names: “Administrative Templates” - “Windows Components” - “Application Package Deployment”.
Open the Application Package Deployment folder on the right side of the editor window - A small list of available functions will appear. The second item on the list should interest us first. Double click to launch it.
In the list of available policies, first open “Allow development of Windows Store apps” - In the gray window that opens on top of the editor, put a round mark to the left of the “Enabled” value. For the changes to take effect, click on “Apply”, and then on OK - the additional window will disappear.
Set it to Enabled and apply changes using the dedicated button - Then we go to another option dedicated to the installation of all trusted applications. Here we also set the value to “Enabled” and apply the changed parameters.
Enable another policy called “Allow installation of all trusted applications” - Close all windows and restart the device. The computer will boot into “Developer Mode”.
Video: three methods for enabling “Developer Mode”
How to open the console in Yandex browser
- On any page, right-click and select explore element. Next, the developer console will appear. By dragging this scroll "1" to the left or right, you change the display window on the left. Thus, you can see how the page will be displayed on the screen of a computer, tablet, or smartphone. It's simple, number 2 is screen pixels. You can also change the display by pressing button No. 3. Well, on the right (or sometimes at the bottom of the screen) is a code window into which you can make changes at the moment. But keep in mind that when you refresh the page, all the information you entered will not be saved.
- You can go more complicated: click 3 bars in the upper right corner of the browser -> Advanced -> Additional tools -> Developer tools. Everything exactly the same will appear.
- Keyboard shortcut Ctrl + Shift + I
- If you need the page encoding, then Right mouse button -> View page code. An additional tab will open in the Yandex browser. Only the Html code of the page is shown here, but when you click on active links you can delve into the CSS, for example. Java is rendered unreadable.
- Same thing Ctrl + U
- JavaScript Console: Ctrl + Shift + J. Essentially the same window opens as Explore Element, but just a different tab. See screenshot below
- By default, the phone does not have this feature. Only if you install additional programs.
How to disable "Developer Mode" on Windows 10
You can deactivate the environment for programmers in the same windows that we used in the previous sections of the article to enable it:
- In the “For Developers” tab, simply select “Windows Store Apps” or “Sideloaded Apps.”
- In the Local Group Policy Editor, set two options to Disabled: “Allow development of Windows Store apps” and “Allow installation of all trusted applications.”
- In the Registry Editor window, write the value 0 for the AllowAllTrustedApps and AllowDevelopmentWithoutDevLicense entries. After this, save the changes and restart your PC.
Tablet mode
This is quite a convenient option when you connect your TV to your computer via HDMI and want to control all processes for setting up and watching a movie using the mouse.
This is also an indispensable option when working with touch screen devices. Turning the option on and off is very simple:
- In the lower right corner of the panel, click on the notifications icon.
- Then click "Tablet Mode".
A touch keyboard will also be available here, which can be easily accessed directly from the Start panel.
Additional features provided by “Developer Mode”
When the user activates the environment, he has access to various system settings that were not previously available. Some of them can be changed in the “For Developers” tab, where the mode is enabled.
Changing Windows Explorer settings
In the corresponding section, you can configure the display of hidden folders, system files and their extensions. This is necessary, for example, to clean the system of unnecessary, junk files with which the system has gradually become clogged over time.
In the “Explorer” section, you can include the full path to files in the title of the window of the same name, and also configure the display of hidden folders and documents
For regular Windows users, the option to display the full path to the file in the address bar of the Explorer window will also be useful. It is displayed in the header after double clicking on the line.
The full path to the file in the address bar of Explorer, you can easily copy it from the address bar with Developer Mode enabled
Setting up a remote desktop
In the same “For Developers” tab in the Windows Settings window, you can configure “Windows Firewall” with one click. In order for devices to connect to a remote PC desktop, you need to change the security settings, since the built-in Windows Defender will block the connection, considering it a threat.
To ensure that the user always has access to his remote “Desktop”, he can disable the transition to “Sleep mode” or “Hibernation” if the computer is powered not from the battery, but from the network.
In the “Remote Desktop” section you can allow remote connections to your computer
Run local scripts without signing in PowerShell
For security purposes, the PowerShell console only accepts and executes digitally signed commands. “Developer mode” involves testing various scripts, so checking the execution of local scripts is disabled in it.
"Developer Mode" allows programmers to enter unsigned scripts into a PowerShell window
This way, users will not encounter the command line error: The file is not digitally signed. They will be able to print various scripts, but only from trusted creators.
You cannot enter commands without a digital signature in Command Prompt or PowerShell: the error The file is not digitally signed appears
Each section has its own “Apply” button: after changing the parameters in it, you must click on it for all the specified values to take effect. To the right of each item there is a “Show options” link. If suddenly the parameter itself is not clickable, click on it - one or another Windows window will open to which it corresponds in the system, and change the settings there.
Using Ubuntu in Bash on Windows 10
In the "top ten" all users have the opportunity to work with the Bash shell based on the Ubuntu environment. Bash can be compared to PowerShell or Command Prompt: on Windows, its window is the same editor on a black background. Ubuntu is an operating system based on Linux.
After enabling “Developer Mode”, the Windows client can download the Ubuntu application from the store or any other program corresponding to a particular type of Linux OS. Most often it is Ubuntu that is downloaded. The utility is something like an emulator that reproduces a Linux environment (in this case Ubuntu) inside Windows.
After installing the application, the user finds the Bash console in Windows Search through the corresponding request.
Search for Bash to open the Ubuntu console
Thus, using the familiar Windows 10, programmers get full access to the Linux environment, its functionality and application programs that they need to create and debug programs.
In the Bash console, a programmer can write commands for the Linux operating system
Device Portal and Device Discovery features
The “Device Portal” option allows you to remotely configure your computer and manage it in real time via a network or USB connection. A portal is something like a web server that connects various devices on a local network (desktops, phones, XBox, and more).
Detected devices are connected via the portal by entering a code. This function is a useful tool for creating and debugging utilities, as well as simply for gaining full remote access to the files of a particular connected device. For example, the portal can be used to remotely connect to HoloLens, Microsoft's mixed reality glasses, when creating a holographic utility window. The next item “Device detection” allows you to make the PC visible for future connections via a local network or via USB.
The device portal allows two devices to connect via a local network or USB to configure settings remotely
Errors when turning on and methods for eliminating them
Various errors may occur when you enable debug mode. For example, in the parameters, the “Enable debugging mode” checkbox is not displayed. In this situation, the integrity of OS components is compromised. You should try to activate the environment through the registry or the gpedit.msc utility. If these methods did not help solve the problem, you need to open the command line and enter the code “scannow /sfc”. The system will analyze the components and repair damaged files.
It also happens that when the user activates the debugging environment, a message appears with the error code “0x80004005”. This problem occurs when the Internet connection is poor or the signal from the wireless access point is weak. You need to restart your PC and reconfigure your network settings. In the case of a router, it is enough to reset the settings to factory settings.
Checking system integrity if an error occurs when enabling the option
You can enable debugging on Windows 10 using standard OS tools. With its help, users can develop applications and install third-party software. If you experience errors when opening debug, you need to check the integrity of Windows components and reconfigure your network settings.
Problems with “Developer Mode” and their solutions
Sometimes problems may arise with entering “Developer Mode”, as well as while working in it. What errors can you encounter and how to fix them?
Inactive option to enable the mode in the “For Developers” tab
The item for launching the environment may simply not be clickable. In this case, it is recommended to use other activation methods described above (using one of the two system editors).
Unavailable items for portal and device discovery
If the first two options for portal and device discovery are not clickable, your computer may not support this feature.
The “Enable Device Portal” and “Device Discovery” items may not be clickable due to the fact that this computer does not support the function
The reason may also be the version of Windows and installed updates. Try rolling back to a previous OS version by uninstalling the latest update. To do this, you can use the built-in Windows system recovery tool (instructions in the section below) or manually remove the update:
- Open the Update & Security tile in the Settings menu. In the “Windows Update” tab, click on the “View history of installed updates” link.
Click on the link “View installed update log” - Now click on the first item to get rid of the recent update in an additional window.
Click on the "Uninstall updates" link to open a new window - In the new window, right-click on the latest update (the first item in the list) and click on “Delete”.
Right-click on the item and select “Delete” - Confirm the action by clicking on “Yes”.
Confirm your intention to remove the update - Try enabling "Developer Mode" again.
Error: "Some computer settings are managed by your organization"
You may see the message “Some of your computer settings are managed by your organization” at the top of the page to enable the mode after you try to activate the environment in the System Settings window. At the same time, some important functions actually turn out to be unavailable, much to the regret of users (they cannot be clicked on, just like the “Show parameters” button).
This may be caused by changes in the registry and local group policies that the user previously made on the device. As a result, some important system files may have been deleted, causing the crash. If you don't remember what you changed, try rolling back using the recovery tool:
- Right-click on the “This PC” icon on the “Desktop”. In the gray menu, click on the “Properties” item.
In the context menu of the “This PC” icon, click on “Properties” - In a large window with information about the operating system and your PC, look for the “Advanced system settings” link on the left side. We click on it.
Click on the “Advanced system settings” link on the left side of the window - In the new window, switch to the second tab “System Protection”, where we click on the “Restore” button.
In the “System Protection” tab, click on the “Restore” button - A recovery window will open. Select “Select a different recovery point” or “Recommended recovery” if the error appeared after a recent update.
In the initial window of the system file recovery tool, click on one of two items depending on the restore point to which you want to rollback - In the first case, select the desired point in the list with the left button. Don't forget to check the box next to the item to enable display of other points. So, you can see the entire list.
Select the required restore point by left-clicking - Click on “Next”. On the next page, click on “Done” to confirm.
Click “Finish” to start the recovery process - The recovery process will start. The duration of the procedure depends on the number of parameters that need to be changed. After this, the device will restart.
Description of developer panel elements
- Elements - in this case, html code and css styles are displayed. That is, how the browser reads it when opening the site.
- Console - errors are displayed here, and you can also insert javascript and see what happens)
- Sources - well, it’s clear from the translation that this is a display of sources with css, javascript, jquery and other various scripts
- Network - using this tab you can see how long it takes to load the site and display its various media elements. This means that in the right hands, this tab will allow you to increase the loading speed of the site(s), and therefore increase the loyalty of search engines and users.
- Performance - essentially this is also a tab for analyzing site loading, but more detailed. And here all elements and modules with detailed loading speed are already displayed.
- Memory - in this tab you can see the size of each element on the page. For example, html code, js, css, picture. In fact, this tab is a derivative of performance.
- Application - here you have access to such storage as: cookies, cache, scripts, fonts, previous sessions and the like.
- Security - from the translation “security”. The connection protocol (http or https), connection security settings and resource security are displayed.
- Audits - audit is also an audit in Africa. Here you can diagnose the site according to 5 parameters: loading speed (perfomance), convenience (accessiblity), what can be improved (best practices), SEO and some kind of progressiveness (progressive web app). So it’s a very interesting and useful thing.
How to enable incognito mode in Google Chrome, how to enable it in Mozilla
Device Portal and Devices
When you enable Developer Mode , your Windows 10 system automatically installs the Windows Device Portal. However, Device Portal is never enabled until you set the Enable Device Portal option to On. On the "For Developers" panel.
If you enable Device Portal, the software will be enabled and firewall rules will be configured to allow incoming connections.
A device portal is a local web server that makes a web interface available to other devices on your local network. You can use the web portal to configure and manage the device, and use many features designed to help you develop and debug applications. Device Discovery allows you to connect a device to Device Portal by entering a code.
How can I debug my computer?
In this article
- Use a debugger to debug the service while it is running. First get the process ID (PID) of the service process. ...
- Call the DebugBreak function to invoke the debugger for timely debugging.
- Specify the debugger that will be used when running the program. ...
- Use event tracking to log information.
Interesting materials:
How to fix unrecognized headphones? How to fix the non-optimal mode Recommended mode 1280x1024 60Hz? How to fix the non-optimal mode Recommended mode 1360×768 60hz? How to fix an unsupported accessory? How do I fix unsupported content? How do I fix an unsupported protocol or cipher suite such as RC4? How to fix wrong GPS location? How do I fix a system misconfiguration with a stop code? How to fix incorrect stop code pool header? How to fix broken port forwarding?