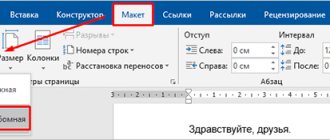
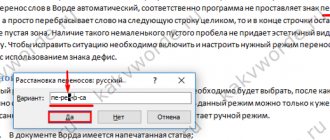
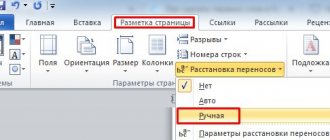
In text documents, a signature in Word is often used, which serves to officially confirm an order, order, instruction or other business paper; this can be a signature under a work of art to confirm the uniqueness of authorship, etc. The signature of a Word document is important to confirm legal status or when correspondence with addressees.
Therefore, when working with documents, many users are faced with the need to sign in Word. There are several types of signatures you can put in a Microsoft Word document.
In this article we will talk about ordinary signatures: handwritten and printed, used when working in a word processor. In addition to a regular signature, you can make an electronic digital signature in Word, which we do not consider in this material.
The MS Word word processor has different ways to insert a signature into a document. We will look at several methods on how to make a signature in Word:
- A handwritten signature is a handwritten signature intended to be inserted into documents.
- Insert a signature line.
- Adding a signature line.
By typing
The combination of holding down the "Shift" key and the "-" key on the upper number row will allow you to enter the underscore character "_". A certain number of characters will allow you to create a long underline. When printing a document, this method is relevant, since you can enter the necessary information into a blank line with an underline.
Underline without the ability to type over it
However, it is impossible to print over such a line in the document itself. There is the following method for this.
Word Software
To get a line over which you can later type the required text, you should activate the “Underline” formatting function by pressing the corresponding key or the hot combination “CTRL + U”.
Then you should press:
By clicking anywhere on such a line, you can print text that will be displayed on top of it.
Text over underline
The line will increase as the printing process progresses. You can remove extra underscores, like regular characters, by pressing “DEL” or “BACKSPACE”.
Important! In newer versions of Word, the Underline formatting icon is located on the Home tab of the taskbar.
First way
Perhaps a situation has arisen when you don’t know how to draw a simple, solid line in Word, in the middle of the line. Most often, when you need to leave a blank space in the text in order to fill in the data by hand later. This is used on document forms, contracts and acts.
On the keyboard, find the “-” key and press it simultaneously with the “Ctrl” key. As a result, a small straight line is formed. If you repeat this operation many times, you can “stretch” it across the width of the entire page. When you reach the margins, move to the second line.
How to remove a line in Word created this way? It’s also quite simple - use the “Backspace” key.
How to make a line in Word for a signature: a few simple ways
As you know, working in Word mainly involves the use of office text documents, contracts, official forms and forms, in which sometimes you need to leave an empty underlined space for signature. In general, the user’s needs may not be limited to just this. The scope of application of such underscores is much wider. But now we will talk specifically about how to make a line in Word for a signature. In the editor itself, you can use several simple tools that every user knows about.
Method one
In fact, in almost any controversial situation that arises in Word, there are several options for getting out of it. And this is very good, because each user can choose what he likes and suits him best. So, let's start with the first method, in my opinion, very simple and understandable to everyone.
Let's imagine that you have typed some text and you need to highlight it with an underscore. To do this, we do this: select the text, then in the “Home” tab on the toolbar we find the “Font” block. There are three buttons: bold, italic and underlined, and if you also need it, you can do this through another menu. Accordingly, just click on the last button, as shown in the screenshot below.
How to make a line in Word for a signature? The simplest method
Anyone who has at least once encountered the Word text editor knows that a regular line can be created using keyboard symbols.
To do this, you just need to hold down the Shift key and then the hyphen (“-”) key. In this embodiment, the line can have an arbitrary length. The main thing is not to get carried away, otherwise when you move to a new line, it will automatically be converted to a bolder one and fill the entire width of the sheet.
Making a line in Word 2003 - 2007 and higher
If you often work in Word, sooner or later you will need to create a horizontal line above or below the text. This is very convenient when you need to make a template for a specific document.
There are many ways to do this in Word, but we will look at the simplest ways to solve this problem.
Horizontal lines in Word 2003
First, place the cursor in the required location. Go to the “Format” menu and select “Borders and Shading” there. Select the required line in the “Type” menu and click “OK”.
Now the line we have chosen will belong to the entire paragraph. If you only need a certain part of the row, then it is best to use cell insertion.
There you will also need to mark visible and invisible lines.
Horizontal lines in Word 2007 and later
In this version of Word, a horizontal line can be made in several ways . If you just need underlined text, you can use the “H” button in the “Home” section. Simply and easily.
To create a line at the top, left, right (vertical), you need to go to the “Paragraph” section and open the “Borders” menu. Here you can select the line you need, after which you can safely type the text. It will be dialed already with the line.
If you need a subscript, but without text, you can do it simply by holding down the “Shift” key while pressing the “-” key the required number of times. You will get a line that looks like “______” without text. Now you can make horizontal lines in Word.
Source: https://gidkomp.ru/kak-v-word-sdelat-liniju/
Using tabs
Another simple way to solve the problem of how to make a line in Word for a signature involves using the so-called tabulator, in other words, the Tab key.
To create a continuous line, you must first set the underline by clicking on the corresponding button on the main panel (it is marked with the underlined letter “Ч” in the Russian version of the editor), or use the combination Ctrl + U, which is the same thing. Now it's a matter of small things. You just need to hold down the Shift key, click on the tabulator several times and create a line of the required length. It is worth noting here that such a line has a fixed length (this depends on what setting for tabulation is set in the parameters).
Tabulation
Tab is just one way to create an underline line.
It is not as common as others, but it is easy and does not require special knowledge of Word.
First you need to enable the display of all symbols function. This is done using the key of the same name, located in the “Home” menu tab in the “Paragraph” section. Marks will appear in the text to indicate empty spaces in the document.
Indent a couple of lines from the main text of the document, press the “Tab” key on your keyboard. If necessary, press several times.
The tab character will appear as a right arrow. Select the desired area where the line will be located.
To create a regular stroke, press the Ctrl and U key combination.
Read: How to make a frame around text in a Word document.
Graphical tools
Finally, the problem of how to make a line in Word for a signature can be solved using the drawing tools that are available in any version of the editor. To do this, use the appropriate section in which you select the straight line drawing tool.
In the text, it is enough to place the cursor at the starting point, then move it while holding down the left mouse button to the final position and release the button. You can change the length of the line by highlighting the element you are looking for, with a four-arrow icon appearing, and placing the pointer on one of the dots until a double arrow appears. The change is then made by stretching or compressing.
Removal
Sometimes it happens that extra lines are formed in the document. They are removed quite simply.
For Word 2003 and below:
Place the cursor over this line, then go to the Format menu and select the Borders and Shading command and in the Border tab, click on the topmost border type: none. Click OK. The line will disappear.
In ordinary text in Word, lines are used quite rarely, but you cannot do without them when drawing up various forms or forms. It is quite simple to underline a ready-made text, but when composing forms, you need to underline the empty space, and given that this form will be filled out electronically, ordinary underlining will not be enough. Next, we will look at how to make a line in Word in various ways, from which everyone can choose the appropriate option.
The easiest way to make a line under text in Word is to use the text underline menu. You can underline text and tabs in this way. But use such an underline to place a line in an empty space, i.e. creating fields for further text entry using such lines is extremely inconvenient. When text is written on such a line, an underline will be applied to it, but all further text will move, which can immediately disrupt the structure of the document.
To do such a simple underlining of text, you need to go to the “Home”
in the
“Font”
find the
“Text Underline”
and click on it. The previously selected text will become underlined, and all further text you type will also be underlined.
If you click on the down arrow, you can choose different underline styles and even line color.
The next way to make a line in Word is to use the underscore character found on your keyboard. To do this, you need to hold down the “Shift”
and by clicking the underscore
“_”
, draw a line of the required length. But this line is also far from ideal. You won't be able to write on such a line in Word, and it doesn't match the level of regular text underlining.
A more suitable way to make a line in Word for a signature is to use a table cell in which only the bottom border should be left visible. In this case, some problems may arise with the positioning of an individual cell, but for the sake of being able to fill in the underlined area of the document electronically, you can try. You just need to insert a table from one cell and configure its placement, size, and borders.
Well, the last way to draw a line in Word on which you can write is to simply draw the line as a separate object. To do this, go to the “Insert”
and find the item
“Shapes”
in the
“Illustrations”
.
In the shapes we find a regular line, click on it and draw in the right place on the sheet. If you hold down the Shift
, the line will turn out horizontal. If necessary, the line can be further configured in the corresponding menu.
Good afternoon.
In today's short lesson I would like to show how you can make a line in Word. In general, this is a fairly common question that is difficult to answer, because... It’s not clear what line we’re talking about at all. That's why I want to look at 4 ways to create different lines.
So, let's begin…
1 Method
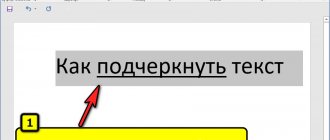
Let's say you wrote some text and you need to draw a straight line under it, i.e. emphasize. Word has a special underline tool for this. Just first select the characters you need, then select the icon with the letter “H” on the toolbar. See screenshot below.
2 Method
There is a special button on the keyboard - “dash”. So, if you hold down the “Cntrl” button and then click on “-”, a small straight line will appear in Word, like an underline. If you repeat the operation several times, you can get the length of the line to cover the entire page. See picture below.
The picture shows a line created using the “Cntrl” and “-“ buttons.
3 Method
This method is useful in cases where you want to draw a straight line (and maybe even more than one) anywhere on the sheet: vertically, horizontally, across, obliquely, etc. To do this, go to the “INSERT” section in the menu and select the Shapes insert function. Next, simply click on the icon with a straight line and insert it into the desired place, specifying two points: the beginning and the end.
4 Method
There is another special button in the main menu that can be used to create lines. To do this, place the cursor in the line you need, and then select the button on the “Borders” panel (located in the “HOME” section). Next, you should have a straight line across the entire width of the sheet in the desired line.
Lines in text documents are often used to underline, emphasize information, create a blank line, or fill or define text. And how to draw a line in Word is a fairly common question that is difficult to answer. First you need to decide what exactly you need.
There are three main options for how to make a straight line in Word, each of which can be useful in different situations. Methods for removing straight lines depend on the chosen path to create them.
Instead of a total
In principle, as you can already see, creating a continuous line for a signature is not that difficult. Some, however, try to use the usual “-” symbol without holding down the Shift key, which only leads to the fact that the line turns out to be dotted, is located in vertical positioning strictly in the middle and simply spoils the appearance of the document. Therefore, it is better to use the above methods. If you don’t need to enter text in the empty space, a keyboard symbol or tabulator for lines of the same length will work fine, but if you need to enter additional symbols or letters, you can’t do without a table.
Source
Captions under and above tables and figures in MS Word
What distinguishes a finished text document from a draft? Of course it's order! Formatting, headings, accompanying pictures and tables - everything is in place, everything is nice and neat. However, 98% of the documents I saw did not differ in any particular order. It seems that the chapter numbers and the table of contents are all in place. But as soon as it comes to captions and numbering of tables and figures, everyone goes to the forest, some for firewood.
Most often, designers do this: first add a picture, then press enter and enter the accompanying text with the number. Of course, there is nothing bad in this, but... there is little good either. Such text is independent of the object it explains, destroys the formatting of the main document, and most importantly, does not have automatic numbering. If you forget to insert one of the tables at the beginning, then you will have to redo the numbering throughout the entire document manually!
Luckily, I can help you. Today we will learn how to make auto-signatures for MS Word objects, beautiful, convenient, and most importantly, equipped with auto-numbering.
Adding a caption to a picture in MS Word
Adding a signature line
A signature line can be created by underlining spaces. How best to do this depends on whether the document is to be printed or distributed online.
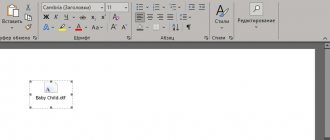
You can add a signature line or an image of a handwritten signature to a document, and then save the signature block as a standard AutoText block.
To emphasize spaces in a document you intend to print, you can press the Tab key and apply an underline to the tab characters.
Applying underscores to tab characters
On the Home tab, in the Paragraph group, click Show or Hide.
Labels are expected to be displayed to indicate whitespace and tab stops.
Press the Tab key.
Select the tab character you want to underline. The tab character appears as a small arrow.
Perform one of the following actions:
To apply a simple underline, press CTRL+U.
To apply a different type of underline, on the Home tab, in the Font group, click the Font dialog box launcher, click the Font tab, and then select a style in the Underline list.
To apply an underline in a web document or web form, you must insert table cells with the bottom border enabled. In this case, the underline remains in place as you enter text.
The line can be drawn by itself, or it can be accompanied by some introductory text, for example, “Signature” or “Date”.
Click where you want to insert the underlined space.
On the Insert tab, in the Tables group, click Table.
Insert a 1x1 table by clicking the top left margin.
To change the length of the underline, move the mouse pointer to the end of the table until the pointer appears as a sizing handle
, and then move the pointer left or right to lengthen or shorten the underline.
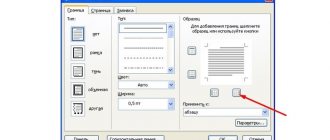
Right-click the table, select Borders and Shading, and then click the Border tab.
In the Type group, select the none option.
In the Style group, select the desired type, color, and thickness of the underline.
To display the bottom border, click between the bottom margin handles in the picture in the View group. Make sure that only the bottom border is displayed.
Under Apply to, select Table, and then click OK.
Note: If you want to display the table without the gray lines that don't appear on the paper, on the Layout tab, in the Table group, select Show Grid.
Drawing a line accompanied by introductory text
Click where you want to insert the underlined space.
On the Insert tab, in the Tables group, click Table.
Insert a 2x1 table by clicking the top left margin.
To change the length of the underline, move the mouse pointer to the end of the table until the pointer appears as a sizing handle
, and then move the pointer left or right to lengthen or shorten the underline.
Right-click the table, select Borders and Shading, and then click the Border tab.
In the Type group, select the none option.
Under Apply to, select Table, and then click OK.
Right-click the cell where you want to insert the underlined space, select Borders and Shading again, and then click the Borders tab.
In the Style group, select the desired type, color, and thickness of the underline.
To display the bottom border, click between the bottom margin handles in the picture in the View group. Make sure that only the bottom border is displayed.
How to remove or add a line in a Word document
This article examines the recurring problem of spontaneous appearance of a trait in a document.
If you came here from a search engine with the question “How to remove a bold line in Word” , “How to remove a line on a page in Word” , “how to remove a line in a Word document” or similar, then you have come to the right place. You can go straight to the Removal section.
It is there that you will learn how to finally get rid of this annoying line.
And if you were looking for “How to make a line in a document in Word” , “How to make a long solid line” , “How to put a bottom line on the entire sheet in Word” , “How to put a line for a signature in Word” and others, then in this my article will also help you. Just below in the Adding section you will learn how to add a solid line in Word and more.
Addition
Removal
Addition
Sometimes in a document you need to separate something with a horizontal line.
Many people mistakenly believe that if they draw an underscore “_” or a hyphen “-“ over the entire line, then visually there will be a line, which means everything is fine.
In reality, this is not the case, because if you change font sizes, margins, or other types of formatting, this pseudo-bar will change and will be either longer or shorter than required.
Word has its own tools for this. So, first, make sure that there is a checkmark in the settings that allows you to realize what you want.
For Word 2003 and below:
Go to the “Tools” menu and select the “AutoCorrect Options” command. In the AutoCorrect dialog box, select the AutoFormat As You Type tab. Check the “Border Lines” checkbox.
For Word 2007 and higher:
Click the “Officce” button and select “Word Options”. In the window that appears, select “Spelling” and click the “AutoCorrect Options” button. In the AutoCorrect dialog box, select the AutoFormat As You Type tab. Check the “Border Lines” checkbox.
Now we can use the following methods to set the trait:
- Type three “-” (three hyphens) in a row and press Enter - the hyphens will be converted into a continuous thin line across the entire width of the page
- Type three consecutive “=” (three equal signs) and press Enter - the equal signs are converted into a double continuous line across the entire width of the page
- Type three consecutive “_” (underscores) and press Enter - the underscores will be converted into a continuous bold line across the entire width of the page
But there is another interesting way, which puts not a solid, but a dotted line across the entire width of the sheet.
- Type three “*” (three asterisks) in a row and press Enter - the hyphens will be converted into a dotted line across the entire width of the page
Removal
Sometimes it happens that extra lines are formed in the document. They are removed quite simply.
For Word 2003 and below:
Place the cursor over this line, then go to the Format menu and select the Borders and Shading command and in the Border tab, click on the topmost border type: none. Click OK. The line will disappear.
For Word 2007 and higher:
Place the cursor over this line, then select the “Borders and Shading” command in the ribbon.
and in the Border tab, click on the topmost border type: none. Click OK. The line will disappear.
Source: https://dvorkin.by/cherta/
How to make a signature in Word - 3 ways
In text documents, a signature in Word is often used, which serves to officially confirm an order, order, instruction or other business paper; this can be a signature under a work of art to confirm the uniqueness of authorship, etc. The signature of a Word document is important to confirm legal status or when correspondence with addressees.
Therefore, when working with documents, many users are faced with the need to sign in Word. There are several types of signatures you can put in a Microsoft Word document.
In this article we will talk about ordinary signatures: handwritten and printed, used when working in a word processor. In addition to a regular signature, you can make an electronic digital signature in Word, which we do not consider in this material.
The MS Word word processor has different ways to insert a signature into a document. We will look at several methods on how to make a signature in Word:
How to quickly draw a dividing line using the Borders tool
April 5, 2013 Lyudmila Home page » Word Views: 2080
Word boundaries. You are typing text in a word processor and you need to put a dividing line in a certain place.
You can simply place the cursor at the beginning of the line, press and hold the key Shift , and then additionally press the dash key on the keyboard, which is located after the number 0. In this case, you will adjust the length of the line yourself.
But you can do the same thing fully automatically. To do this, you need to use Word's border feature.
Word Borders
Such borders can be used in tables.
Place the cursor in the desired location, select the Borders and click the Bottom Border .
You can select the Upper Limit . Then the line will be located under the text itself.
If you select Add horizontal line , then you will draw a horizontal line in gray.
If you need to create a frame and then write something in it, then choose
Function External boundaries .
Delete borders function there .
These simple functions make working in the Word text editor very easy.
In Word 2007/2010, Word borders are found in the Home .
Sincerely, Ludmila
Source: https://moydrygpk.ru/word/kak-bystro-narisovat-razdelitelnuyu-liniyu-pri-pomoshhi-instrumenta-granicy.html
Signature in Word by handwriting
Documents often use a signature written in advance by a person's hand to be inserted into the documents. This gives the document individuality, and in some cases, eliminates the need to sign manually with a fountain pen, in the case of printing a large number of copies of the document in paper form.
The essence of this method is to perform several subsequent steps:
This is not a digital signature; it does not have the legal status of an electronic signature. A similar signature can be used in letters or within an organization for documents that are not particularly important.
You can cut a signature from another document, for example, using a screenshot, and then save the screenshot as a graphic file.
Otherwise, you will need to scan a paper sheet with a signature using an appropriate device. This could be a scanner, a camera, or a phone camera.
Now let's see how to sign a document in Word.
Make sure the caption image file is the right size to match the font used in the document. If necessary, resize the image in advance or adjust the image to the required size in Word.
Move the signature to the desired location in the document. If necessary, add a test before the signature.
Second way
Do you need not a horizontal line, but a vertical or inclined one? How to make a line in Word, which tool to recycle? A straight line created like a figure is easy to perform.
Using the second method, you can draw a straight line in absolutely any corner of the sheet: parallel and perpendicular to the text, at an angle. To do this you need to take several steps:
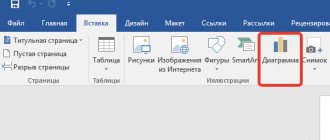
- Go to the special section “Insert”, select the “Shapes” command.
- Click on the icon depicting a straight line.
- Click the mouse at the starting point on the sheet, instead of the cursor you will see a cross.
- Move the mouse in the direction you want while holding the left button.
- At the point where the line needs to be completed, release the button.
In exactly the same way, you can draw arrows, curves, wavy ones, and so on. Subsequently, you can change their appearance, width, color and other parameters. If you accidentally stopped earlier, you can lengthen the straight line: to do this, click on the circle at the tip and stretch to the desired size while holding the left button.
How to delete a line in Word made as a shape, if, on the contrary, it is not needed? Any shape can be removed by selecting it with the mouse, then pressing the “Delete” key or selecting the “Cut” button in the toolbar. To select it, just click on it anywhere.
Saving a handwritten signature in a collection of express blocks
The signature of a Word document, along with the adjacent text, can be saved as a template for inserting into other documents. The program creates a standard block in one of the block collections, which can then be inserted into any other document.
Follow these steps:
How to make a line for a signature in Word - 1 way
Documents often use a signature line in Word. The signature line can be with accompanying text or displayed as a separate paragraph without text.
A signature line is not added to the document according to modern GOST, but this element is often found in office work.
There are several ways to add a line to a document.
Let's look at a simple way to add a signature line with accompanying text, done by creating a table:
If necessary, drag the edges of the table to move the elements in the cells closer together.
We need to remove the edges of the table so that they do not appear in the document. To do this, do the following:
A signature line with accompanying text has appeared in a Word document.
Add or remove a digital signature in Office files
This article explains digital signatures (also known as digital ID), what they can be used for, and how you can use digital signatures in the following Microsoft Office programs: Word, Excel, and PowerPoint.
In this article
What is a digital signature?
Signature lines in Word and Excel
Create a signature line in Word or Excel
Sign the signature line in Word or Excel
Remove digital signatures from Word or Excel
Invisible digital signatures in Word, Excel or PowerPoint
Add invisible digital signatures in Word, Excel or PowerPoint
Remove invisible digital signatures from Word, Excel or PowerPoint
What is a digital signature?
A digital signature is an electronic, encrypted stamp of authentication of digital information, such as email messages, macros, or electronic documents. The signature verifies that the information came from the signer and has not been altered.
Signing Certificate and Certificate Authority
Signature certificate
To create a digital signature, you must have a signature certificate that verifies your identity. When you submit a macro or digitally signed document, you are also submitting your certificate and public key. Certificates are issued by a certification authority and, like a driver's license, can be revoked. The certificate is usually valid for a year, after which the signer must renew or obtain a new signing certificate to establish identity.
Certificate Authority (CA)
A certificate authority is an organization similar to a notary public. It issues digital certificates, signs certificates to verify their validity, and tracks which certificates have been revoked or expired.
What does a digital signature guarantee?
- Authenticity
The signatory is confirmed as the signer.
- Integrity
The content has not been altered or tampered with since it was digitally signed.
- No disclaimer
Proves to all parties the origin of the signed content. A repudiation is an action by a signer that denies any connection to the signed content.
- Notarization
Signatures in Word, Excel or PowerPoint files that are timestamped from a secure timestamp server have the force of notarization under certain circumstances.
To make these guarantees, the content creator must digitally sign the content using a signature that meets the following criteria:
- The digital signature is valid.
- The certificate associated with the digital signature is current (not expired).
- The signatory person or organization, known as the publisher, is trusted.
Important:
Signed documents with a valid timestamp are considered to have valid signatures, regardless of the age or revocation status of the signing certificate.
- The certificate associated with a digital signature is issued to the signing issuer by an authoritative certificate authority (CA).
Top of page
Signature lines in Word and Excel
The signature line resembles a typical signature placeholder that might appear in a printed document. However, things work differently. When a signature line is inserted into an Office file, the author can include information about the intended signer and instructions for the signer. When an electronic copy of a file is sent to the intended signer, that person sees a signature line and a notification that their signature is being requested. The signatory may:
- Enter your signature or
- Select an image of an inked signature, or
- Create a signature using the drawing feature on a touchscreen PC
When a signer adds a visible representation of a signature to a document, a digital signature is added at the same time to verify the signer's identity.
Important:
A digitally signed document becomes read-only to prevent changes.
Create a signature line in Word or Excel
- In your document or worksheet, place your pointer where you want to create a signature line.
- On the tab Insert
In
the Text
, click the
Signature Line
, and then click
Microsoft Office Signature Line
. - In the dialog box Signature Setup
Enter the information that will appear below the signature line:
- Proposed signer
Full name of the signatory.
- Suggested signer title
Position of the signatory, if any.
- Suggested signer email address
Signer's email address, if required.
- Signing Party Instructions
Add instructions to the signer, such as “Before signing the document, check that the contents are correct.”
- Select one or both of the following check boxes:
- Allow the signer to add comments in the Sign dialog box.
Allow the signer to specify a target for the signature.
- Show signature date in signature line
The date the document was signed will be displayed along with the signature.
Advice:
To add additional signature lines, repeat these steps.
Note:
If the document remains unsigned, the
Signatures
. Click
View Signatures
to complete the signing process.
Top of page
Sign the signature line in Word or Excel
When you sign a signature line, you are adding a visible representation of your signature and a digital signature.
- In the file, right-click the signature line.
Note.
If the file opens in Protected View, click
Edit Anyway
if the file is from a trusted source. - From the menu, select Sign
.
- To add a printable version of your signature, enter your name in the box next to X
.
- To select an image of your written signature, click Select image
Select Signature Image
dialog box, browse to the location of the signature image file, select the file you want, and click
Select
.Notes:
For customers using Chinese (Traditional or Simplified), Korean, or Japanese versions, the Stamp Signature Line
.
- Alternatively, you can sign the signature line by double-clicking the signature line. Enter your name next to X
.
Or, in the signature
, under
Requested Signatures,
click the arrow next to the signature.
From the menu, select Sign
. - To add a handwritten signature (Tablet PC users only), sign your name in the box next to X
using the handwriting function.
- Click Signature
.
- Button Signatures
appears at the bottom of the document or worksheet.
The following image shows the Signatures
.
Top of page
Remove digital signatures from Word or Excel
- Open the document or worksheet that contains the visible signature you want to remove.
- Right-click the signature line.
- Click Remove signature
.
- Click Yes
.
Note:
Alternatively, you can remove a signature by clicking the arrow next to the signature in the signature panel. Click
Remove Signature
.
Top of page
Invisible digital signatures in Word, Excel or PowerPoint
An invisible digital signature, such as a visible digital signature line, guarantees the authenticity, integrity, and provenance of a document. You can add invisible digital signatures to Word documents, Excel workbooks, and PowerPoint presentations.
Signed documents will have a Signatures
at the bottom of the document. Additionally, for signed documents, signature information is displayed in the
Information
, which you see after clicking the
File
.
Top of page
Add invisible digital signatures in Word, Excel or PowerPoint
To protect the authenticity of document content, you can add an invisible digital signature. Signed documents have a Signatures
at the bottom of the document.
- Click tab File
.
- Click Information
.
- Click Protect document
,
Protect Book
or
Protect Presentation
. - Click Add a digital signature
.
- Read the message in Word, Excel, or PowerPoint and click OK
.
- In the dialog box Sign
In the
Purpose for signing this document
, enter the purpose. - Click Signature
.
Once the file is digitally signed, the Signatures
, and the file becomes read-only to prevent changes.
Top of page
Remove invisible digital signatures from Word, Excel or PowerPoint
- Open the document, worksheet, or presentation that contains the invisible signature that you want to remove.
- Click tab File
.
- Click Information
.
- Click View signatures
.
- The document, worksheet, or presentation view returns and the panel appears Signatures
.
- Next to the signature name, click the arrow.
- Click Remove signature
.
- Click Yes
.
Top of page
.
Signature line in Word - method 2
This is a similar method, but the line style will be different.
Follow these steps:
A signature line has appeared in a Word document.
How to sign in Word using the signature line
Now we will look at how to make a signature in Word using the built-in “signature line” element.
In the Word program window, do the following:
After applying the settings, a signature line with an “X” will appear in the document in the place where you need to sign.
Create a word signature with super easy steps
Do you know how to create a signature with a word? Microsoft Word has an important built-in feature that allows users to create and add electronic signatures to documents. However, despite its popularity, Word is somewhat limited when it comes to electronic signatures. This makes it a legacy software choice for most organizations that could benefit from moving to a more modern development platform such as eSign Genie.
Briefly, what is an electronic signature?
An electronic signature is simply a digitized form of a typical physical signature that allows you to easily sign a document online. Like a regular wet ink signature, electronic signatures are primarily used as proof that the signer has formally approved the document in question.
Additionally, many people believe that electronic signatures make documents appear more professional, which is very important when trying to present the right image in the corporate world.
Why are electronic signatures needed?
Electronic signatures are much faster to use compared to wet ink signatures because you do not have to print, sign, scan and then send documents back to other relevant parties. You only need to create the signature once, and then you can always easily add it to any future documents.
Electronic signature is convenient for anyone who wants to send signed documents frequently. Contract managers, sales teams and virtually any business owner can greatly benefit from their use. When used correctly, a signature is as legally binding and secure as a hand and paper signature.
The importance of adding an electronic signature in Word?
MS Word is an established word processing software used by individuals and businesses around the world to create documents. Because it is so widely used, many people choose to add signatures to Word documents to improve their document processing speed.
However, while this may be the most obvious benefit, make sure that the organization or people you are dealing with support the option of using electronic signs before making any transactions.
How to Create an Electronic Signature Using Microsoft Word
Follow these basic steps to add signatures to an MS Word document. The note; These steps only apply to MS Word 2007, 2010, 2013, 2016, 2022 and Word 365 versions:
- Place your cursor exactly where you want your signature to appear in the Word document.
- Go to the Insert tab. In the Text , click Signature List , then Microsoft Office Signature Line. »
- Complete all required fields that appear in the Signature Setup . When finished, click " OK ".
- Right-click the signature field in the document
- Click " Select Image " to select the signature image that you have already saved on your computer.
- Alternatively, if you're using a touchscreen, you can physically draw your signature in the box.
- When you are ready, share the document with the organization or person from whom you are requesting a signature.
If you are the person intended to receive the document, follow the steps highlighted below to complete the signature:
- When you open a document, you will receive an alert in the top menu bar with a yellow notification bar indicating that the document requires a signature.
- From the yellow notification bar, select View Captions .
- To add your signature, double-click next to the " X ".
- A signature field will appear where you can enter your name to indicate your signature, or you can upload an image from your computer.
- When you're ready, click "»
- Send it back to the other party.
As you may have noticed, although it is possible to sign documents online using MS Word, setting up the signature can be time-consuming.
Limitations of using Microsoft word for signatures
Microsoft Word is not intended to be an online signature solution, and while it can add signatures digitally, there are some glaring functionality gaps that limit its potential benefits.
However, the biggest limitation of using MS Word is that it cannot easily do what other advanced document signing software can do. Contracts or agreements usually need to be sent to other relevant parties (recipients) for signature. As we already mentioned, a signature is intended to provide legitimacy and support for the content written on them.
Now imagine that your organization wants to send out a business proposal to potential prospects or clients. You need to first create a document, sign it electronically, and then send it to perhaps dozens of recipients.
These recipients must read it, decide if they are interested, sign it, and send it back. If you used an online signing tool, you could quickly send a document to a list of recipients and then see how each recipient interacted with the document before signing it. You see... this is not possible with MS Word.
Another notable disadvantage of MS Word is that it is not fast enough when it comes to adding signatures to documents. This may not be a big problem for those who have difficulty sending documents that need to be signed; however, for departments and organizations that send a large volume of documents, using Word can be very tedious.
What can other signature platforms offer that MS Word can't?
There are various platforms designed to create and sign documents electronically. These platforms provide a much wider range of practical features, making it easier overall to create electronic signatures. eSign Genie, for example, offers users a huge database of templates tailored to a range of business scenarios to speed up the creation of quality professional contracts.
Adding an electronic signature to this dedicated online signature software is very easy. It often supports a user-friendly interface and one-click addition. Once the document is signed, it can be sent to the relevant parties directly through the software.
Viewer metrics such as the time the recipient spent on each document, the time it took to complete a signature, and more are automatically collected and sent to the sender. This information clearly shows what works for their clients and what doesn't, helping organizations optimize their documents and become more effective over time.
These powerful features mean that investing in dedicated online signature software can revolutionize the way you sign electronically and simplify the entire document management process.
How to Add an Electronic Signature to an MS Word Document Using a Platform Like eSign Genie
eSign Genie makes it easy to add electronic signatures to any document. Follow these steps:
- Open the document in eSign Genie (either by downloading the file from a cloud storage application or computer, or by selecting a saved file in eSign Genie).
- Drag the signature field onto the desired document and add any additional text or fields you want.
- Select recipients and click Send.
- Recipients will receive an email notification with a direct link to the electronic version of the document. They must click the signature field and choose to upload, enter, or draw their electronic signature.
- The sender's copy of the contract or document is automatically updated as signatures are added. Surprisingly, document activity can be tracked and follow-ups sent accordingly.
.