03/14/2017 Asus | Beeline | Rostelecom
This step-by-step instructions provides details on how to configure the ASUS RT-N11P Wi-Fi router to work with home Internet providers Beeline (L2TP) and Rostelecom (PPPoE). The following steps of setting up a wireless router will be considered in order:
- How to connect Asus RT-N11P
- Logging into the router settings web interface
- Setting up Internet Beeline and Rostelecom
- Setting up wireless network security (setting a Wi-Fi password)
- Setting up IPTV
How to connect ASUS RT-N11P for setup
The first step is to properly connect the Wi-Fi router, which is usually not difficult:
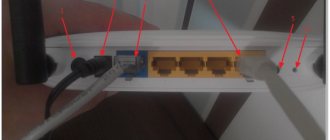
- Connect the power cable to the corresponding connector on the back panel of the router.
- Connect the Internet cable (including the cable from the modem if your provider uses an ADSL modem) to the WAN (Internet) connector marked with an icon resembling the Internet Explorer icon.
- You can also connect the connector of the network card of the computer or laptop from which the setup will be done with a cable (included with the router) to one of the LAN connectors on the router (marked with numbers). If possible, it is better to set up via a cable connection, but if this is not possible, you can also do it via Wi-Fi.
And finally, the last thing we recommend doing before proceeding directly with the setup is to check the local network connection settings on your computer or laptop (if it is connected to the ASUS RT-N11P with a cable).
Turn on the router's power (the button on the right side on the back) and wait a minute or two until it boots up. If the router is not connected by cable, connect to the ASUS wireless network that appears.
Description
Login to the “admin panel” and basic configuration
For quick setup instructions, see here:
Before you start setting up the ASUS RT-N11P Wi-Fi router, you need to connect it correctly. The provider cable must be installed in the WAN connector (it is marked with the Internet icon). If you have an ADSL modem, then we work through it.
Now we connect a PC or laptop to the router. We insert one end of the patch cord into any LAN port (labeled 1, 2, 3, 4), the other into the computer’s network card. We connect the RT-N11P to the power supply and turn it on with the button located on the rear panel. We are waiting for the indicators to activate.
It is recommended to perform initial setup with a cable connection. Afterwards, you can remove the network cable and use Wi-Fi.
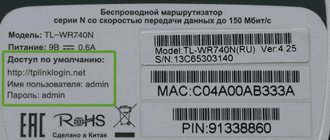
Now you need to get to the user menu. In the address bar (text field at the top of the window) of any browser, write the IP address 192.168.1.1. You need to enter your username and password in the appropriate lines. The default login and password for ASUS RT-N11P is admin. In some versions, access to the settings is not password protected. Find everything you need to obtain administrator rights at the bottom of the device.
If you are setting up the router for the first time, the quick setup menu will open. What the system will offer us:
- Change the code to access the admin panel. It’s better to change it and write it down on a piece of paper.
Software Update
For correct operation of the device, it is recommended to update the firmware immediately after basic setup!
It is better to download the software from the “officials”. Website link – asus.com. In the Drivers and Manuals section, go to the Download Center. There, use the search to find your model and download the necessary files. Don't forget to indicate what OS you have on your PC.
How to enter the router settings interface
To enter the web interface of the Asus RT-N11P settings, launch any browser on a computer or laptop connected to the router and enter 192.168.1.1 in the address bar - you should see a login and password request.
The standard login and password, if you have not changed them before (and changing the password is required after logging into the settings for the first time), is admin and admin, respectively.
If this is the first time you enter the router settings, then you will be greeted by a quick setup wizard that:
- Will offer to set a new password to enter the settings, instead of the standard admin
- It will try to detect the connection type (it often does this incorrectly and will require manual configuration, which is described below).
- You will be prompted to set the Wi-Fi network name (SSID) and password for it. Please note that if you are setting up via a wireless network and not via cable, then immediately after changing the network name and key and clicking the “Apply” button, you will have to reconnect to the new network and go into the router settings again (until you do this , in the browser it may seem to you that the router is frozen, although this is not the case, there is simply no connection to it anymore).
After completing the QIS (Quick Internet Setup) steps, you will find yourself on the main settings page of the ASUS RT-N11P router, which allows you to set the necessary options, configure the Internet and other parameters manually, which is often necessary, especially if your provider is Beeline.
Quick Internet setup on an Asus router
When you first access the web configurator, you will see a wizard prompt to quickly configure the device. We agree. The first step is to change the default access password:
Instead of the default “admin”, use any other one. It is desirable that it be more or less complex: consist of 7-8 characters, contain letters of the Latin alphabet, numbers and special characters @#$%&.
The next step is to select your Internet connection type:
Asus routers can work in the network of almost any Russian Internet provider - Rostelecom, Dom.ru, TTK, etc. The main thing is that you need to check with technical support in advance which communication protocol the telecom operator uses.
Most often, either “Automatic IP (DHCP)” or “PPPoE” is used. In the first case, usually, you don’t need to specify anything additional, but in the second, you will need to enter the login and password for the connection, which you were given when concluding an agreement with the provider. Click on “Next”.
In the next step, we will configure the Wi-Fi wireless network:
Here you will need to enter the network name SSID and password for it - Network key . If you are setting up a dual-band router, here you will need to enter the WiFi name and password for the 5GHz band. Click on the “Apply” button.
At the last step of the wizard you will see summary information:
Click “Next” and go to the network map.
Setting up ASUS RT-N11P for Beeline
Attention: in order for the router to connect to the Internet, the Beeline L2TP connection on the computer itself, if there is one, must be disabled (and there is no need to connect it in the future, the router will automatically establish a VPN connection and “distribute” it to the end users). devices).
To set up a Beeline Internet connection on a Wi-Fi router, on the settings page, select “Internet” in the menu on the left, and then on the “Connection” tab, set the following network connection parameters (below there is also a screenshot with the necessary parameters):
- WAN connection type - L2TP
- Obtain WAN IP address automatically - Yes
- Connect to DNS server automatically - Yes
- Username - your login from your Beeline home Internet (usually starts with 089)
- VPN server - tp.internet.beeline.ru
The remaining parameters do not need to be changed; by default, they are exactly what is required (unless you have already changed them before). Click "Apply" and wait a while.
If all the parameters were specified correctly, then after a short time on the computer (provided that the Beeline Internet on it is disconnected, as mentioned above), access not only to the “admin panel” of the Asus RT-N11P will appear, but also to the Internet (you can open a new tab in your browser and try to go to a website or look at the network status on the main page of the wireless router settings web interface).
The driver is an important component!
We urge you not to forget that the driver is the link between the hardware and the OS. Without this talented negotiator, everything works quite crookedly or does not work at all - this may be the answer to the question - why the computer does not see the Wi-Fi network. Regardless of whether it is a laptop or a desktop PC, whether the adapter is connected externally or internally, the solution is common.
- In the taskbar you can see another icon - a crossed out monitor, see the screenshot. If Windows 7 or 8, follow:
- “Start” → right-click “Computer” → “Properties”
- " Device Manager"
- Expand “Network adapters” → look for “Intel(R) Centrino”, “Atheros...” is also possible, etc. It should look like on the screenshot, without any marks
- if there are red or yellow symbols, right-click and select “Enable” - most likely, a driver update will be required.
If Windows version 10, follow:
- Right-click "Start"
- "Device Manager"
- We will also cover “Network adapters”
We see that the drivers are not installed:
- go to the manufacturer and download the appropriate drivers.
- install → restart system
- check, if it works, we’ll finish here, otherwise we’ll look for other reasons.
Setting up a connection to Rostelecom and Dom.ru (PPPoE)
In order to configure Rostelecom or Dom.ru Internet using the PPPoE protocol on ASUS RT-N11P, on the settings page on the left, click “Internet”, and then on the “Connection” tab, set the following parameters:
- WAN connection type - PPPoE
- Obtain an IP address automatically - Yes
- Connect to DNS server automatically - Yes
- Username and password - your data (login and password) for your home Internet Rostelecom or Dom.ru
The remaining parameters usually do not require changes. Click “apply” and, if everything was done correctly, then after a short period of time Internet access will appear on your computer and on other devices connected via Wi-Fi to the ASUS RT-N11P.
Note: in some rare regions, Rostelecom and Dom.ru use the “Dynamic IP” connection type. If this is the case, then essentially your router is configured out of the box; all that is required is to set a Wi-Fi password, which is done at the automatic setup stage.
Updating the firmware and software of the ASUS router
You can find the current firmware version for our network equipment on the manufacturer’s official website. firmware version for RT-N11P in the “software” menu .
After downloading and unpacking the archive, go to the router configuration, and from there, by selecting the “firmware update” tab in the “administration” menu, find “overview”. We look for the unpacked file and select it.
After a short period of time, the program itself will update the firmware and software.
How to change Wi-Fi password on ASUS RT-N11P
To configure the wireless network settings on the router, select “Wireless Network” in the menu on the left, and then set (or change) the necessary parameters:
- SSID - the name of the wireless network (which is visible from connecting devices). Don't use Cyrillic.
- Authentication method - WPA2-Personal is the best option
- The WPA preshared key is your Wi-Fi password and must contain at least 8 characters. Also, as with the SSID, do not use the Cyrillic alphabet.
Save your settings. After saving on those devices that were connected via Wi-Fi, you may need to reconnect. If the network name has not changed and only the Wi-Fi password has changed, you may need to “forget the network” before connecting, see Network settings saved on this computer do not meet the requirements of this network, Authentication error on Android phone (smartphone says Saved WPA /WPA2).
The most common
So why doesn’t the laptop see the wifi network? This can happen due to the fact that there is no wireless Internet at all!
- Let’s make sure that there is wireless Internet in the coverage area by using other devices: a tablet, smartphone, laptop or PC and check whether they see wifi on the laptop. If yes, we proceed further, if not, then it does not see wifi, check the settings of the router. We found out that there is Internet, but the laptop does not see the Wi-Fi network, why - it means that something is wrong with our device, as a rule, and there are extremely banal solutions.
- See if the adapter is turned on; as a rule, the indicator lights up on the keyboard:
- turned off - looks like the screenshot below.
- turn on the keys, according to the device layout, [Fn] + from [F1] to [F12].
- after that the search for networks should begin with a notification in the tray and a yellow star near the antenna, see screenshot.
- if everything works and the laptop sees the Wi-Fi network – enjoy surfing, otherwise further
- Let’s try to run troubleshooting – right-click on the antenna → “Problem diagnostics”
- the procedure helps in most cases, otherwise we are looking for another reason why the laptop does not see wifi.
Repeater mode
In addition to the standard functionality that we discussed above, the RT-N11P model can function as a repeater.
How to set up this mode:
- We go to the control panel.
- In the main menu we find the “Administration” category.
- Select the repeater option and activate the mode.
- Don't forget to save your settings.
The router will automatically reboot. It will then search for available networks. You will need to select a suitable network from the list. Next, you only need to enter your password and connect.
