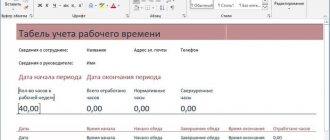
The standard Microsoft Word program allows you not only to print and edit various texts, but also to draw tables of varying levels of complexity. The user independently decides how many columns and rows are needed, and also adjusts other parameters. How to create a table in the Word editor of different versions, how to edit cells, and delete tables? Instructions for placing tables in Word will help answer these questions. An example of a table that can be created in the program.
Make a table in Word and fill it out
The process of creating a table in Word 2003
If you want to create a table in the 2003 version of Word, place the cursor on the worksheet where you want the table to be. After this, follow the instructions:
Step 1. In the menu at the top, find the “Table” section, then “Insert”, then click on the “Table” icon.
Find the “Table” section, then “Insert”, then click on the “Table” tab
Step 2: The Insert Table menu should appear. Decide on the parameters (number of rows and columns) and enter these values.
In the fields with numbers, enter the appropriate number of rows and columns
In this window, you can also edit the “Auto-fit column widths” option:
Auto-Fit Column Width settings
- when you select “Constant” in the “Automatic” value, the columns will become the same width;
- when you select “Constant” and enter the required size, the columns will become the selected width;
- If you select "Fit to content", the width will be oriented to the largest content of the cell;
- if you select “Fit to window width”, the table will adjust to the width of the entire page, and its columns will be equal in width;
- The AutoFormat button allows you to customize the format.
On a note! There is another way to place a table in Word 2003. Click on the “Add table” panel, then mark the number of rows and columns, click once.
Click on the “Add table” panel, mark the number of rows and columns, click once
Tips for structuring information
Before creating a table in Excel, we suggest learning a few general rules:
- Information is organized into columns and rows. Each line is allocated for one entry.
- The first row is reserved for the so-called “header”, where the column headings are written.
- You need to adhere to the rule: one column – one data format (numeric, monetary, text, etc.).
- The table must contain the record identifier, i.e. the user allocates one column for row numbering.
- Structured records should not contain empty columns and rows. Null values are allowed.
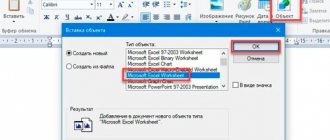
Adding a table to Word in Excel format
The process of inserting an Excel table is quite simple:
Step 1. From the “Insert” menu, select the “Table” section, and then click on the “Excel Table” button.
In the “Insert” menu, select the “Table” section, click on the “Excel Table” button
Step 2. An Excel table will appear on the sheet, which can be edited in Word. Use the tools in the top main menu to get started working with the table.
Excel table with its own toolbar, with which you can edit it in Word
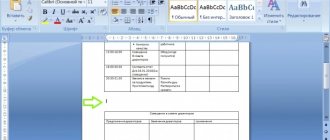
Convert text
The fourth method is to convert text into a table. If you have text that needs to be placed in cells, then this is not difficult to do. First, let's format it as needed.
So that Word understands when you need to create a new column, divide the text using the “Tab” button on the keyboard; there are arrows drawn on it in different directions. To create a new line, put "Enter" at the end of the previous paragraph. To skip the required number of columns, place the corresponding number of “Tabs” in a row. For a more visual representation, it is better to include non-printable characters. Instead of "Tab" you can use ";", "%" or another sign.
Now select the edited text and select “Convert to Table” from the menu.
A window will appear. At the bottom, put the separator you used: “Tab”, “;”, “%”. Word itself will determine how many columns there should be. You can set the desired column width.
My table looks like this. All empty cells were preserved in it, and a new row was created correctly.
How to insert a table in Word for Mac?
The Mac version of Word is similar to the Windows version. To add a table, follow these steps:
Step 1: From the main menu at the top, select the Insert tab.
Select the “Insert” tab
Step 2. Click on the “Table” icon, select the required number of cells with the mouse, then release the mouse.
Press the “Table” button, select the required number of cells with the mouse, then release the mouse
If you need to insert more rows and columns, you can enter the parameters manually. For this:
Step 1. Select the “Insert” tab in the top main menu, then click on the “Insert Table” button.
Select the “Insert” tab in the top main menu, then click on the “Insert Table” button
Step 2: Enter the appropriate number of columns and rows, then confirm the operation.
Enter the required number of columns and rows, click “OK”
The note! To create a complex table yourself, use the “Draw Table” button in the “Insert” – “Table” options.
In the “Insert” menu, then “Table”, select “Draw Table”
Definition and purpose
The tables themselves are needed to organize some data, generate reports and create graphs. We can add text, numbers or pictures to it.
Your document for study or work will be much more interesting to read if it contains not only solid text, but also a visual representation of some data, believe me.
Built-in tools allow you to make either a unique sign with individual dimensions and general appearance, or use ready-made templates from the developers. We will consider all possible options for making a table in Word. I suggest you start.
How to Draw a Table in Word
To draw your table:
- click on the “Insert” menu;
Click on the “Insert” menu - Next, click on the “Table” button, then “Draw Table”.
Next, click on the “Table” button, then “Draw Table”
You can draw any number of columns, cells and other elements yourself. By selecting the Eraser tool, you can remove unnecessary lines.
To remove unnecessary lines, select the Eraser tool.
Editing a Document: Working with Cells
To format a table and bring it to the required form, you need to learn not only how to create columns and rows, but also how to edit cells. Word has the ability to merge, split, shade, or delete cells.
The process of merging cells in a table
To merge cells automatically:
- use the mouse to select the required quantity;
Using the mouse, select the required number of cells
- Right-click on the highlighted area, then click on “Merge Cells”.
Right-click on the highlighted area, then click on “Merge Cells”
Result of merging cells
Split one cell into several
In Word you can also split a cell into two or more. To do this:
Step 1. Select a cell, right-click on it and click “Split Cells”.
Select a cell, right-click on it, click “Split Cells”
Step 2. If everything is done correctly, a window will open to enter the number of rows and columns. To split cells, enter parameters and confirm the operation.
Specify the number of rows or columns and click “OK”
How to color table cells?
Sometimes the user may need to color the table. For this:
- Right-click the cell you want to paint, and in the list that appears, click on the line “Borders and Fill”.
Right-click on the cell that you want to paint, in the list click on the item “Borders and Fill”
- Activate the “Fill” tab by left-clicking.
Activate the “Fill” tab by left clicking the mouse
- In the Fill option, select a suitable color.
In the “Fill” parameter, select the appropriate color
- Below in the "Apply to" option, select "cell".
In the “Apply to” parameter, select “cell”, click “OK”
- Check the settings, click OK.
Check the settings, click “OK”
How to delete a cell, column or row?
Select the cell, column or line you want to get rid of with the mouse. Click “Delete” in the window that opens, and then select what you want to delete.
- select the cells, right-click, then left-click on the “Delete cells” option;
Right-click the cell and select “Delete Cells”
- select a line, right-click on it, left-click on the “Delete lines” option;
Select the lines, right-click, select “Delete lines”
- select one or more columns with the left mouse button, right-click, select the “Delete columns” option.
Select the column or columns, right-click on them, select “Delete columns”
1.1.4. Google text editor that allows you to type text online for free
Google has a wonderful editor that allows you to type text directly in the browser, online, without installing an application on your computer. But to access it, you need to create an account on Google or use an existing one. After this, the user will have access to convenient services for working with documents, including an online text editor .
This online service is located in the “Drive” tab, which appears at the top of the browser when you select the Google search engine. To start typing text ,
you need to click on the bright red “Create” button, then “Document”, after which the editor will open in a new tab.
In terms of its functionality, the Google text editor is something between Microsoft Word and Notepad. It supports several text formats (DOCX, RTF, TXT), as well as HTML, PDF. In it you can format texts, use different fonts and styles, change the color of the text, insert tables, pictures, formulas, links, special characters, page numbers, footnotes and comments, search and spell check (the editor underlines misspelled words and suggests options for them writing). Another unique feature is the translation of text into different languages. The translated text opens in a new window, allowing you to compare it with the original.
All documents are automatically saved in the “My Drive” section.[2]
1.1.3 Text editor Notepad
Notepad is the simplest text editor that is included in the standard Windows installation package. It works with the TXT extension, but can open INF, INI, LOG files.
The Notepad editor has a very small set of functions. It allows you to type texts, select fonts, search, automatically replace words, save documents and send them to print. Features such as formatting, spell checking ,
Inserting images and using different colors are not available in this application.
However, Notepad is useful not only for beginners, but also for experienced users, as a simple and convenient auxiliary tool. Here are just some of the features of this program:
- Notepad works with texts in Unicode, UTF-8 and ANSI encodings and allows you to convert one encoding to another. To do this, you can simply select the desired encoding when saving the file.
- If you type text in Microsoft Word or another similar editor and then publish it on a website or blog, a lot of unnecessary stuff will appear there.
- You can make or edit simple Web pages in Notepad.
- Notepad allows you to remove unnecessary things that may appear when copying text from other editors. But she cannot recognize everything, and many incomprehensible icons remain in the text. To remove them, just copy the result into Notepad.[2]
1.1.2 LibreOffice Writer
LibreOffice Writer is currently the most powerful free text editor. It allows you to work with Microsoft Word, RTF documents, and create HTML documents. It also allows you to insert tables, pictures, multimedia objects and other elements into texts. LibreOffice Writer has an editable dictionary and a spell checker. The program's interface is reminiscent of early versions of Word, so it's easy to master. [2]