Why is USB debugging needed?
In most cases, debugging mode or usb debugging is needed by specialists who develop and test applications. In it, your phone or tablet goes into a special mode. Its main function is to find and eliminate errors in software. But, as mentioned above, for ordinary users it can be very convenient.
First of all, USB debugging helps to flash a smartphone and restore its operation after a system failure, and helps to find accidentally killed files and data. It can be used to create copies of applications, and also if you need to install an application on a device without Google Play.
This mode will also help those who are going to use a device with Root rights.
However, please note that it is better to use the mode for confident PC and smartphone users. If you doubt the correctness of actions, it is better to consult a specialist.
Can you tell a cringe from a crash? Take this fun test and find out!
Through Recovery mode
In some cases, it is not possible to enable this mode on a mobile device. This could be, for example, due to damage to the touchscreen screen or a non-functioning mobile phone in general. In such a situation, a method that involves using recovery mode will help you. It is worth noting that to implement this, custom Recovery CWM or TWRP must be installed on your smartphone. This will allow you to gain root access to the mobile phone's operating system. Let's consider the list of necessary actions that need to be performed to be able to debug the phone via USB in this case:
- From the official website, download and unpack the qtADB-cwm-edition application into the root directory of the computer operating system.
- There, create a folder called SQlite3_Windows and install the pre-downloaded SQLite relational database into it.
- Restart your mobile phone and enter Recovery Mode by simultaneously pressing several keys. You can read how to enter the recovery mode of a specific model on the manufacturer’s official website.
- Connect your mobile phone to your computer using a USB cable.
- Run the executive file QtADB.exe on your computer, located in the folder of the manager you downloaded earlier.
- Click the “advanced” item and make sure that the “Data” section of the mobile device is displayed correctly.
- Select the “files” tab in the left panel, and then open the previously created folder with the SQLite relational database.
- Open the directory data/com.android.providers.settings/databases/ in the right panel of the program.
- Move the file called settings.db from the right panel folder to the left one.
- Launch the Windows command line (using the Win+R key combination) and enter: “cd C:\Sqlite3_Windows”, “sqlite3 settings.db”, “update secure set value=1 where name='adb_enabled”.
- We copy back the file called settings.db, agreeing to rewrite and reboot the mobile device.
How to enable developer mode
In order to enable USB debugging on Android and put the phone into debugging mode or debugging mode, you will need to change some parameters on your smartphone. More precisely, switch to developer mode. For this:
- On your smartphone go to the “Settings».
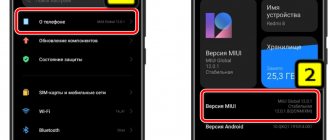
- Select the item “About phone"/"About tablet».
- In the window that opens, look for the line “Build number” / “MIUI Version” and click on it a couple of times (you may have to click 8-10 times, the main thing is to click without breaks).
- You may have to enter a password. As a result, a message should appear on the screen: “You have become a developer.”
- For Developers in the Settings menu .
After that, we proceed directly to connecting USB debugging:
- Open “ Settings ” - “ Advanced ” - “ For Developers ”.
- Here you switch the slider to “On».
- A window will open asking you to allow debugging. Click " Ok ". This way you can solve the question of how to enable or disable USB debugging. After this, you can begin the necessary processes on your smartphone in a special mode.
M or F? Take the test and find out who you are in everyday life: are you a man or a woman?
If you want to connect via WI-FI
After you have enabled this option on Android, you can connect your smartphone to your PC and enter the necessary adb commands or get Root rights!
Do you still have questions? Write them in the comments, tell us what you did or vice versa!
That's all! Read more useful articles and instructions in the section. Stay with the site, it will be even more interesting!
On any smartphone or tablet computer running on the Android platform, regardless of its manufacturer and pre-installed OS version, it is possible to enable a special function called “Debug Mode”. However, the process for activating this functionality varies. The fact is that it all depends on the version of the installed system.
In this article we will take a closer look at the question of how to enable USB debugging on Android, both on earlier versions of the OS and on the latest ones. We will also look at the question of what tasks this mode is intended to solve.
Let's first figure out for what purposes the average user may need to activate this mode.
As you might guess, it is necessary for debugging applications and the devices themselves. In simpler terms, it is intended to test the functionality of programs, and therefore is very popular, primarily among software developers. However, for mere mortals it is also valuable, since it allows you to interact with Android via a PC and use programs (primarily ADB) that can remotely carry out various manipulations with the device.
USB debugging, how to enable on Android 9, 10, 11
Now we will analyze in detail the process of how to enable USB debugging on different versions of Android. First, let's look at how to enable this special mode on devices with Android 11, 10 and 9.
If you have a shell from the manufacturer, there may be slight differences. For this:
- Let's go to "Settings", select the section "About the phone».
- We find the column “Build number", click on it several times and enter the password, this will enable "Developer Mode».
- Return to the main menu "Settings" and select the tab "System»
- Next, go to the “Additionally”
- Now open the section for “Developers”
- Move the slider to “ON”
Why root your tablet or smartphone?
Root access is, roughly speaking, maximum rights in the operating system. They allow you to backup all contacts, message contents, phone history, any files and information.
Root rights allow you to get the most out of your Android device
By default, Android does not offer such features. Root access also allows you to change the design: change application icons, system sounds, and so on. But the most important thing you can do with such access is to regulate the processes that are loaded into memory.
The operating system is designed in such a way that every running application has an AfterStart event. It can contain a whole list of actions, including launching other processes. Often this is displaying advertising, collecting statistics and other frankly “unnecessary” things. With the help of root rights and small applications, you can flexibly manage the operation of both Android as a whole and individual programs.
How to enable debug mode on Android 8, 7, 6, 5
To enable the special usb debugging mode or USB debugging on older versions of Android: 8.7, 6, 5, you have to follow similar steps.
- Enable “Developer Mode” in the same way as on newer versions of Android through “ Settings ” - “ About phone ”.
- After that, go again to the “ Settings ” - “ For Developers ” tab.
- Find the line “ Debugging ”. Here we enable the “ USB Debugging ” function.
Problems and solutions
The phone does not respond to commands
To work with ADB, the cable must support data transfer, and not just battery charging. If there are no problems with this point, then make sure that debugging is enabled and the connected computer is among the trusted devices (if such lists are maintained by the system).
Please note that you can only send commands that require USB debugging when the system is fully booted. For example, ADB cannot be used if the device is turned off or in fastboot or recovery mode.
USB Debugging button is greyed out
When connecting to a computer, older versions of Android offer to select the mode in which the device will operate (for example, “USB modem” or “File transfer”). If in this list the “USB Debugging” item is not clickable or is missing, but you have already enabled it according to the instructions in this material without removing the cable, go to the quick access panel and open the connection notification. Then all that remains is to activate the function through the window opened by this alert.
The functionality provided by USB debugging greatly helps with many tasks and is especially important in case of screen problems. Even if the feature was disabled at the time of the display failure, nothing will prevent you from activating it along with installing CWM or TWRP, following the procedure described in the material.
Share link:
How to enable USB debugging on older versions of Android 4.2 and below
If you need to enable debugging mode on older versions of Android, below 4, then you have to go through completely different steps.
- Open "Settings" and go to the tab "Applications».
- Next we go to the window “Development».
- Afterwards we enable USB debugging mode.
- To confirm, click “ Yes ”.
Take the test on the topic “Legends of the 90s”, remember which of these you had?
Activation procedure on different versions
Android version 2.0 - 3.0
If you have an old Android device with versions 2.0 and 3.0 installed on board, then to activate debugging you need to take a few simple steps:
Android version 4.0, 5.0 and 6.0
On Android versions four, five and six, you have to tinker a little, since the debugging mode in them is carefully hidden from the user’s eyes.
How to enable USB debugging mode on the latest versions of Android? To do this, you need to take the following steps:
USB debugging on Samsung
The USB debugging mode on Samsung devices is enabled a little differently. First, just like in the above options, we check the operation of the “Developer Mode” function. For this:
- Go to the “ Settings ” menu, select the “ About phone ” section and turn on this mode.
- Go to “ Settings ”.
- Click on the “ Developer Options ” icon, it will appear after activating developer mode.
- You will see a tab listing all available options in an expanded format. Select the “Debugging” section. Activate “ USB Debugging ”.
- Allow the phone to debug via USB. Click “Ok”.
What to do if nothing works
To work with USB debugging, special ADB drivers are used (Android Debug Bridge, literally “bridge for Android debugging”), which can be downloaded from the Google website, the official page is located at: https://developer.android.com/studio/ index.html. Let's figure out what to do if ADB does not detect the device, why it is impossible to use USB debugging mode.
Make sure your mobile device is detected by your computer
. For this:
- Check the USB cable for damage. Pay special attention to strong bends and sections of the cable near the plugs, where connecting wires often break. Try using a different cable to connect. If the problem is truly a physical defect, replace the cable.
- Try plugging the plug into a different USB port on your computer. It is advisable to use the ports on the rear side of the system unit, since the rear ports are located directly on the motherboard. The front USB ports are not always connected correctly, which is what causes the problem.
- Try connecting your Android device to another computer. Sometimes it happens that a particular PC incorrectly recognizes a smartphone or tablet and does not read the necessary data from it. If the device is recognized correctly on another computer, take your PC for repair and explain the problem, since the causes of problems may be different.
- Try disconnecting all USB devices from your computer. Some of them may prevent your smartphone or tablet from connecting normally to your PC.
Make sure you are using the official firmware of the device manufacturer
. If you have installed third-party firmware on your smartphone or tablet (such as CyanogenMod or similar), then USB debugging may not work correctly.
Make sure you have installed the correct ADB drivers
. There are different versions of drivers for different devices. All of them are distributed by smartphone and tablet model on the official website. There are also universal ADB drivers, but it is better to use them only if there is no separate driver for your device, since with universal drivers there may be connection problems that can only be resolved with Google support.
It is better for software developers to use not separate ADB drivers, but the Android Studio system, which can also be downloaded from the official website: developer.android.com. In Android Studio, driver configuration occurs automatically; in addition, there is an Android emulator for the computer, so USB debugging may not be necessary.
On Honor Huawei
Using similar instructions, you can enable debugging or usb debugging mode on devices from Honor and Huawei. For this:
- Turn on “ Settings ” - “ System ”.
- Select the “ About phone ” tab.
- Click on the line “Build number” several times until the message: “You have become a developer!” appears.
- After that, we return to the “ System ” section and go to the “ For Developers ” tab.
- We find the line “USB Debugging", turn it on.
- Confirm the action – “ Ok ”.
What instrument are you? Take the test and find out
Checking the cable and port
Before you go into your phone settings, install drivers and curse the day you bought this Android, check the cable and USB port.
I was once very surprised that the computer stopped identifying the smartphone, which it had previously seen perfectly well. It turned out that the cat liked the cable and chewed it through. From this situation I drew two conclusions: the wires must be put away in a box and inspected before connecting. The cat did not draw any conclusions. If no kinks, bites, breaks or other mechanical damage are found on the wire, check the USB port. Try connecting to a different connector or inserting another device into the same port - for example, a mouse. If Windows XP is installed on your computer, then urgently look for an opportunity to upgrade to at least “seven”. But first, you can simply install the MTP protocol so that XP learns to work with Android. The trick is that when the first version of Android appeared, Microsoft had already released Windows 7. Therefore, there is no MTP protocol in XP, and you have to install it separately. You can download MTP
If the computer detects any other device, but the phone categorically does not want to see it, then it’s time to shift the focus to Android settings and connection features. Yes, there is a possibility of mechanical damage to the microUSB connector on the phone, but I have not encountered this yet. If you have something broken, you will most likely notice it.
Most often, the inability to establish a connection between a computer and a phone is due to software errors. If none of the methods listed below help solve the problem, contact a service center - it seems that the smartphone really needs to be repaired.
How to enable USB debugging on Android Xiaomi
The process of connecting USB debugging on Xiaomi phones and tablets is also easy. For this:
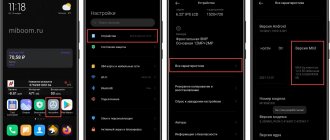
- In the “ Settings ” menu, select the “ About phone ” column.
- Scroll to the line “MIUI version» and click on it several times until a notification appears indicating that you have become a developer.
- We return to the main menu “ Settings ” and go to the “ Advanced settings ” section.
- Next, open the option “ For Developers ” - “ Debugging ”.
- Make active the line “USB Debugging».
Super test on the topic “Money” and how can you be friends with it?
Answer
USB debugging mode is usually required to obtain root access (superuser rights) or modify and finalize firmware, in other words, making changes to the OS at a deeper level. This mode was originally created for developers; it allows you to:
- Optimize applications and the operating system itself
- Check how the created program functions with the OS
- Detect operational failures
- Test hardware components
- Update software
- Create a backup
- Access your smartphone's file system from your computer
- Restore your phone
- Receive detailed process statistics
The debugging service itself is called ADB (Android Debug Bridge). You can enable debugging mode on all Xiaomi devices through the phone/tablet settings. Depending on the version of your system, the location of the menu item you need may vary slightly.
- Go to the following path: Settings-General-About smartphone
- Find the line with the build number (miui version), then click on it about 7 - 10 times
- There should be a notification about enabling the menu for developers
- We return to the settings, go to “Advanced” and find the item “For Developers”
- In this menu we find the “USB Debugging” option and check the box next to it, that’s all.
It is worth mentioning that after connecting to the computer for the first time in debugging mode, you will need to confirm the connection on your phone.
If the smartphone is not detected, there are usually three reasons:
- The device is locked - you just need to unlock the smartphone
- Inappropriate usb port - use only rear ports and version 2.0
- Drivers are missing - download MI PC Suite or find drivers separately
USB debugging is a mode of an Android device in which it provides enhanced access to its OS for computer programs. This feature is actively used by application developers.
But for ordinary users, debugging mode can also be useful. Thanks to it, utilities like PhoneRescue accidentally deleted files. And apps like Helium create mobile device data using a PC. These are just typical examples. There are many different situations in which USB debugging may come in handy.
Enable debugging mode via computer
In order to start using a special operating mode on your device and enable debugging mode, you need to change the settings of your computer or laptop. For the mode to work correctly you will need:
- Install the ADB (Android Debug Bridge) program on your computer. For settings
- After downloading, unpack the archive into an accessible folder.
- Open the command line from this folder. To do this, right-click on the free space of the folder and hold down the “Shift” button.
- In the window that opens, select the “Open PowerShell window” option.
- Let's connect your phone. To do this, change the USB mode to the “file transfer (MTP)” mode.
- In the command line enter: adb devices
- A window will appear on your phone screen asking you to allow access. Click " Ok ".
- Enter the adb devices command again.
- The serial number of your device should appear on the command line. After this, the device is ready to connect to the computer. You can work in USB debugging mode and use the proprietary HiSuite utility. To check the serviceability of the connected mode, connect the device to your PC using a cable (before this, be sure to install drivers for it). Launch the ADB program or any other program for working with a smartphone, and a window will appear asking you to connect. Once you allow the action, you can get to work.
Who are you in the world of The Witcher?
Useful commands in debug mode
When USB debugging is properly configured, you can send commands via ADB or ADB Run. Since the latter program has a more accessible interface for novice users, the first application officially released by Google deserves more attention.
Taking a screenshot
To screenshot the screen without using the side keys and even the separate button provided on some ASUS phones, specify the following:
adb shell screencap /sdcard/screen.jpg
A screenshot called screen.jpg will be located in the root of the external MicroSD memory. You can specify any other name, and in addition to the JPG extension, PNG is supported. Afterwards you will need to “pull” the image from the device’s memory:
adb pull/ sdcard/ screen. jpg
The following command is suitable for taking a recovery screenshot:
adb pull /dev/graphics/fb0
Please note that in this case the file will have the extension fb0. You can convert it to PNG using the separately downloadable FFMPEG plugin. It requires this command:
ffmpeg -f rawvideo -pix_fmt rgb32 -s 1560×720 -i fb0 fb0.png
As a result, a document fb0.png will appear with a resolution of 1560 by 720 pixels. Please note that you need to indicate the actual screen size, and also take into account what position the device was in at the time the screenshot was taken: vertical or horizontal.
Video recording
There will be no problems in creating videos using ADB functions:
adb shell screenrecord --verbose /sdcard/video.mp4
A three-minute recording will be created and saved to the SD card as video.mp4. More detailed settings are possible:
- — size – screen size (native is used by default);
- — bit- rate – update rate (for example, 6000000 is equal to 6 Mbit);
- — time- limit – time in seconds during which a recording is made and logs are saved (by default – 180).
stop any ADB-related processes, use the combination Ctrl + C.
Receiving logs
Actions are recorded by the logcat and dmesg . They can be easily saved as files:
adb logcat > logcat.txt
adb dmesg > dmesg.txt
As a result, text documents will appear containing information about the actions performed with the device recently.
Software backup
You can create a backup of applications without utilities like Titanium Backup; for this you will need the adb backup . It supports the following optional parameters:
- — all creates copies of all programs available on the phone;
- — f – the name of the file under which the backup will be saved;
- - apk – include the executable file in the backup copy (if you do not specify or set - noapk , only application information will be saved);
- - obb – add files . obb to a copy (the opposite of - - noobb , which is the default);
- — shared – backup along with program data saved on the SD card (not enabled by default, so noshared is );
- - system (default) shows whether it is worth copying the system software (there is an option - nosystem ).
- all is not entered , you will need to specify the names of the applications that need to be added to the backup.
USB debugging is enabled and Android device is not detected
Sometimes users may encounter this problem. After connecting the necessary modes on the phone and installing programs on the computer, the connected device is not detected.
- In such a situation, first of all, check the availability of the necessary Android drivers, and if necessary, reinstall or update them.
- Another reason for this error may be a blocked smartphone or tablet. For USB debugging mode to work correctly, devices must be unlocked. In addition, we do not recommend using a USB 3.0 port, only USB 2.0.
- If none of the above helped, and you are still wondering how to enable USB debugging mode, we recommend changing the type of connection to the computer. For this:
- Connect the device to the PC.
- Pull the information bar down and select the “ Select USB connection ”
- Click on “PTP Mode”. This way, you can connect the device to your computer and begin the necessary work with your smartphone or tablet.
Working with USB devices in Android
In a recent article on Geektimes, a question arose in the comments about support for peripherals connected to the USB bus in the Android OS. Indeed, most vendor software, for example, for working with printers and MFPs, only supports network connections. However, this does not mean that the Android OS itself does not have such a feature - it only means that most devices do not have a full-fledged USB host, and not all have OTG support. Absolutely everyone without exception can work over the network. Most Android devices with an OTG port support the following device classes at the system level (Linux kernel or standard Android components):
- Input devices - keyboards, mice, joysticks (HID)
- Mass Storage
Somewhat less frequently:
- Cellular modems
- Network adapters
- Webcams
Hubs are supported on full host ports, but are not supported on OTG ports.
A more detailed list of devices supported at the Linux kernel level can be obtained in sysfs: $ ls /sys/bus/usb/drivers If the module is in principle available in the Linux kernel source code, but is not included in Android, you should not count on it It will be possible to collect and arrange for all target systems.
However, starting with Android 3.1 (API 12), the system contains tools sufficient to support any USB peripheral at the application level. These tools are described in the USB Host section of the Android API manual. Here I want to give examples of real work with certain types of devices.
Access rights
As with other actions, Android requires that the application receive permission to access USB peripherals. There are 2 ways to obtain this permission:
- Declare a list of devices in AndroidManifest
- Explicitly show the user the “allow” dialog
Since for my purposes unnecessary questions to the user were undesirable, I used the first method.
So, we need to add the following to the manifest:
... And in res/xml/device_filter.xml enter the following: I note that although it is generally accepted to indicate VID:PID in hexadecimal, here they must be indicated in decimal. The documentation states that it is possible to specify only the class, without VID and PID, but this did not work for me.
Printers
Using a printer as an example, I will show how to directly use the android.hardware.usb API. At the data transfer level, all printers support the standard USB device class: int UsbConstants.USB_CLASS_PRINTER = 7; The class is extremely simple. Within this class, the device must support:
- Mandatory bulk out endpoind to send data to the printer
- Optional bulk in endpoind to get printer status
- 3 control requests
int GET_DEVICE_ID = 0;
int GET_PORT_STATUS = 1; int SOFT_RESET = 2; The code below provides functionality similar to the /dev/usb/lp device in Linux. Next, we need a filter that converts the source document into a data packet that is understandable to a specific printer model. But this is a topic for another article. As one option, you can build ghostscript using the NDK. To work with the device, we first need:
1. Find the device. In the example, for simplicity, I look for the first one that comes up:
UsbDevice findDevice() { for (UsbDevice usbDevice: mUsbManager.getDeviceList().values()) { if (usbDevice.getDeviceClass() == UsbConstants.USB_CLASS_PRINTER) { return usbDevice; } else { UsbInterface usbInterface = findInterface(usbDevice); if (usbInterface != NULL) return usbDevice; } } return NULL; } UsbInterface findInterface(UsbDevice usbDevice) { for (int nIf = 0; nIf < usbDevice.getInterfaceCount(); nIf++) { UsbInterface usbInterface = usbDevice.getInterface(nIf); if (usbInterface.getInterfaceClass() == UsbConstants.USB_CLASS_PRINTER) { return usbInterface; } } return NULL; } UsbDevice mUsbDevice = findDevice(); UsbInterface mUsbInterface = findInterface(mUsbDevice); 2. Get endpoints: for (int nEp = 0; nEp < mUsbInterface.getEndpointCount(); nEp++) { UsbEndpoint tmpEndpoint = mUsbInterface.getEndpoint(nEp); if (tmpEndpoint.getType() != UsbConstants.USB_ENDPOINT_XFER_BULK) continue; if ((mOutEndpoint == NULL) && (tmpEndpoint.getDirection() == UsbConstants.USB_DIR_OUT)) { mOutEndpoint = tmpEndpoint; } else if ((mInEndpoint == NULL) && (tmpEndpoint.getDirection() == UsbConstants.USB_DIR_IN)) { mInEndpoint = tmpEndpoint; } } if (mOutEndpoint == NULL) throw new IOException("No write endpoint: " + deviceName); 3. Directly open the device: mConnection = mUsbManager.openDevice(mUsbDevice); if (mConnection == NULL) throw new IOException("Can't open USB connection:" + deviceName); mConnection.claimInterface(mUsbInterface, true); 4. After this, we can read and write to the device: public int read(final byte[] data) throws IOException { int size = Math.min(data.length, mInEndpoint.getMaxPacketSize()); return mConnection.bulkTransfer(mInEndpoint, data, size, getReadTimeout()); } public int write(final byte[] data, final int length) throws IOException { int offset = 0; while (offset < length) { int size = Math.min(length — offset, mInEndpoint.getMaxPacketSize()); int bytesWritten = mConnection.bulkTransfer(mOutEndpoint, Arrays.copyOfRange(data, offset, offset + size), size, getWriteTimeout()); if (bytesWritten <= 0) throw new IOException("None written"); offset += bytesWritten; } return offset; } 5. When finished, close the device: mConnection.close();
USB-Serial Converters
Unlike printers, USB-Serial converters are much less standardized.
There are several common chips for which the settings of the serial port parameters—bitrate, parity, etc.—are significantly different. Fortunately, there is a library github.com/mik3y/usb-serial-for-android that supports almost all existing chips. The library completely hides the USB API, reducing all necessary actions to a minimum of calls with a minimum of parameters. 1. Find and open the device:
UsbSerialPort mUsbSerialPort; UsbManager mUsbManager = (UsbManager) DEVICE.getSystemService(Context.USB_SERVICE); String type = “FTDI”; for (UsbDevice usbDevice: mUsbManager.getDeviceList().values()) { UsbSerialDriver usbSerialDriver = UsbSerialProber.probeSingleDevice(usbDevice); if (usbSerialDriver == NULL) continue; if (!type.equals(usbSerialDriver.getShortDeviceName())) continue; mUsbSerialPort = usbSerialDriver.getPort(0); mUsbSerialPort.open(mUsbManager); break; } 2. Set the serial port parameters: mUsbSerialPort.setParameters(baudRate, dataBits, stopBits, parity); 3. Read and write to the port: public int read(final byte[] data) throws IOException { return mUsbSerialPort.read(data, getReadTimeout()); } public int write(final byte[] data, final int length) throws IOException { return mUsbSerialPort.write(data, length, getWriteTimeout()); } 4. Upon completion of work, close the port: mUsbSerialPort.close();
Summary
I hope that I was able to show that working with USB peripherals is quite simple and logical.
Of course, the implementation of the protocols of some specific devices is not very simple - but this will manifest itself in any system to the same extent. I took all the examples given from a real project, I just excluded the obvious checks, leaving only the key lines.
When will this instruction be useful?
The instructions below will come in handy if your smartphone or tablet stops working normally. Most often this occurs due to the device being dropped, a system failure, or a damaged display. Please note that to successfully complete the tutorial, custom recovery must be installed on your phone .
Not many people know, but every Android device has a recovery menu that allows you to perform various actions with your smartphone. For example, resetting the phone to factory settings, removing viruses or updating firmware. By default, each device is equipped with Stock Recovery, installed by the manufacturer from the factory. Some users install Custom Recovery, that is, a recovery menu containing a number of additional functions. The most common types of custom recovery are TWRP and CWM.
If you have stock recovery installed on your smartphone, then don’t worry. The article will also discuss a method that allows you to enable USB on almost any device . There is just one caveat - it is advisable to have a wireless USB mouse, as well as an OTG cable.
Checking Energy Saving Settings
Windows is trying to conserve energy so that the same laptops can last longer on battery power. One of the saving factors is the automatic shutdown of USB ports. Sometimes this results in external devices not connecting at all. To check these settings and troubleshoot any deficiencies:
- Open Control Panel.
- Turn on display mode "Large Icons".
- Go to the "Power Options" .
- Find the scheme you are using and proceed to configure it.
- Choose to change advanced settings.
- Expand the USB settings and set the “On Battery” and “On Mains” to “Disabled” .
- Click "Ok" to save the configuration.
This is interesting: How to view the Wi-Fi password on an Android phone with and without root rights
I haven't measured how much the ban on automatic port shutdown affects battery life, but there is no noticeable difference. But problems with connecting external devices such as Android phones are eliminated.
Which connector to use
Many questions concern which USB connector to use on the Honor 8a phone. For connection, a standard USB-C or other type of connector is used on one side and a standard USB computer on the other. After connecting the two devices, you just have to choose one of the three options discussed above. If the connection is unsuccessful, you can enable debugging of your Honor phone using the scheme discussed above.
If Honor is not connected via USB, you need to configure or go through the following steps:
- Check that the cable you are using is in good condition.
- Make sure the USB connector on your computer is intact.
- Try connecting your smartphone to a different port on your PC/laptop.
- Check for software problems. Notice the USB icon appears after connection. On your PC/Laptop, go to Device Manager and find the ADB/HDB driver. If it is not there and there is an exclamation mark on the icon, the driver will not work and you need to reinstall it.
- Select the correct option when connecting your Honor phone. To send files, you must select File Transfer. If you select Charge only, no information will be transmitted over the cord.
- Check whether debugging is enabled. How to enable it if USB is disabled on Honor is discussed below.
If the problem persists, the cause may be a third-party application for connecting two devices. To connect your Honor phone to PC/Laptop, it is recommended to use Huawei HiSuite. To install it, connect your smartphone to your PC/laptop via USB, open My Computer and select HiSuite from the list of portable devices. In the next step, double-click on HiSuiteDownloader.exe.