Hello friends! I finally bought myself a good and cheap Zyxel Keenetic 4G III. Today we will unpack it, look at the characteristics, and of course, configure it. A short preface. I took it to access the Internet in a country house. I live about 10 kilometers from the main city.
And, unfortunately, there is no Internet at all. But I still hope that someday fiber optics will be installed nearby. So / first, we will unpack it, look at it, install it, configure it. Next I will tell you about all its features, perks and small nuances that for some reason no one mentions.
Since this router has two versions (A and B), they have different firmware. If B has support for new firmware with OS version 2.12, then A only supports old firmware - 2.08. They are fundamentally different in setup. But I will tell you how both new and old firmware are configured. Go!
HELP! If something went wrong during the setup process, feel free to write your questions in the comments, and I will help you. But it is advisable to write in as much detail as possible at what stage the problems arose.
Installation and connection
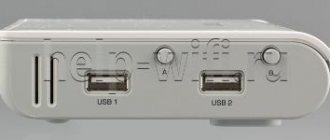
I apologize right away, but I will use photographs from the Internet. Since my slipper takes off so disgustingly that many of my readers may suddenly develop a gag reflex. Let's first take a look at the back where all the ports are located.
Let's start in order from left to right:
- So, the first port is for connecting wired Internet. The router is still a modem, but the manufacturer took care and included a wired interface just in case.
- The second port for connecting a computer or laptop via wire. Well, at worst, you can plug a TV or printer in there.
- In the middle, like a king, sits the main port – USB 2.0. Well, you don't need more. Since not all modems work with 3.0.
- Next comes the button for resetting the settings. By the way, if it was given to you or someone else used it before, I strongly recommend resetting the settings to factory settings. Just take a paper clip or a needle and hold it down for 11-15 seconds until it starts flashing.
- Power input.
I've seen enough of him. Let's connect. We can plug any Internet modem into the USB input. According to the manufacturer, the device supports up to 150 modems of different types and classes.
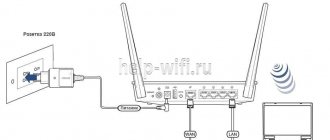
Now attention! I will be setting it up via my laptop. But oddly enough, there is no power cord in the box. How so? All the routers I installed always had a spare wire - short, long, but it was there. But here they saved money and didn’t put in the wire. And yes, the official website also does not list a network cable included in the package.
To be honest, it shocked me a little. Luckily, I found my old power cord and plugged it into the yellow connector. If you also connect via wire, do not mix it up; insert it into the connector labeled “Home Network.” If you do not have a computer or laptop, then the setup can be done from your phone or tablet. Oh yes - don't forget to turn on the power supply.
Setting up the Internet via a 3G/4G modem + list of supported modems
Both models work with approximately 150 types of modems from different operators. You can see the full list on the manufacturer's official website.
To set up the Internet from a modem, you usually only need to connect it to the USB output on the router. Then the devices will figure it out on their own - the Internet will appear almost immediately. The only thing you can do is check all the parameters in the settings account:
- Open the Internet section. There you jump to the “Modems” or 3G/4G tab.
- Find the entry associated with your modem and expand it.
- Make sure all the necessary settings are set there. Click "Apply".
Check if the connection settings for your modem are correct
How to connect via Wi-Fi
First you need to connect to the network. But, of course, you can’t plug the wire into the phone, so we’ll connect via Wi-Fi. Similarly, you can connect from a laptop or computer (which has a Wi-Fi module). Look at the front panel. By default, Wi-Fi should already be turned on, and you will see the wave indicator light up.
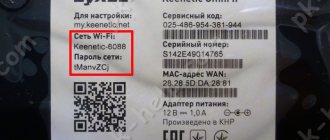
If it is not lit, then simply press the top button with the same image. Now we are looking for the wireless network in your device. But what is it called? – Turn your device upside down, and you will see both the name of the network and its password.
If there is no such network, and the indicator is on, then you just need to reset it to factory settings. I already talked about this above.
Local LAN and DHCP
How to set up Zixel's home network:
- Click on the icon of two computers below. This block is precisely intended for debugging the local network.
- In the first section you will see all the devices that are currently connected to the router. In the second block “IP Settings” you can change the main IP address of the local network (this is the address of the router that we went to in the browser to open the settings account).
In the first settings block you can set a new router IP address
- In the “DHCP Server” settings block, you can change the DHCP server parameters. Firstly, it must be turned on. Second, set the starting address of the local address range. The following indicates the number of addresses in this range. What value to set depends on how many devices are simultaneously on your Wi-Fi network.
- You can also specify a pair of DNS servers that the router should use. After changing all the values, do not forget to click “Apply”.
How to access settings via phone or tablet
In general, this can be done in the same way as from a computer. Just open the browser and enter the address. But I recommend using a special application for convenience. It can be downloaded from these links:
- iOS
- Android
Just download it, install it and follow the instructions. The program is very convenient with interesting functionality. For example, you can log into your router from anywhere in the world and change some settings.
What does it look like?
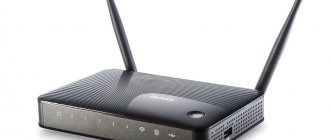
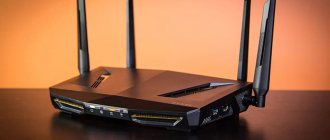
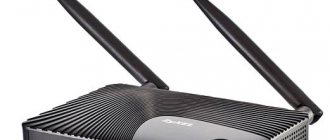
The router is made of plastic, has a black body with a ribbed surface on top. All icons and inscriptions are applied neatly and in contrast, so that they are visible even in poor lighting, the port markings on the rear panel are colored - the incoming port is blue, the additional ports are yellow. At the top in the corner there is a button to turn the router on and off. The antennas are made of plastic, but have metal elements inside that conduct the connection. The weakest part of the antenna is the adjacent element, which can break off if handled carelessly.
The control panel (Internet center) looks simple and clear, there is a Russian language, all tabs are located in a convenient sequence.
At first glance, everything is not bad! All routers are fragile and brittle, there are no obvious flaws.
Setting up on new firmware
That's it, we installed it and launched it. I went into settings. Now I will tell you everything step by step.
- I was immediately greeted by a new friend. The default language is Russian, but you can change it to any other. Click on the only button in the center.
- So, my connection is via USB with a regular flash drive. So I select "3G/4G". But the Zyxel Keenetic company has separate “3G/4G” modems, if you use it, then press point 3. Those who use wired Internet, then you are welcome, point one.
- And lo and behold! I immediately connected to the Internet. But you may be asked for a password to access. It is in the box that came from your 3G/4G modem.
- Now we are asked to enter “Internet filter”. But we won’t install it for now, since before that we need to make some settings. This thing protects the network and individual users from dangerous or adult sites. If you have children, then this protection is perfect - but we will set it up later.
- At the very end, you will be given the name and password of the Wi-Fi network. For some reason they didn't let me change it. But let's change it ourselves.
One more thing - if something happens, you can change the settings in the “3G/4G Modem” section. There you can set a turn-on schedule and so on. The device also autonomously supplies power to the modem, and if the Internet is not active, the router turns off the modem. I also recommend doing a software update of the OS. To do this, click on the main page on your version of the operating system. Next, the device will inform you whether it is worth downloading the update or not.
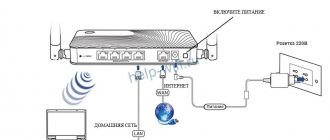
How to connect Zixel to the provider line and prepare the PC before setting it up
The connection procedure is as follows:
- Connect the computer and the router with a yellow cable: insert one plug into the local network output on the router, the second into an output of the same shape on the PC.
- You insert a 3G/4G modem into the router or connect an Internet cable from the entrance to the WAN port.
- Turn on the router and wait until it boots up completely.
Using the cable included in the kit, you need to connect the router to the computer.
Now let's configure the network card on the PC:
- Open “Network Settings...” through the context menu of the network tray icon.
- Call up the window for changing adapter settings, then open the properties of the local connection through the context menu (right-click).
- Click on the line responsible for changing the parameters of the fourth edition protocol, and set the automatic method for obtaining DNS and IP.
Set the value to “Obtain automatically” for IP and DNS
Changing the Wi-Fi network password
It turned out that everything is simpler than I thought:
- "Home network".
- "Wi-Fi wireless network."
- The slider can be turned off, then the network will not work. This is for those who use purely wired Internet.
- Be sure to set the security type to WPA2-PSK.
- Enter the password below.
- “Operation schedule” – you can set a schedule for turning Wi-Fi on and off. For example, turn it off at night to reduce the load on the module.
Possible malfunctions and ways to eliminate them
- The most common problem that users encounter is constant crashes when downloading torrents or an online game that requires a constant Internet connection. It is recommended to disable the update, do not connect more than three devices at the same time, configure the communication channel manually, and you need to set a permanent IP, as this will solve most problems.
- Another common problem: the router does not distribute the connection, that is, the device connects to it, but the Internet does not arrive. In this case, the problem may be either a failure of the DNS servers or an incorrectly installed information transfer protocol. It is strongly recommended to re-read the instructions again and configure the router, strictly following it. If all else fails, you need to reset the router settings via the web interface or using the button located on the case.
- Devices do not connect to the router, or connect and then crash. There may be a reason for this due to a frequency range conflict. To solve this bug, you may need the Advanced IP Scanner program, which can test the network and show free channels that are not very busy and channels that are almost always clogged. Using it, you need to distribute the network in such a way that all devices can connect to the channels without overload. You can correct the error manually in the “Mode” tab.
ATTENTION! Another reason is a failure of the parental control system, which can periodically turn the router on and off.
For inexperienced users, only one solution is obvious - resetting to factory settings or updating the router firmware and re-configuring from scratch. Remember that incorrect manipulations with equipment can damage the command shell, after which you will have to buy a new router, since the old one will no longer be usable. Frequent complaints about speed limits are most likely due not to the router setup itself, but to the limitations of the modem and provider. Although, as a result of incorrect manipulations with the protocol and DNS addresses of the network, the speed can drop down to 1 Mbit/sec. Also, a VPN network or various types of encryption can affect the speed and slowdown. The router already has a built-in VPN system that partially encrypts the traffic and sends it through a large network of nodes. Firmware update
Network filter
This is a thing that protects registered devices from bad and dangerous sites. Where can a computer pick up viruses? And, of course, protecting the child from adult content.
- First you need to register the connected devices. Now you will understand what it is.
- Go to the “Device List”.
- You will see all connected devices to the router in the “Unregistered devices” section.
- We don’t press any. I clicked on the connected TV.
- For convenience, we call it whatever we want. I called it " Smart TV". But it could be “Daughter’s Phone” or “Wife’s Laptop”. The name is only needed for you so that you can quickly see who is connected.
- These devices appear in the Registered Devices . Now you can give them filters, limit their speed, prohibit them from climbing certain sites, etc.
- But we will make everything simpler. I’ll show you using the Yandex.DNS security utility as an example – it’s free and has useful functions.
- Go to “Internet filter”. And install the Yandex filter.
- A sign like this will come out. Now you can set a filtering category for each registered device:
- Without filtering - I installed it for myself, since my computer is protected and I know how to use the Internet safely.
- Basic Internet – installs DNS from Yandex. I have DNS from Google, but you can set this option for yourself. There is no filtration at all.
- Safe – blocks all sorts of dangerous sites where you can catch a virus. Fraud sites are also blocked.
- Family - as above, only in addition all “18+” content is blocked. I installed this filter for my children.
As you can see, there is nothing complicated, and you can change the settings at any time.
Internet Protocol Settings
Open the contract that you entered into with your provider for the provision of Internet. The protocol (connection type) must be indicated there - L2TP, PPTP, PPPoE, static or dynamic IP. Now proceed to the instructions that suit your protocol.
L2TP, PPTP, PPPoE
How these three types are configured:
- Go to the “Internet” section. Open the PPPoE/VPN settings block.
- Add a new connection.
Click on “Add connection”
- In the protocol type we indicate L2TP, PPTP or PPPoE. For the first two, we immediately indicate the server address, which is noted in the contract for your provider.
- For any of these protocols, we also write a login and password to enter the operator’s network. Apply the settings.
Select the appropriate protocol from the menu
Static and dynamic IP
In the case of these two protocols, go to another IPoE tab. We are also adding a new interface there. In the IP setting we set it to “Manual”; if you have a static IP, we write down all the relevant data from the contract, including the address itself, mask, etc.
If you have a dynamic IP, simply leave the value “Automatic” in the IP parameters and save.
Setting up on old firmware
- You will also be greeted by a Quick Setup Wizard. Click “Quick setup”.
- After this, the router should report that a modem is inserted into it. Click “Next”.
- If the provider asks for a password or additional settings are needed, then enter them from the contract. But often the connection will be set up right away.
At the very end you will be asked to update the firmware. I wouldn't recommend doing this. Yes, now many will start saying that firmware solves problems, errors and generally improves performance. O dear friend! On my old router, also from this company, I once tried to reflash the OS. Since he couldn’t do this in offline mode, I ended up downloading the firmware from the official website.
Of all the firmware that were there, only one worked. The rest were crooked: either they did not distribute Wi-Fi, or the Web interface was buggy. So I don’t recommend flashing the firmware on older versions - it works fine. After reading user reviews, many encountered a problem - they reflashed it, and then the device stopped distributing Wi-Fi. So I'm not the only one who has encountered this.
If you need to make changes to the 3G/4G modem settings, you can do this further in the menu by clicking on the planet icon below, and then select the appropriate section. There you just click on the only connection and change the configuration.
To set up Wi-Fi, click on the ladder.
Set up a name and password for the network. Also make sure that the security is WPA2-PSK. And be sure to turn off WPS - if it is enabled. Click “Apply”.
Setting up IPTV
You can watch digital TV through both routers, but to do this you need to configure the IPTV function:
- In the “Internet” settings, go to the “Connection” tab.
- Click on the Broadband connection profile.
Select the Broadband connection line
- We place it opposite the output to which the TV set-top box is connected.
Check the box next to the corresponding port
- Save the changes. Next, the router will reboot for all changes to take effect.
Network filtering
Older firmwares also have filtering for adult and dangerous sites. Everything is done in the same way as in the new firmware.
- First you need to register your devices. Click on the computers icon.
- Click on each device and give it a name. You can also check the box “Deny Internet access to all unregistered devices” - then even if you are hacked, freeloaders will not be able to use the Internet.
- Click on the fire shield.
- Go to the “Yandex.DNS” . Check the “Enable” checkbox. And for each family member we set our own filter. For myself, I turned off filtering. And for my wife and child I installed “Family Internet” - it protects against dangerous sites and adult content.
- Click “Apply”.
Firmware update for Zyxel Keenetic 4G router
The update can be semi-automatic, when the system looks for an update for itself and installs it:
- In the settings account, switch to the “System Monitor” section. In the system, look at the “Updates” item on the right.
- If the value “Available” is there, it means there is an update for your firmware. Click on this word.
Click on “Available” in the “Updates” line
- You will find yourself on the update page. Just click on “Install” and wait for the upgrade to complete. During this time, do not press anything.
Run the installation of the router firmware update
Characteristics
| Models | Zyxel Keenetic 4G lll REV.B (OS up to 2.14) Zyxel Keenetic 4G lll REV.A (OS up to 2.08) |
| Connection type support | 3G/4G/LTE |
| Internet port | There is |
| Ports | 2 at 100 Mbps |
| Wi-Fi standards | 802.11 b/g/n |
| Maximum speed over wireless technology | 300 Mbit per second |
| Frequency | 2.4 GHz |
| USB | 1 port version 2.0 |
| Dimensions | 140x110x30 mm |
| Weight | 200 grams |
Repeater mode
Keenetic 4G III can be used to increase the coverage area of an existing and operating network. To do this, you will need to switch the router to signal repeater mode. It is desirable that the first device is also from Keenetic.
Read detailed instructions on how to connect two routers into one network.
Algorithm of actions to activate the repeater mode:
- Open the “System” section by clicking on the corresponding shortcut.
- Go to the "Mode" tab.
- Select Booster - Wi-Fi Range Extender.
- A reboot message appears. Click "OK".
- After the reboot, a window will open with instructions for further network setup.
- To sync, press the Wi-Fi button on both devices. There is no need to hold it.
- After 2-3 minutes, when the data exchange ends, look at the amplifier’s IP address in the web configurator on the main router. Open a tab with a list of registered devices. The amplifier data will be indicated there.
A short review of the router
I bought the device at a discount for 2000 rubles. In general, what I would like to note:
- The device works stably. I haven't overloaded it yet. But it’s new – there’s still more to come.
- It’s very easy to set up, but I have new firmware and version B. If you have version A, then you won’t be able to update to the new firmware, but it’s not a big loss - they are the same in functionality, it’s just that the new firmware is a little more convenient.
- Many people complain that it costs more now. Dear readers, write in the comments - how much did you buy it for?
- Good speed and does not cut.
- No 5 GHz support. But I don’t need this, since I have a large house, and a higher frequency has a shorter range. And the output is only USB 2.0, so the speed here will not be higher - therefore support for 5 GHz is not needed.
- 5 dB antennas. They even penetrate 2 walls quite well. If you have a huge house, you may need a repeater - but that's enough for me.
Now let's talk about the cons:
- Only one LAN port. That is, if you want to plug in a TV and a computer or something else, then you simply do not have enough ports.
- To be honest, it seems to me that this is just a stripped-down version of the regular Zyxel Keenetic OMNI or Lite. They also support modem connections, but they have more ports.
- The company saved not only on the number of ports, but also on the network cable. I’m just used to setting up a router via wire, and when I didn’t find it in the package, I was very surprised.
Overall, the model is not bad, but I should have taken the standard one - it costs the same and has more ports. Otherwise, the router is good, it works stably. In my opinion, it’s a little expensive - for me, the price for this router is 1200 wooden ones.
REQUEST! Dear readers, write your review about this model.
Setting up ZyXEL Keenetic 4G as a repeater
Zixel routers can work not only as the main router in the house. They can simply repeat the signal of another device, thereby expanding the Wi-Fi zone in the apartment. How to set up such a connection:
- Go to the “Mode” section in the “System” settings block.
- Put o. Click on “Apply”. The router will reboot.
- Follow all the steps described in the instructions in the account window. In short: you just need to press the WPS button on the main router and the Zixel button almost simultaneously. This action will connect the two devices.
Highlight "Amplifier" in the list
Conclusion
Zyxel Keenetic router model 4G II: review, specifications
The Keenetic 4G Internet Center is a reliable device for organizing a home network or a small office network, capable of satisfying most user requests when working with the “global network”.
pros
The advantages of the device include:
- affordable price;
- multifunctionality;
- reliability.
Minuses
Keenetic 4G has practically no disadvantages. We can only wish the developers to expand the capabilities of the USB port so that they can use a wider range of functions in the router.