Chrome offers a built-in password manager to save passwords when logging into websites. Once saved, Chrome will automatically fill in passwords in the login and registration forms every time you open a website. In our previous article, we explained how to view and delete saved passwords in the Chrome browser. However, many users have asked us how to bulk download all passwords and download them again. So in this article, let's discuss downloading all saved passwords from Chrome into a CSV file and downloading multiple passwords back to the browser.
The process of transferring Google Chrome profile data to the operating system of another computer
Essentially, in order to transfer all or part of the Google Chrome settings, you need to click on a small image, an icon, which is a settings menu and is also responsible for controlling browser functions.
It is located at the very top of the browser window on the right, made in the form of three stripes parallel to each other, arranged in a column. Activate the Switch to Chrome option. In order for bookmarks, as well as other settings, to be synchronized in Google Chrome, the user will have to enter the details of their own Mail mailbox address, as well as enter the password for their account (if you don’t have a mailbox, just register in Gmail). After that, click on the button that is responsible for further transition:
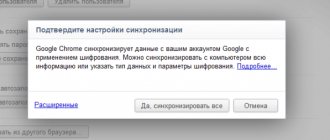
A window will appear in Chrome that provides the user with information that a transition to the Google Chrome browser account has been made. After this, the full set of browser settings is instantly synchronized with your Google account. Next, you simply agree to all the requirements and proceed to further actions:
To go through a partial synchronization procedure (individual Chrome settings), selecting only specific options or deactivating your account in the Google browser, you must again click on the small menu image, and then go through the value of your own Mail email.
The Chrome personal browser settings have a section with auxiliary options, which you will have to go to. You will have to specify exactly the synchronization and what specific settings need to be made.
Carefully mark all the points that need to be synchronized. Agree to the requirements and move on.
When the process of synchronizing all the options you have selected comes to an end, you will have the opportunity to launch the browser on the operating system of another computer. Next, you will have to log into Google Chrome exactly as shown in the screenshot above. The procedure for transferring all bookmarks, custom options, and Google Chrome browser history data to a PC is very quick and simple.
Google Chrome
Let's look at several ways to save Google Chrome browser data.
Method No. 1
Read also: TOP 15 Best free browsers for Android devices: review of the fastest and safest surfing programs | 2019
First, you need to be sure to close your browser if it is open.
- Next you need to display all hidden files and folders. To do this, go to the “View” and “Hide protected files” . And check the box “Show hidden files” and folders. In addition, we recommend that you also uncheck “Hide extensions for registered file types”
Show hidden files and folders
- And then confirm your action.
File Display Confirmation
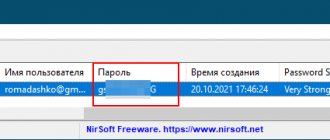
- Now you need to copy to a safe place (or better yet on removable media) the Default , which stores all passwords, bookmarks, extensions and other saved information. You can find it at the address shown in Fig. 5.
Path to storing passwords in Google Chrome
After reinstalling the system and installing the browser, log into it and immediately exit. Then again follow the steps indicated in Fig.
Paths and replace the contents of the Default with the one you copied.
And then, the next time you use the browser, you will see all the old saved tabs, bookmarks and the passwords that you saved.
Method No. 2
Read also: Google account contacts: how to find, save, move, delete, restore, synchronize + Reviews
- This can be done using settings in Chrome. To do this, select the “Users” and log into your account.
Setting up synchronization
- After this, synchronization is completed and must be confirmed.
Enable synchronization
- Well, at the end you need to indicate the elements that will be synchronized. We advise you to select everything, since you cannot know exactly which of these may be useful to you in the future. Well, if you only need passwords, then place a switch next to them.
Selecting items to sync
- After reinstallation, you need to log into your account in the browser. And then all synchronized elements are automatically synchronized.
VIDEO: Backup bookmarks of passwords and applications in the Google Chrome browser
Google Chrome How to save and transfer profile settings, passwords, cache.
If you have decided to reinstall Windows and don’t want to worry about synchronization or want to transfer all the data to a new computer, then this video is for you. just save the profile folder to a flash drive or any convenient location.
How to transfer chrome profile to another computer
When you replace your computer or you want to use your own Google Chrome web browser settings on your work computer, it is important that you are familiar with the methods of transferring various extensions, bookmarks, passwords, digital applications, as well as Google Chrome user settings to the operating system of another computer
The process of transferring Google Chrome profile data to the operating system of another computer
Essentially, in order to transfer all or part of the Google Chrome settings, you need to click on a small image, an icon, which is a settings menu and is also responsible for controlling browser functions. It is located at the very top of the browser window on the right, made in the form of three stripes parallel to each other, arranged in a column. Activate the Switch to Chrome option.
In order for bookmarks, as well as other settings, to be synchronized in Google Chrome, the user will have to enter the details of their own Mail mailbox address, as well as enter the password for their account (if you don’t have a mailbox, just register in Gmail). After that, click on the button that is responsible for further transition:
A window will appear in Chrome that provides the user with information that a transition to the Google Chrome browser account has been made. After this, the full set of browser settings is instantly synchronized with your Google account. Next, you simply agree to all the requirements and proceed to further actions:
To go through a partial synchronization procedure (individual Chrome settings), selecting only specific options or deactivating your account in the Google browser, you must again click on the small menu image, and then go through the value of your own Mail email.
The Chrome personal browser settings have a section with auxiliary options, which you will have to go to. You will have to specify exactly the synchronization and what specific settings need to be made.
Carefully mark all the points that need to be synchronized. Agree to the requirements and move on.
When the process of synchronizing all the options you have selected comes to an end, you will have the opportunity to launch the browser on the operating system of another computer. Next, you will have to log into Google Chrome exactly as shown in the screenshot above. The procedure for transferring all bookmarks, custom options, and Google Chrome browser history data to a PC is very quick and simple.
Exporting bookmarks you've created from Google Chrome
In order to implement this procedure successfully you will need:
- Go to the Chrome browser itself;
- Go to the menu, the icon of which is located at the very top on the right side.
- Go to the “Bookmarks” section, and then to the “Manager...” section;
- Find the file management item;
- And then select the item responsible for exporting bookmarks to a file document like HTML.
Data synchronization
The easiest way to save information is to sync between devices. Synchronization in Google Chrome allows you to transfer passwords, search history, visited pages, bookmarks both between computers and from a mobile device to a PC.
How to enable synchronization from your computer:
- Go to menu Google Chrome (1) – «Settings» (2).
- The first block is the synchronization settings. Click " Enable Sync ".
- Log in to the system if you are not logged into your Google Chrome account on your device.
- Confirm the action – in the pop-up window, click “OK».
Repeat the same action from another device - all your data will be synchronized.
If you saved some of your passwords and search history on your phone, also enable synchronization with your mobile device. How to enable synchronization with Android:
- Go to system settings on your mobile device.
- Scroll down the page to the “ Personal Data ” block and go to the “ Accounts ” section (1).
- Select from the list Google Chrome (2) – provided that you have previously logged into your account from this device. If you have not logged in before, click " Add account» at the bottom of the page and log in to the system.
- Next, the synchronization settings will open. Move the switches opposite the desired services to the active position (1).
- Click on the button in the upper right corner and select "Synchronize» (2) to transfer all data.
Synchronization is only available within one Google Chrome account. You won't be able to import data from different accounts, even if they both belong to you.
Transfer bookmarks from Google Chrome all ways
Bookmarks saved on only one device cannot be used to their full potential. There are several ways to move links to saved pages to other devices:
- synchronization;
- via file.
Why is it better to use built-in tools rather than transferring links manually:
- Fast. It only takes a few minutes to copy the list.
- Comfortable. We need a series of quick and simple operations instead of dozens of copying operations and links and transitions to sites.
- Organized. If links are grouped by directories, they will be moved in the same order and in the same folders.
Method 1. Synchronization
To access all bookmarks from any device that has the Google Chrome browser, it is possible to set up synchronization. By setting up synchronization, you will have access to all bookmarks from any device that has the Google Chrome browser - phone, tablet, laptop, computer.
If you have access to the Internet, information about saved pages will never be “lost”, even if you reinstall the browser or OS on your computer. Synchronization is the storage of some user data (bookmarks, passwords, etc.) on Google servers and importing them to paired devices. A paired device is any device on which you are logged into your account.
If you have a “clean” Google Chrome without an account:
Step 1. Open your browser, left-click on the icon with a stylized human figure.
Left-click on the icon with a stylized human figure
Step 2: Select Sign in to Chrome.
Select “Sign in to Chrome”
Step 4. Enter the password for your email address, left-click “Next”.
Enter the password for your email address and left-click “Next”
Step 5: Once the system message appears, click OK.
Click "OK"
If you need to add a new account for synchronization:
Step 1. Select the button with the name of the activated account. Right-click on it.
Right-click on the name of the activated account
Step 2. Select “Manage users” by left-clicking on the item.
Select “Manage users” by left-clicking on the item
Step 4. Enter the name of the new account and select its icon. If you want to create a separate desktop shortcut to log into your account, click “Add”. If not, uncheck the checkbox and click “Add”.
Enter the name of the new account, select its icon, leave or uncheck the “Create shortcut…” checkbox, click “Add”
Log in to your account on any device and wait for synchronization (a few minutes) - you will have access to all tabs without additional actions.
Method 2: Export to file
If you do not want or cannot set up synchronization (for security reasons, if you do not have access to the Internet, etc.), the list of saved pages can be exported to an external file. This file can be connected to Google Chrome on another computer or to another browser.
To export bookmarks to a file:
Step 1. Left-click “Bookmark Manager” via “Customize and manage Google Chrome” → “Bookmarks”.
Left-click on “Customize and manage Google Chrome”, then “Bookmarks”, then “Bookmark Manager”
Step 2: Left-click on the three dots “Manage” icon.
Left-click on the icon with three dots “Management”
Step 3. Select “Export bookmarks” by left-clicking on the line.
Select “Export bookmarks” by left-clicking on the item
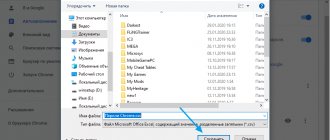
Step 4. Select a location to store the folder and enter a file name, left-click and click “Save”.
Set the file name and storage folder, left-click and click “Save”
How to enable “remembering” passwords in the browser
Via PC
This option will allow you not to bother with remembering passwords for logging into the site from your smartphone. To set up synchronization:
- Log into your browser from your computer.
- By default, this option is always enabled. To check this, click on the circle to the right of the address bar with your account parameters. There, click on the key-shaped icon, the leftmost of the three.
- Next to the “Offer to save passwords” function, the slider should be in the on position. This is indicated by the color blue. Move the slider to the right if it is inactive.
- In addition, you can configure automatic saving of data for authorization on sites. Go to the same account menu – “Passwords”, and move the slider next to the “Automatic login” column to the “ON” position. This way you will save yourself from having to log in to the site every time.
Procedure
The flexibility of Google Chrome's operation and settings allows you to delete previously saved user data in several ways. You can clear all information for logging into a specific site - login and password, or selectively.
Removing a password on the site
Let's start with the fastest and easiest way to remove passwords. You can run it directly from the site to which you want to disable automatic access:
- Launch Google Chrome.
- Go to the page for which you need to delete your login and password.
- At the end of the address bar you will see a key icon, which indicates that automatic login has been saved for this site.
- When you click on the key below, a form with information about the site will appear. Next to the password there will be a trash can icon indicating “Delete”. Confirm your action and delete the data.
This method is especially convenient, since you do not need to specifically enter the browser settings and selectively delete the password to make changes.
Individual password removal
The next method is suitable for those who want to erase passwords from several selected sites at once. To carry out such a procedure, you need to go to the corresponding Chrome settings menu:
- Open your browser.
- Click on the menu button in the upper right corner (three vertical dots).
- From the drop-down list of functions, select “Settings”.
- Go to the settings page, stop at the “Autofill” section.
- Click on the “Passwords” item.
- In the column with saved passwords you will see the name of the sites, and opposite the login key (password), which is encrypted with dots.
- To delete login information for a specific site, click on the trash can icon at the end of the line or on the three vertical dots, where the “Delete” function will appear.
- Confirm your action, and the site is removed from the saved pages for automatic login.
It will not be possible to mark and delete several sites with passwords at once. Only by selectively clicking on each one. Not everyone knows, but by clicking on each site from the list, you can not only delete several resources and passwords for them individually, but also preview the password for any site. To do this, just opposite the site name after the dots, click on the eye icon. The browser will immediately display the password. Before deleting, you can view it to remember it or log in to your page from another device.
Removing all passwords
Another similar and relevant method where you can delete all passwords for sites in Google Chrome at once. This radical method allows you to get rid of any data that helps you log into the site without entering a password, as well as view the password in the settings. The algorithm of actions is quite simple:
- Open Google Chrome.
- Go to settings via the menu button.
- Select “Advanced” at the end of the settings page.
- In the “Privacy and Security” section, click on the “Clear history” item.
- The browser will take you to a new page with your browsing history; on the left you will see a “Clear history” button.
- A window with settings for deletion will appear on the screen. In it you need to indicate the time period “For all time”, and in the paragraphs below, check the box “Passwords and other data”.
- Next, click “Delete data”.
You can quickly go to the menu to clear history by using the hotkey combination Ctrl+H.
Thanks to this convenient function, you can delete passwords and other data for any period of time working in the browser, as well as a number of other unnecessary saving parameters - history, cache files and cookies. Regularly clearing Chrome of such data will make it work faster and safer. You should know that if you have set up the synchronization function with other devices in Chrome, then when you delete passwords, they will be erased from the cloud, and therefore from other devices too. If you do not want this, then disable synchronization (Settings-Users) before deleting.
Export options
Save to file: export from Google Chrome
Enable the feature in experimental settings
The order is:
- In the browser address bar, enter chrome://flags/#password-export and click Enter.
- You will enter the experimental settings menu. In the search bar write Password import. When this option appears, select Enabled from the list to the right of it.
- Then click on the big blue Relaunch button to restart Chrome.
The screenshots show how import is enabled. It's not a mistake. My browser no longer has an export setting. This is true for older versions of the program.
Instructions for saving
- After restarting the browser, call the main menu by clicking on the ellipsis. You are interested in the “Settings” category.
- Click on the "Passwords" category. In it you will see a list of sites with saved login data. Click on the ellipsis to the right of the table of contents, and there configure the “Export” option.
- A window will appear. In it, select “Export”.
- Name the file as you wish and determine where it will be stored.
Subsequently, you can easily open this document using Excel. And if you don’t use Google data in your browser in the future, it’s better to delete it from Chrome for security reasons.
Export from passwords.google.com service
Another option for transferring data involves logging into your account settings. For this:
- Go to Google and click on the purple circle at the top. Select the "Account Management" option.
- In the box on the left, click “Security.” Scroll the slider all the way down on the right until you see the “Password Manager” tab. Click on it.
- You can get here in another way. Just enter passwords.google.com in your browser. After that, click on the gear icon.
- Click on the “Export” button next to the corresponding line.
- A warning window will pop up. In it, select “Export” again.
- The Google Passwords CSV file will begin saving. When it is completed, a check mark will appear next to the “Export passwords” line.
Options to transfer bookmarks from Google Chrome to another PC.
Enable the option Import missing passwords in Chrome
Here's how you can activate the feature:
- Open your Chrome browser and type chrome://flags/#password-import-export into the address bar. After pressing Enter, you will be taken to the Chrome flags page.
- Select the "Activate" option from the drop-down menu. Chrome will then ask you to restart your browser. Click "Restart Now" to restart your browser.
- Open Chrome Password Manager by typing chrome://settings/passwords or going to the Settings menu and selecting the Manage Passwords option in Advanced Settings.
- To export your password list, simply click the Export button. A window will open asking you to enter your user account password. After entering the password, the “Save” window will appear.
- The browser will automatically save your list of passwords in a simple csv text file. From there, you can import all passwords into a password manager that supports "csv" import.
- For those who want to import passwords, simply click the "Import" button. Unlike exporting passwords, Chrome doesn't ask you for your account password. Simply open the "csv" file containing your password and Chrome will do the rest.
One important thing to keep in mind when exporting passwords using this method is that Chrome creates a list of passwords in plain text. When you're done importing passwords into your password manager, you should delete the file immediately to prevent it from being triggered accidentally.
If you can't import passwords into Google
If the system gives an error during import, check what format the data file is saved in - it should be in csv form. If you see a different format, try resaving the correct file from your browser.
If the file format is correct, try updating it:
- Open the csv file with the data.
- Check the first line. The data in it should be presented in the form “ url,username,password ”. If the line contains a different name, change it to the correct one.
- If the name of the first line is correct, but the file is not imported, try replacing it with “ username,password,url ”.
- Save your changes and close the file, try importing it again.
Also check the number of saved passwords - the number for import is limited to 3000. If there are more login data in your table, split them into several files and upload each of them separately.
Importing and exporting passwords allows you to transfer login information between browsers. This action saves the user time - you do not have to manually enter authorization data each time. Import and export also allow you not to keep all the passwords in your head - you can access the necessary web pages automatically from any browser and from any device.
How to export passwords from Yandex Browser on a computer
Quick export is only possible to the Opera application - other popular browsers prohibit transferring data from Yandex.
In Google Chrome, Opera, Mozilla Firefox on the same computer
To copy passwords from Yandex to Opera, you need:
- Open Opera, click on the browser icon in the form of the letter O at the top left. In the gray menu, select “Settings”.
- Scroll the page to the “Synchronization” block and click on “Import bookmarks and settings.”
- In the drop-down menu, specify Yandex (as a data source). Make sure the checkbox next to “Saved Passwords” is checked. If necessary, mark other types of data to move. Click on “Import”.
- Click on “Done”.
If passwords do not appear after export, you need to restart Opera.
Importing passwords into Yandex Browser is possible: you can transfer data from Microsoft Edge, Internet Explorer, Opera, Chrome.
How to do it:
- Go to Explorer to: C:\Users\%username%\AppData\Local\Yandex\YandexBrowser\User Data\Default. Instead of %username% there should be the name of the current PC account.
- Find the Login Data file in the folder. This is where all passwords from Yandex Browser are stored. Right-click on the file and select the “Copy” action.
- Go to the same folder, only for Chrome: C:\Users\%username%\AppData\Local\Google\Chrome\User Data\Default.
- Right-click on an empty space and select “Paste” or press Ctrl + V.
- Restart Google Chrome. As a result, all Chrome passwords should be replaced with data from Yandex Browser.
In Google Chrome, Opera and other browsers on another PC
You can use the previous method of transferring the Login Data file to the Chrome folder, but here you need to first transfer the file to another PC - using a flash drive (or other drive) or via Bluetooth.
To transfer, you can also use synchronization in third-party password managers, for example, LastPass (browser extension), 1Password, Kaspersky Password Manager and others. Before you transfer anything, you need to manually enter all the data into the application.
Import methods
Transfer from other browsers through Chrome settings: import from Opera, Firefox, IE, Yandex
You can use one of the other web browsers installed on your computer for this task. The transfer algorithm is as follows:
- Go to the already familiar Chrome main menu, click “Settings”.
- You will immediately see the “Me and Google” section. Left-click on the “Import bookmarks and settings” option.
- A window will pop up. First, select your desired browser from the list above. In the “Items to import” field, there are usually checkboxes next to each item by default. You can remove the ones you don't need. But remember: opposite the line “Sites with saved passwords” there must be a checkbox. When you have selected everything, click “Import”.
- After a short time, the system will notify you that the transfer has been successfully completed. Click "Done" to exit the menu.
Load from CSV file
Enabling the feature
If the proposed method does not work, then try transferring the data to Chrome from the saved CSV file. The algorithm of actions is similar to the one during export:
- Enter chrome://flags in the address bar.
- Select Enabled in the list next to the Password import function.
This will enable the option, but you will need to restart Chrome to continue working.
Procedure in Chrome settings
- After restarting the browser, go to the main menu, to the “Settings” category. There, go to the “Passwords” tab.
- If you enabled the option correctly, when you click on the three dots at the top of the list of sites with saved login data, there will be 2 positions - “Import” and “Export”. Choose the first one.
- Through the window that appears, find the saved CSV file. After a short time, all your login data for sites will be imported into Chrome.
If necessary, you can easily deactivate this option. Follow the familiar path chrome://flags, and next to Password import select the Default item.
Ways to recover your Internet password on your computer
Connecting and setting up the ZyXEL Keenetic router model Lite II
How to find out the Internet password on a computer is the most common question among users who have lost it. You can restore it:
- using special programs;
- by calling the provider’s online support;
- independently through the provider’s website.
Special programs
First you need to determine the type of connection you are using. Since cable Internet can be connected in two ways: in router and bridge mode.
If there is no high-speed connection in the PC’s network environment, but there is Internet access, then the first type of connection is used. In this case, the Asterisks Key program will help you recover your password. It's quite simple to use. To do this, you need to launch it, and then open a window with the hidden code. In this particular case, you will need to go to the router settings and find the page with your account information. Select a closed message and click the “Recover” button in the program. After which the necessary data will be displayed in the program window.
A connection in bridge mode implies the presence of that same high-speed connection. In this case, you can view the forgotten code in the Dialupass program. To do this, you need to download and run it by opening the file with the .exe extension. After launch, the program window will appear. It will display all the connections available on the computer and the accounts used for them.
The utility is free, does not require installation on a computer and supports work from removable media.
Call the provider's online support
You can also find out your forgotten home Internet access code from your technical support operator. To obtain information, you will need to confirm the client's identity. Each service provider uses a specific set of data for this. However, most often they ask for the subscriber’s full name, residential address and passport details. Some of them may ask for a code word.
Technical support numbers for the most common operators:
- 88001000800 - Rostelecom;
- 88007008378, 0611 - Beeline, and the short number is used for calls from mobile phones;
- 88002500890 - MTS.
Independently through the provider’s website
You can also recover your Internet password yourself. To do this, you need to log into your personal account on the provider’s website. If there is no registration there, you must register.
Step-by-step instructions for recovering your Beeline account password:
- Authorization in your personal account.
- Click on the link “How to get a password”.
- Select a user account.
- Enter your login and click on the “Check login” button.
- Check your phone by entering its number in the appropriate field and clicking on the “Check phone” button.
- Click on the “Get password” button.
For other operators, the scheme may be slightly different, but the meaning remains the same. does not support this feature. In your personal account, you can only change the password, but to complete the procedure you must enter the old key.
Opera
Ways to save data in the Opera browser.
Method No. 1
Read also: TOP 15 browsers for Windows: Choosing the best
- Just like in the Chrome method, you must first display all hidden files and folders in order to gain access to those files in which Opera stores the necessary data.
- Then follow the steps shown in Fig. paths:
The path to storing passwords in Opera
- In the last folder in the address - Opera, you need to find and copy the following files to a safe place (preferably to removable media):
- file with all settings of the express panel – speeddial.ini
- file containing passwords – wand.dat
- file with favorites and bookmarks – bookmarks.adr
Files with passwords and bookmarks
File names in different versions of Opera may differ, so if you don’t find them, it means they are named differently: ● Passwords – Login Data
● Bookmarks
● Express panel settings – favorites
After reinstallation, you must send all copied files back to the folder from which you copied them. If they are already present there, just replace them.
Moving replacement files back to the original folder
After further logging into the browser, all settings should be restored to the ones you had before the reinstallation.
Method No. 2
Read also: TOP 3 ways to update the Opera browser to the latest current version absolutely free
Synchronization with your Opera account.
- First, you need to select the “Synchronization” in the Menu.
If you already have an account, then log in, if not, you need to create one.
Synchronization in Opera
- Enter your registration or login information and log in to your account. Right there, you can immediately change and select the data for synchronization.
Login to your account to sync
- When choosing the data to synchronize, we advise you to mark everything in case it may be needed in the future. Next, click “OK” .
Additional synchronization settings
- And after applying the settings, you should see a green checkmark next to the user icon to confirm that synchronization is enabled.
Enable synchronization
Where are passwords entered in any Internet browser stored?
A password is also data entered by a person. It doesn't matter whether they are encrypted or not - they must be stored somewhere on the user's computer.
As a rule, all passwords are recorded in service history files created in the folder where the browser itself was installed. It also doesn’t matter whether it’s a regular version of the browser or a portable one (launched without installation). For example, for Mozilla Firefox this is the folder C:\Program Files\Mozilla Firefox\ - not only passwords are recorded in one of the subfolders of the Mozilla Firefox folder itself, but also their logins, and the history of the sites on which these passwords were entered. In the case of the portable version, this may be another location on the computer disk, or removable media (not necessarily the system partition of the hard drive) where you copied Firefox - for example, the G:\MyPrograms\FirefoxPortable\ folder.
Everything is clear with disk storage. Passwords are stored there in encrypted form, making it more difficult for viruses to read them and send them to the attacker’s server. Passwords are displayed in their normal form directly from the browser itself - as you entered them, that is how they remain. If the portable version of your browser, located not on the “system” drive, but on another drive, has not been changed, then passwords can be stored indefinitely - at least 10, at least 15 years, as long as your PC is in good working order. To get to your passwords, each browser - Mozilla Firefox, Google Chrome, Opera or Yandex.Browser - has a corresponding control called “Privacy” (or “Data Protection”).
If passwords are not saved
Reasons for not saving passwords:
- auto-filling of logins and passwords in the browser settings by the user is disabled;
- Browser and Windows system settings were changed using Trojans;
- programs are used to “automatically rollback” the Windows system every time it starts (for example, Reboot Restore);
- Service files are damaged or accidentally deleted from the browser folder and Windows recovery point databases.
Is it possible to disable automatic import
You can disable automatic import of passwords from other devices by disabling synchronization. Click on your profile picture in Chrome, select Sync, click Disable. This way, passwords will only be saved on this device and will not be transferred to others.
If you want to ensure that passwords are never automatically imported into your browser using different files, disable the special “password import” flag in chrome://flags/#PasswordImport. Switch it to Default or Disabled and press the blue Relaunch button.
Mozilla Firefox
Passwords can be exported from Mozilla Firefox to a separate XML file. To do this:
- Open your browser and click on the three stripes icon.
- Select the "Add-ons" sub-heading - you need to enable the Password Exporter extension.
- Enter the name in “Search” and click the “Install” button.
- Wait for the process to complete and restart your browser.
- Now go to Settings Firefox again.
- In the list on the left, find the item “Protection” - “Import/export passwords”.
- Select Export.
- Specify the folder in which you want to save the document and confirm the operation.
In Mozilla Firefox, you can import passwords from Google Chrome and other browsers directly or from a file. Let's try the first option first:
- Open Firefox and click the familiar icon to go to the menu.
- Select the “Bookmarks” section and expand everything.
- Click the "Import" button and specify that you want to transfer data from another browser.
- Indicate the name of the previous surfer.
- Click the button to start the import process.
If you have a document with passwords saved, you can transfer them from there:
- Here we take all the actions described above, where we talked about exporting passwords, and reach point 7.
- Now, instead of “Export”, click “Import”.
- Specify the path to the data file.
Please note that when writing an XML document, you cannot enter Cyrillic letters into it - they will be recoded into meaningless characters
Synchronization: a way to “copy” your passwords to Google servers
There is a reliable option for transferring input data to other devices that use Chrome. We are, of course, talking about synchronization. When it is enabled, you will not need to re-enter your login information on sites each time. In addition, using synchronization, you can set up automatic transfer and change of passwords in another browser. This option is not always useful. If necessary, you can disable it through the settings of the browser where you import data from Chrome.
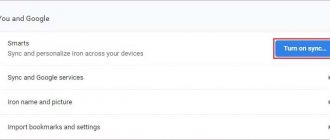
To enable the option, go to settings, then to the “Me and Google” section and click the “Enable synchronization” button.
Similarly, through the settings section, synchronization is enabled on a mobile phone with Android.