Views: 1,818
What is TWRP recovery? This is a modified recovery. Stands for Team Win Recovery Project. Recovery is a mode into which the phone is transferred for various manipulations with it, for example, for recovery.
It allows you to install custom firmware. Unlike stock (built-in) recovery, it has touch controls and more advanced functions. It is also needed to create a backup of your phone. It has control over the entire operating system, allowing for finer tuning, down to the kernels.
For example, on Xiaomi phones the stock recovery is called Mi Recovery.
They usually enter this mode by pressing certain keys, each phone has its own key combination, but in most cases the procedure is as follows - turn off the phone, press volume up + power at the same time and hold (sometimes volume up + power + home).
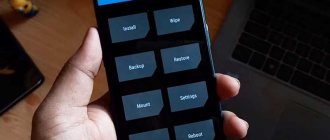
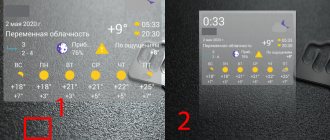
This is what the TWRP recovery menu looks like:
There is also another custom recovery called CWM recovery.
How to install TWRP recovery? There are two ways: 1) through a computer and you need an unlocked bootloader 2) through your phone and you need root rights.
Installing TWRP recovery via phone
Using TWRP Manager
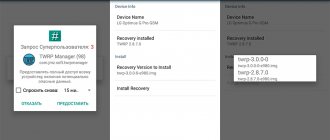
To do this, you will need root rights and a special application. You can use the TWRP Manager application. It can be found on the Play Store. This application is highly specialized, it can only determine the phone model and download twrp with its further installation. We assume that you have rooted the app and downloaded and installed it on your phone. When opened, it will ask for super-user rights, grant them to it. Next, everything is done very easily: we must indicate our phone and download twrp from the list that TWRP Manager will offer. Specify the phone name in the Device name section, and download twrp from the Recovery version to install section. When you have completed all the steps, click Install recovery.
Using Flashify
Similarly, you can install TWRP recovery using the Flashify application. Install this application from the Play Store, open it, and give it super-user rights. In the recovery image item, you will be able to download recovery, if you do not already have it, using the Download TWRP link. Or, if you downloaded twrp in advance, and you already have it on your phone, then you can select choose a file, an explorer will open in which you can select the downloaded twrp. Then click YUP! The installation is complete.
Using Rashr
Another Rashr app. Install and open the application. There are several types of recovery available in the menu. Select the one you need and install. Don't forget that root rights are required here too.
Using the Official TWRP App
Download the official application from the TWRP developers called Official TWRP App. When you install the application and open it, check the first two boxes, otherwise you will not be able to launch it. These two points disclaim responsibility and grant super user rights to this application. Next, in the main menu we will be offered several items. At the moment we are only interested in one item called TWRP Flash. Once you click on it, you will be presented with two menu options, we need both of them. In the first paragraph we will determine our phone and the twrp version for your model. Select the twrp version from the list that appears.
If you purchased this application, then you can install twrp directly from here, if the program is free, then you will be redirected to the site for downloading twrp. I hope you can download from the site, look for the Download button there. After twrp is downloaded, click on the second application menu item (select a file to flash), you will be asked to select a twrp file to install. Approximately look for it in the phone folder called Download, this is, of course, unless you yourself have redefined another folder for the downloaded files. Also, for the purity of the process, rename the found file to twrp.img. Official applications usually have such a requirement.
Once you have found the file, mark it with a checkmark and press select at the bottom of the window. After this, a window will appear waiting for confirmation that this is the file you need to install - click Flash to recovery. If everything went well and twrp was installed, then they will write to you Flash Completed Successfully.
Installing TWRP recovery via computer using fastboot
Let's assume that the bootloader of your phone on which you want to install TWRP recovery is unlocked. We will also agree that you are able to install Fastboot and ADB on your computer. If not, then let’s quickly go over how to do it.
Installing ADB and Fastboot on your computer
- Come here. Go down to the words Command line tools only. Download SDK tools package. It will be in the archives.
- Unpack the archive to the root of the C:\ drive
- In the tools folder there is a file android. You press it.
- The Android SDK Manager window will open. Check the Android SDK Platform-tools item and click the install 1 package button (which means install this one package).
- I think you can install it yourself, remember which folder it was installed in, it will probably be the platform-tools folder, in the folder we are interested in two files called adb and fastboot. We will also upload the twrp file there later.
Enable USB debugging
Take care first of all the drivers to connect your phone to your computer.
Next, we connect the phone to the PC, naturally via a USB cable. You also need to enable USB debugging on the handset, this is easy to do, the approximate path to follow in the mobile menu is as follows: settings - for developers - USB debugging. The same can be done in another way: turn off the phone, hold volume down + power (this combination works for Samsung, Xiaomi phones). This way you can enter download mode. This is needed to synchronize your computer with your phone. However, as always, it all depends on your model, look for a combination of buttons for your device!
Running the command line
1st method - launch the command line where we are now, and go inside it to the desired folder
Launch the command line (right click on Start on PC). The command line may be called Windows PowerShell. This command line can be opened in another way: you can find a program called Run in the program menu on your PC in the utility category, you can also call it by pressing the Win + R key. In the Run window, write cmd, this will launch the command line.
That is, we open the command line in two ways:
1) right-click on Start, select Command Prompt or Windows PowerShell (which is the same thing);
2) Win + R keys, in the window that appears called Run, write cmd and get a command line.
Why do we need a command line? Fastboot is a console thing (works via the command line). We need to go to the command line to the location of the folder with ADB and Fastboot. To do this, we need to find out the exact path where this folder is located. The explanation looks like this:
for example, if we want to find out the address of the General folder (everyone has it on their computer, we just need to go to drive C, then to the Users folder, then to the General folder. Are you there? We are now in Explorer in the General folder. We raise our eyes higher and see the line where it says:
This PC > Local Disk (C:) > Users > General
This is the address for the person. This is how we understand where we are now. For a car, the address will look different. Move the cursor to the empty space to the right of the word General and click in this field, the address will transform into:
C:\Users\Public
This is the address for the car. Similarly, you should find out the address of the folder with ADB and Fastboot (in fact, in the vast majority of cases, the folder with adb and fastboot will be called platform-tools). After we have found out the address, write on the command line:
cd folder address with ADB and Fastboot
Pressed Enter (for example: we found ADB in the platform-tools folder, which in turn is located in the android-sdk-windows folder. Then we will write in the command line: cd C:\android-sdk-windows\platform-tools).
With this action we went to the ADB and Fastboot folder. We are in it, but not through the usual Explorer, but through the console.
2nd method - open the command line directly from the desired folder
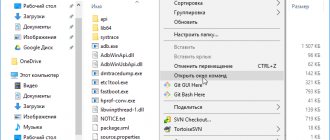
There is another way to open the command line from the folder with adb. Open this folder, hold down the Shift key and right-click on an empty space inside the folder. In the context menu that appears, select Open Command Prompt Here or Open PowerShell Window Here. This is a faster way. That is, we no longer need to go to the folder location on the command line; we immediately opened the console from this folder.
Booting into fastboot mode
Next we need to put the phone into fastboot mode. We write on the command line:
adb reboot bootloader
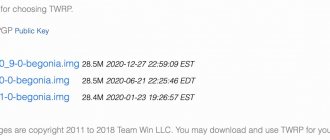
We see the corresponding picture on the phone. Next, download TWRP to your computer, follow this link and select your device. Choose the version for Europe. The downloaded TWRP must be placed in the same folder where we have ADB and Fastboot. That is, the three of them will already be there (plus a bunch of necessary files). Let me make a reservation right away that your downloaded TWRP may have a hefty name. Let's make it shorter. Rename it to twrp.img. This will make it easier to handle.
What do we have at the moment? We switched the phone to fastboot mode, we have it connected to the computer, the command line is open with a changed location in the folder with adb, fastboot, twrp files.
Direct installation of twrp after all preparations
Now we write on the command line:
fastboot flash recovery twrp.img
This command installs TWRP recovery on our phone. In this command, twrp.img is the name of our twrp file (we agreed to rename it shorter), but if you did not change the name, then write your name instead. If everything went well, you will see finished and so many seconds in the console. We return the phone to normal mode with the command:
fastboot reboot
If we do not want fastboot reboot (return to normal mode), but want to boot into recovery directly from the console (from the command line), then we will use the following command (write on the command line):
fastboot boot twrp.img
And if you disconnected from the computer, but have not yet rebooted the phone, and it is still in fasboot mode, then you see a menu on the phone screen, you can select recovery mode with the volume key and press the power button to confirm the choice. This way you can go into recovery.
If you have Xiaomi, then you can disconnect from the computer, turn off the phone and enter twrp using the Volume Up + Power keys held down.
Let's now briefly describe installing TWRP on Android via a computer:
- Installing adb and fastboot.
- Connecting the phone with a cable to a computer with USB debugging enabled.
- Launch a command line, go inside this command line to the location of the folder with the adb and fastboot files (or launch the command line directly from the folder with adb).
- Download TWRP for your phone, move this file to the folder where adb and fastboot are located.
- Run the following commands on the command line:
adb reboot bootloader
fastboot flash recovery twrp.img (- where twrp.img is the name of the twrp file)
fastboot reboot
If you suspect that the computer does not see the phone, then type adb devices in the console, this command checks whether the console sees your phone. It will show up in the console if everything is ok.
Problem solving
If you encounter any problems while working with fastboot, there are two most common reasons:
- You are trying to use Fastboot over USB 3.0. This does not work on all devices, use USB 2.0. If there are no such ports on your PC, use a USB 2.0 hub.
- You are using an old version of fastboot. Just download the new version from the official website. It is not necessary to install it, just unpack it into any folder and can be used instead of the system one.
Installing TWRP recovery via computer using Odin
This method is suitable for owners of Samsung phones and tablets. If you have already flashed Samsung via Odin, then installing TWRP will not be difficult.
The actions will be as follows:
- Download and install Odin. Choose.
- Download TWRP from here.
- Launch Odin.
- Uncheck the Auto reboot option in the Odin program.
- Press the AP button and select our TWRP.
- Click Start.
- On the phone from the off state, we boot into the firmware mode: volume down + home + power (hold). Loaded up.
- We connect the phone with a cable to the computer.
- Odin saw the phone and installed TWRP on it.
- Be sure to immediately load into TWRP using the combination of buttons for your device (you need to look for this combination of buttons in advance), since there is a risk that TWRP will crash immediately.
Installing TWRP recovery via computer using SP Flash Tool
SP Flash Tool is a computer program with which you can install an operating system on your phone. You can also use it to install TWRP recovery. You can download this program from this link. Next you need to install and run it. Phone drivers should already be installed on your PC. You should also already download TWRP recovery. The download link can be found above. When you launch the program, immediately go to the settings and check the box DA DL ALL With Check Sum.
On the main page of the program, in the Scatter-loading item, you need to put the TWRP recovery scatter file (look for this file in the recovery archive). Put your phone into firmware mode. On Samsung, volume down + power from off state. Click Download in the program on your PC. Connect your phone with a cable. The installation of TWRP recovery will begin.
Advantages of third-party recovery
In addition to the functions that the stock recovery mode offers, this one can do a lot of other things, namely:
- install Root without a PC;
- install .zip documents with firmware and mods;
- update your smartphone to the latest version of Android;
- easy to create backups.
Disadvantages of custom recovery:
- a chance to disrupt the phone’s functionality as a result of incorrect operation;
- loss of warranty after installation.
There are many advantages, especially for geeks and those who want to install third-party firmware on Android. However, you can actually turn your phone into a “brick” by performing incorrect manipulations in recovery mode. Be careful and don't do anything you're not sure about.
What to choose, TWRP VS CWM?
There are two popular Custom recovery:
- Team Win Recovery Project (TWRP) is characterized by a minimalistic interface with large buttons and user-friendly graphics. It also provides the opportunity to conduct work in Russian. The system has more features than CWM.
- ClockworkMod (CWM) has an outdated design and navigation is done using hardware buttons (volume and power keys). Unlike TRWP, CWM does not support touch input and has fewer options on the home screen.
In 2022, we recommend the first option as it has better support and is easier to manage.