Popular Graphic key - how to unlock it on Android if you forgot it
Android - what is it on a phone: Details
How to open and configure the engineering menu on Android - instructions and secret codes
Can't connect Android to WI-FI network?
“Phone memory is full” on Android: reasons and solutions
Commented by Zheim Happer 02/02/2021 18:52 Deleted Stk.apk, no problems :-)… Removing system APKs
James Happer 02/02/2021 18:50 Deleted Stk.apk, everything works as it should. I even noticed a certain article... Removing system APKs
Maksim 01/26/2021 11:50 Smart Launcher is essentially a third-party shell for Android... How to hide applications on Android
Tahir 01/23/2021 06:23 Cash. Memory... Solving the problem with files on the...
Arayka 01/17/2021 19:52 How can you hide an application in a smart launcher? You can or... How to hide applications on Android
fans-android.com › Android
April 20, 2020
Author: Maxim
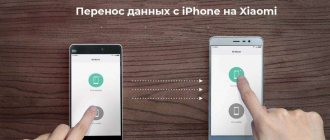
Transferring data from an Android phone to an Android phone is an extremely important and always relevant topic. Every year many new devices are released on this OS, and when purchasing one, you always want to keep everything that was on the old one.
Therefore, it is extremely important to know how to transfer all data from Android to Android phone or tablet quickly and correctly so that problems do not arise in the future.
In the previous article, we looked at how to create a Google account and how to link it to your smartphone. Now we will understand in detail and with examples how to transfer all information from Android to Android.
Interesting! Transfer of information/data can be done on any device with this OS, regardless of its model, be it: Honor, Xiaomi, Samsung, Sony or others.
On the current device we do:
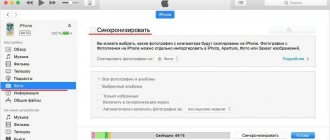
1. You must have a Google account created and connected to the device. Go to settings, open the accounts section and see if it is added, if not, then do it. Go into it and check all or only the required items to the active position. Click on synchronization so you don't have to wait for it to happen automatically.
2. If you are using a smartphone with a version of Android up to 8. In the settings, open the “Backup and reset” section (it may be called a little differently if you are using a third-party launcher). And enable the data backup option in it. Add your account for reservation here.
The activated auto-recovery function will automatically configure a new phone with the specified account in the same way as the old one was configured and transfer the data from the backup copy.
2. On new OS versions starting from Android 8, go to the “System” section in the settings and then open “Advanced settings”. The backup item will be here - open it and enable the function of uploading data to Google Drive, if this is not done by default. Then click on “Start copying”.
On a new device:
When activating a new smartphone or resetting it to factory settings. When enabled, indicate your Google account. You will be prompted to restore data from your previous device - select it from the list.
Already on the activated smartphone, go to the device settings in the “Accounts” section. Add the one that was on your old device and sync all data.
Interesting! If you need to transfer additional photos and other multimedia files, you can use Google Drive or other provisions. Read about all the ways to transfer pictures in the material - how to transfer photos from Android to Android.
Using apps
We will only consider software that really works and is confirmed by positive reviews from users who have used it.
Copy My Data
Address: Phone Clone
It will copy information from the old device to the new one extremely quickly and without problems. Quite a lot of positive reviews on Google Play. Allows you to copy: contacts, calendar, photos, videos.
Phone Clone
Address: Phone Clone
Works on many phone models, copies: contacts, messages, calendar, notes, photos, call list.
X-Transfer - Share/Backup Files/Contacts/SMS/Calls
Address: Phone Clone
An excellent solution to quickly transfer contacts, SMS, call lists and photos. It works quickly and efficiently - there are many positive reviews.
phone clone
Address: phone clone
Allows you to transfer music, videos, photos, contacts, SMS and other data.
CLONEit - Batch Copy All Data
Address: CLONEit
A good application that allows you to transfer contacts, SMS, mms, applications, etc. It works quite well, but judging by the reviews, some smartphone models may not be supported.
Via computer via USB
Connect your device to your computer and transfer the folders with the necessary files to your PC or laptop. Then copy them back to your new phone. You can transfer this way: music, photos and other images, downloaded data and other multimedia.
Also, almost every manufacturer of devices based on this OS has its own application that allows you to backup the device and transfer data to a new one. For example, Samsung has a Smart Switch. But there is practically no point in using them in data transfer, only if other methods do not work. It is better to use them for their intended purpose - creating a backup of the current device.
Methods for transferring information from an Android phone
Since the replacement of smartphones among users is a frequent occurrence, a lot of ways to transfer information have appeared, conditionally divided into three categories:
- Standard tools.
- Third party services.
- Manual transfer.
The first category includes built-in tools implemented by the operating system or user interface developer. For example, the services of the owner of the Android OS, Google, are pre-installed on all devices that have passed certification. Or large companies developing their own shell. For example, Xiaomi with the Mi Cloud service pre-installed in MIUI firmware.
Third-party services include mobile and desktop programs created by Android device manufacturers, private companies or application developers.
The manual method involves data transfer with in-depth user participation . Using tools not included in the first two categories.
Important! The methods in each category are focused on transferring a specific type of data. And the preferred method is influenced by ease of interaction, type, quantity and volume of information transferred.
How to transfer data from android to android using standard tools
The operating principle is based on automatic backup. In accordance with the configured settings and if the Internet is available, the data is synchronized and sent to the server for storage automatically. And since the content is tied to your account, you just need to enter your login and password on the new device to receive a copy of the content.
Automatic backup will allow you to transfer data and settings: phone book contacts, application installations, calendar events, passwords, browser history, etc.
Media files can only be copied to a cloud drive with a fixed capacity. If you have a lot of videos, music and other massive files on your phone, you will have to buy additional space or use other transfer methods.
Below we will look at three ways to transfer data using automatic backup.
Method 1. Transfer data from Android to Android via Google services
Important!
- To create a backup copy, Google services and an account are required.
- Recovery options are affected by the device type and Android version. File migration is not possible or only partially possible if data is being migrated from a later version of the OS to an earlier version. For example, from Android 7.1 to 4.1 or 5.0, etc.
- For multimedia files, Google Drive cloud storage is used. The basic disk capacity is 15 GB.
- Application settings are copied to the server no more than once a day. In this case, you need to connect your Android device to the power supply and Wi-Fi. Also, don’t use your phone for a couple of hours. If the device is inactive for 14 days, Google will delete application data after 60 days. The period is automatically extended when activity resumes.
- Backup for some applications is not supported because the developers have not enabled this option.
Instructions
1. Create a Google account if you haven't already. Go to settings, open the “Accounts” section. Then choose to add a Google account. To complete registration, follow the account creation wizard and enter the required information.
2. Activate backup. In most devices without a modified interface, the parameter is called “Restore and reset”. Activate the option, and also familiarize yourself with the type of data that will be saved. Next, select an account.
Important! To restore the contents of the information on a new Android phone, you need to activate the “automatic recovery function”.
3. For multimedia files, go to Google Drive, click the “Add” button and specify the path to the files. Automatic uploading of photos and images, available in the settings section.
RELATED TOPICS
Backing up apps in Android 6 Marshmallow
How to recover deleted files on Android
Method 2. Transfer data from Android to Android using Mi Cloud
Important!
- The service is available only in MIUI firmware.
- To use Mi Cloud, you must first register a Mi account.
- The basic disk capacity is 5 GB.
Instructions
- Create a Mi account if you haven't done so before. Direct link to the registration page.
- In system settings, open the Mi account section.
- Accept the user agreement and allow access to the service.
- Enter login and password.
- Select the type of data you want to save, and then create a backup copy.
Method 3. Creating a local backup on MIUI firmware
Important!
Local backup does not save multimedia files: music, videos, photos, voice recorders, etc.
Instructions
- Open system settings.
- Select Advanced, then “Backup and Reset”.
- Then – the “Local backup” item.
- In the new window, click on the “Backup” button and select the type of data that you want to save. The “system settings” item includes: Wi-Fi network passwords, messages, call log, etc. The “applications” item—data from third-party applications.
- For convenience, set a schedule to automatically create backups.
- After some time, which is influenced by the amount of information being backed up, a folder with data will appear in memory. Path: Miui – backup – AllBackup. Transfer the folder to the cloud or to your computer so that you can later copy it to a new device.
- To restore files, you should visit the section for creating backup copies, select a backup and click on the “restore” button.
Transferring bookmarks and passwords in the browser
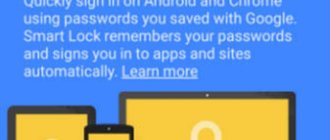
During the Google account synchronization process, the user can save their favorite pages in the browser, as well as saved passwords. To do this, you just need to go to the settings menu, the “Accounts” section and enter the data from your email address.
In addition, many browsers, for example, Opera or Yandex, already have a pre-built page synchronization option that can independently transfer all information and saved passwords from accounts to new mobile devices.
0 0 Votes
Article rating
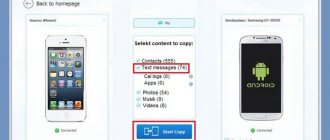
Transferring data from one Android to another Android using third-party services
Transferring information, including photos, videos and music, is carried out using a utility from a specific manufacturer: Motorola Migrate, Sony Xperia Transfer Mobile, HTC Transfer Tool, LG Mobile Switch or Samsung Smart Switch. Or programs written by application developers, for example - CLONEit - Batch Copy All Data.
The listed programs work on a similar principle. The user selects the data type, and then a new Android device with the same program. Next, the application creates a copy of the files and sends it to the new phone.
RELATED TOPICS
Best Data Transfer Apps for Android
The best services to sync photos on Android
Best Apps to Record Smartphone Screen
Method 1: Transfer files using the Motorola Migrate app
- Download the app on your old and new phone.
- Launch the program and establish pairing between the two devices. Using your old device, scan the QR code on your new phone.
- Select the type of data you need to send, and then choose your preferred sending method.
- Wait until the files being transferred are finished.
Important! The Motorola Migrate utility is not supported on Android 7 and above.
Method 2. How to transfer data from Android to Android using CLONEit
- Install and then launch the apps on both phones.
- Activate Wi-Fi. On the old phone, click on the “send” button, and on the new one, “accept”.
- Wait for both Android devices to establish a connection.
- Select the files required to upload and then the appropriate button to confirm
Using proprietary utilities
To transfer all the necessary data, you can turn to proprietary utilities for help. For example:
- MyPhoneExplorer - this free utility allows you to exchange various information between devices for free. To transfer data, you can use a USB cable, WI-FI connection and even Bluetooth;
- CLONEit is the best application for transferring data without connecting to a personal computer;
- Autosync for Google Drive – using the presented application, you can transfer not only photos or documents, but also the settings of the device itself. Moreover, it is possible to configure certain time intervals at which files will be automatically saved in the service.
How to transfer data from android to android manually
Manual file transfer is useful when you need to transfer a specific type of information or a selected group of files. For example, music, videos or application data. Moreover, sending directly to a new Android device, cloud storage or computer is available.
RELATED TOPICS
How to synchronize Android with computer: 4 ways
What is synchronization in an Android phone?
Method 1: Back up applications using Titanium Backup
The program allows you to selectively or completely create a copy of installed applications, or save only the data and then restore it on a new device. In this case, you must obtain ROOT rights on both smartphones. For details, visit the corresponding section of our resource.
Instructions
- Open Titanium Backup on your old Android device.
- Click on the "Backups" tab.
- Select the application you are interested in and click the “Save” button in the new window. The backup will start automatically. For the duration of creation of the r.k. influenced by the amount of data.
- To transfer data, hold down the application item until a window with actions appears. Select "Transfer latest backup" and then the data type.
- In the next window, select the desired method for transferring files: email, cloud drive, etc.
- If you need to make multiple backups, check the required applications. For a complete backup, visit the “Batch Actions” section in the menu.
- By default, backups are saved in the Titanium Backup folder on the internal drive. Move the folder to the new device, then go into the program and restore the data of the necessary programs one by one. Or, through the “Batch Actions” section, restore all applications.
Important! Some programs are sometimes restored incorrectly due to hardware and software differences between the new and old smartphone.
RELATED TOPICS
Backing up data in Android and creating it using Titanium Backup
Preparing an Android smartphone to reset to factory settings
How to backup Android firmware
Method 2: Copy files to cloud storage
Cloud storage services offer 5-50 GB of free disk space. Sometimes this is enough to temporarily or permanently store some data, including photos, music or videos. To choose the optimal service, we recommend reading the relevant material below.
RELATED TOPICS
Best cloud storage - TOP 15
Cloud storage
Instructions
- Activate Wi-Fi Internet on your phone.
- Install your preferred cloud storage service client.
- Register an account and/or log in.
- To copy content, in the application, click the “Add” button, and then mark the necessary files.
- Install a similar client on your new phone and log in. Then go to the application and download the necessary information.
Alternative option
Select the required files, click on the “Share” button. In the new window, select the cloud drive and confirm the download.
Method 3. Transferring data to a computer
A convenient method of transferring data in case the old device is damaged - the screen is broken or the sensor does not respond.
Instructions
- Connect your old phone to your PC using a USB cable.
- In the “USB configuration” section, select MPT.
- Wait until the removable drives are displayed. Then copy the necessary data to your computer.
- Then connect your new Android device and transfer the previously copied information.
RELATED TOPICS
The computer does not see the phone via USB
The computer does not see the iPhone
Why doesn't my tablet connect to wifi?
Method 4. Transferring data to a computer via a Wi-Fi router
Instructions
- Install the Moto File Manager app on your old phone.
- Connect your smartphone and computer to the Wi-Fi network.
- In the hidden left panel on your phone, select remote control, and then “connect.”
- Enter the displayed address on your PC in the address bar of Explorer.
- Transfer content from your old smartphone to your computer.
- When finished, stop the connection on the old phone, and then connect the new device to transfer data.
Method 5: Send files using NFC
Important! Data exchange is possible provided that the old and new smartphone are equipped with an NFC module.
Instructions
- Open the system settings of both phones. Expand hidden sections to view additional items.
- Activate the NFC module and the Android Beam function to be able to exchange data.
- Select the files you need to transfer, such as photos. Tap the Share button and then select via NFC.
- Place the old phone against the new one. If necessary, confirm receipt of the files.
Method 6: Transfer files using Bluetooth
Instructions
- Open the settings of both devices.
- In the Bluetooth section, turn the switch to active.
- On your old phone, prepare files to send, select and click on the “Share” button.
- In the new window, select "Bluetooth".
- On the new device, enable discovery.
- Wait on the old phone for the name of the new device to appear, and then select the device.
- If necessary, confirm receiving files on your new Android smartphone.
Method 7. Transferring files using a memory card
If your old and new smartphone support installing MicroSD cards, you just need to transfer the information to the drive and then install the card in the new device.
Important! Do not use this method if the Adoptable storage function was activated on your old phone.
Instructions
- Insert a memory card into your old device.
- Open your file manager.
- Go to the internal memory of the device, select the necessary data and transfer it to the memory card.
- When finished, remove the memory card and install it in a new device. If necessary, use a file manager to move information from the MicroSD card to the internal partition of the phone.
Method 8. Transferring files using an OTG adapter
If your new or old device does not support installing a MicroSD card, you should use an OTG adapter to connect the drive externally.
Instructions
- Insert the MicroSD card into the Card reader, and then into the USB connector of the OTG adapter.
- Connect the assembled structure to the old phone.
- Open a file manager and transfer data to a removable drive.
- When finished, disconnect the drive and connect it to the new phone. Open the file manager and transfer the data to the internal memory.
Method 9. Use Android applications to transfer data
Another effective method of transferring information is data transfer programs. It works provided that both devices have working Wi-Fi and/or Bluetooth modules.
Instructions
- Install one of the programs from the article “Android applications for data transfer” on both devices.
- On the sending device, select the files, then click on the “Send” button or the button with the corresponding function.
- On the receiving device, click on the accept button. Or use the QR code.
- Next, specify the recipient on the sending device. In a little time, the information will be successfully copied to the new device.