On mobile phones running the Android operating system, there is a special “USB debugging” mode that is disabled in the normal state, so some users are looking for an answer to the question of how to enable debugging on a smartphone or tablet.
USB debugging mode allows you to use your mobile device as an external drive: move files from computer to phone, from phone to computer, install applications, view logs.
USB debugging mode is in demand by software developers in the Android operating system to test functions and applications. Regular users will need debugging mode to operate some programs, for example, recording a smartphone screen, restoring data deleted from the phone, creating a backup, flashing device firmware, etc.
Why is USB debugging needed?
In most cases, debugging mode or usb debugging is needed by specialists who develop and test applications. In it, your phone or tablet goes into a special mode. Its main function is to find and eliminate errors in software. But, as mentioned above, for ordinary users it can be very convenient.
First of all, USB debugging helps to flash a smartphone and restore its operation after a system failure, and helps to find accidentally killed files and data. It can be used to create copies of applications, and also if you need to install an application on a device without Google Play.
This mode will also help those who are going to use a device with Root rights.
However, please note that it is better to use the mode for confident PC and smartphone users. If you doubt the correctness of actions, it is better to consult a specialist.
Can you tell a cringe from a crash? Take this fun test and find out!
If none of the methods work
Let's consider what needs to be done if ADB does not see the mobile device. First of all, you need to check the software component, which may involve using unofficial firmware or inappropriate ADB drivers. The OS version can always be downloaded from the manufacturer’s website, and the necessary software from the Google website. Another reason why debugging from a computer does not work is the use of a damaged USB cable or connector. You can check this by connecting your mobile phone using a different wire and into a different connector.
USB debugging is a mode of an Android device in which it provides enhanced access to its OS for computer programs. This feature is actively used by application developers.
But for ordinary users, debugging mode can also be useful. Thanks to it, utilities like PhoneRescue accidentally deleted files. And apps like Helium create mobile device data using a PC. These are just typical examples. There are many different situations in which USB debugging may come in handy.
How to enable developer mode
In order to enable USB debugging on Android and put the phone into debugging mode or debugging mode, you will need to change some parameters on your smartphone. More precisely, switch to developer mode. For this:
- On your smartphone go to the “Settings».
- Select the item “About phone"/"About tablet».
- In the window that opens, look for the line “Build number” / “MIUI Version” and click on it a couple of times (you may have to click 8-10 times, the main thing is to click without breaks).
- You may have to enter a password. As a result, a message should appear on the screen: “You have become a developer.”
- For Developers in the Settings menu .
After that, we proceed directly to connecting USB debugging:
- Open “ Settings ” - “ Advanced ” - “ For Developers ”.
- Here you switch the slider to “On».
- A window will open asking you to allow debugging. Click " Ok ". This way you can solve the question of how to enable or disable USB debugging. After this, you can begin the necessary processes on your smartphone in a special mode.
M or F? Take the test and find out who you are in everyday life: are you a man or a woman?
Connecting your device using Wi-Fi
First you need to get an IP address
and the port of your gadget that is connected to the Wi-Fi network. This can be done using the ADB Wireless program, which is available completely free on Google Play. After launching this application, click on the red button, which will turn into green, and then the connection will begin. Below you can see some service information.
After that, on the computer, press the combination Start + R, in the window that appears, write cmd and press Enter. A command prompt window will appear in which you will need to enter adb connect “Device IP address and connection port.” Now you can take full advantage of the ADB protocol.
USB debugging, how to enable on Android 9, 10, 11
Now we will analyze in detail the process of how to enable USB debugging on different versions of Android. First, let's look at how to enable this special mode on devices with Android 11, 10 and 9.
If you have a shell from the manufacturer, there may be slight differences. For this:
- Let's go to "Settings", select the section "About the phone».
- We find the column “Build number", click on it several times and enter the password, this will enable "Developer Mode».
- Return to the main menu "Settings" and select the tab "System»
- Next, go to the “Additionally”
- Now open the section for “Developers”
- Move the slider to “ON”
What is OEM Factory Unlock?
Starting with Android 5.0, many manufacturers began to implement an additional security mechanism against unauthorized modification of system partitions. As a result, the “OEM Factory Unlock” function was introduced into the “Developer Menu” section; when activated, you will be able to flash third-party Recovery and custom firmware.
Do not confuse “OEM Factory Unlock” with Bootloader unlocking, which is required by many manufacturers - Xiaomi, HTC, Huawei, Google Pixel, Sony.
How to enable debug mode on Android 8, 7, 6, 5
To enable the special usb debugging mode or USB debugging on older versions of Android: 8.7, 6, 5, you have to follow similar steps.
- Enable “Developer Mode” in the same way as on newer versions of Android through “ Settings ” - “ About phone ”.
- After that, go again to the “ Settings ” - “ For Developers ” tab.
- Find the line “ Debugging ”. Here we enable the “ USB Debugging ” function.
How to enable USB debugging on older versions of Android 4.2 and below
If you need to enable debugging mode on older versions of Android, below 4, then you have to go through completely different steps.
- Open "Settings" and go to the tab "Applications».
- Next we go to the window “Development».
- Afterwards we enable USB debugging mode.
- To confirm, click “ Yes ”.
Take the test on the topic “Legends of the 90s”, remember which of these you had?
USB debugging on Samsung
The USB debugging mode on Samsung devices is enabled a little differently. First, just like in the above options, we check the operation of the “Developer Mode” function. For this:
- Go to the “ Settings ” menu, select the “ About phone ” section and turn on this mode.
- Go to “ Settings ”.
- Click on the “ Developer Options ” icon, it will appear after activating developer mode.
- You will see a tab listing all available options in an expanded format. Select the “Debugging” section. Activate “ USB Debugging ”.
- Allow the phone to debug via USB. Click “Ok”.
Inclusion
- Open Settings → Options tab → Developer options.
Find the “USB Debugging” item and check the box next to it.
On Honor Huawei
Using similar instructions, you can enable debugging or usb debugging mode on devices from Honor and Huawei. For this:
- Turn on “ Settings ” - “ System ”.
- Select the “ About phone ” tab.
- Click on the line “Build number” several times until the message: “You have become a developer!” appears.
- After that, we return to the “ System ” section and go to the “ For Developers ” tab.
- We find the line “USB Debugging", turn it on.
- Confirm the action – “ Ok ”.
What instrument are you? Take the test and find out
How to enable USB debugging on Android Xiaomi
The process of connecting USB debugging on Xiaomi phones and tablets is also easy. For this:
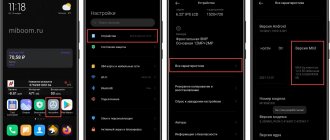
- In the “ Settings ” menu, select the “ About phone ” column.
- Scroll to the line “MIUI version» and click on it several times until a notification appears indicating that you have become a developer.
- We return to the main menu “ Settings ” and go to the “ Advanced settings ” section.
- Next, open the option “ For Developers ” - “ Debugging ”.
- Make active the line “USB Debugging».
Super test on the topic “Money” and how can you be friends with it?
Enable debugging mode via computer
In order to start using a special operating mode on your device and enable debugging mode, you need to change the settings of your computer or laptop. For the mode to work correctly you will need:
- Install the ADB (Android Debug Bridge) program on your computer. For settings
- After downloading, unpack the archive into an accessible folder.
- Open the command line from this folder. To do this, right-click on the free space of the folder and hold down the “Shift” button.
- In the window that opens, select the “Open PowerShell window” option.
- Let's connect your phone. To do this, change the USB mode to the “file transfer (MTP)” mode.
- In the command line enter: adb devices
- A window will appear on your phone screen asking you to allow access. Click " Ok ".
- Enter the adb devices command again.
- The serial number of your device should appear on the command line. After this, the device is ready to connect to the computer. You can work in USB debugging mode and use the proprietary HiSuite utility. To check the serviceability of the connected mode, connect the device to your PC using a cable (before this, be sure to install drivers for it). Launch the ADB program or any other program for working with a smartphone, and a window will appear asking you to connect. Once you allow the action, you can get to work.
Who are you in the world of The Witcher?
Further actions
After enabling this option, you will have full control over the device from your computer.
When you connect for the first time, after which a confirmation dialog appears on the gadget’s screen, you will be asked whether you trust the computer from which control will be performed or not. It is worth checking the box “Always allow debugging from this computer” so that in the future you do not bother yourself every time you connect the device to the computer. You now have full access to the operating system and can perform any actions and enter any commands available within the ADB protocol.
USB debugging is enabled and Android device is not detected
Sometimes users may encounter this problem. After connecting the necessary modes on the phone and installing programs on the computer, the connected device is not detected.
- In such a situation, first of all, check the availability of the necessary Android drivers, and if necessary, reinstall or update them.
- Another reason for this error may be a blocked smartphone or tablet. For USB debugging mode to work correctly, devices must be unlocked. In addition, we do not recommend using a USB 3.0 port, only USB 2.0.
- If none of the above helped, and you are still wondering how to enable USB debugging mode, we recommend changing the type of connection to the computer. For this:
- Connect the device to the PC.
- Pull the information bar down and select the “ Select USB connection ”
- Click on “PTP Mode”. This way, you can connect the device to your computer and begin the necessary work with your smartphone or tablet.
A few more words about ADB
Adb is a console application for PC through which you can debug Android gadgets or emulators.
It works according to the client-server scheme.
On first startup, a system service is created that listens to commands that are sent to port 5037 (can be changed). ADB will allow you to:
- Work with logs;
- View the list of connected devices;
- Copy files;
- Install applications;
- Work with the data section;
- Work with different scripts;
- Manage various hidden OS options.
ADB you can download along with the SDK kit,
but if you are not a developer (which is most likely the case, because a developer would hardly read these lines), then you are better off downloading adb separately, because the complete package weighs quite a lot.
I doubt that most people know what USB debugging is on Android 7.0 in a xiaomi, HTC, Motorola, Samsung, Sony Xperia, Lenovo LG, Google Nexus and so on phone.
Usually they only find out about it when they find a solution to their problem on the network, where one of the conditions is to enable usb debugging mode, or the system will display something like “device detected, enable usb debugging.”
No one is usually interested in what this means – it has to be done, it has to be done. Turned it on and forgot it.
However, this function is already for developers, although without it you will not be able to see or transfer the contents of your phone to a computer or vice versa using a cable, flash the firmware or gain superuser rights.
Ordinary smartphone owners go no further than these functions. Although the term sounds very technical, it is actually very simple to do. This feature is especially relevant for Samsung users.
Of course, you won’t be programming anything, but you’ll need to quickly reflash and transfer photos - you can find out how to allow your phone to do USB debugging by reading the instructions below.