Do you want to know where push notifications are stored on Android so that you can view them at a time convenient for you? It happens that a push notification pops up, and the user accidentally swipes it away. But it interested him, and he would like to read it. Shown push notifications are not stored in an easily accessible location on Android; To view them, you will need to carry out small manipulations.
Let us remind you that push notifications are small messages from installed programs, games and web resources that are displayed on the phone screen on top of all open applications. Push notifications are displayed for a short time. They contain some information, often advertising or some important information about the resource from which they were sent. Out of habit, many users automatically “swipe them away”, mistaking them for another advertising message, but there are also notifications that you still want to read.
What are push notifications and what are they for?
Push notifications are small blocks that contain all the information the user needs. The main advantage of such messages is their location. They do not fill the entire smartphone screen, creating inconvenience for the user, but are located in the “curtain”. In this case, the person will not miss important notifications.
Examples of push notifications
Note! Push notifications require preliminary configuration. How to do this will be discussed below.
conclusions
Any modern Android smartphone supports the ability to disable any notifications. If you can’t disable something specific, you can use the total disabling of all notifications from applications. To avoid encountering spam in the future, you need to control the permissions of installed applications and not agree to receive push notifications.
Let me know what you think about this topic of material in the comments. Thank you so much for your comments, responses, likes, subscriptions, dislikes!
Please leave your feedback on the current topic of the material. Thank you so much for your comments, responses, likes, dislikes, and subscriptions!
DShDanil Shemyakinauthor
Where to find push notifications on Android
How to turn off notifications on Android - ways to block notifications
How to enable push notifications on Android and where to find them are the first questions you should deal with. Push notifications received by the gadget are displayed on the phone display. Information received while using the device will be displayed at the top of the device for a couple of seconds. This way, the person will be able to see the content of the message and open it immediately.
For your information! If you are not using your mobile phone, incoming push notifications will appear on the lock screen.
New marketing channel
Before looking at how to interact with this technology from a user's perspective, let me spend a little more time talking about the concept of Push Notifications in marketing. When using such a development, you need to be careful not to cross the fine line that separates cooperation from intrusiveness. If a marketer or someone in training is reading this, remember that this should provide valuable information that will reflect positively on subsequent interactions.
Push notifications should contain timely and relevant content. So, in an application that is aimed at children, advertising coffee will be very out of place, which, in turn, will most likely lead to a loss of popularity.
How to view Push notifications on Android
How to enable push notifications on iPhone - detailed instructions
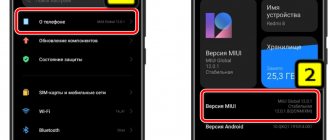
To accomplish this task, you need to perform a number of simple steps:
- Go to “Settings” of your smartphone.
- Select the “About phone” item. Typically this section is located at the bottom of the list.
- Go to the “Software Information” section and find the “Build Number” parameter, which you should click on several times.
- Exit the gadget settings to the desktop.
- Hold your finger in any free place on the desktop.
- A menu will open in front of the user, in which you need to click on the word “Widgets”.
- Drag the widget to your desktop.
- A menu will appear in which you need to select the “Notification Log” option.
Notification log
Important! After completing the above steps, the user will create a new widget, opening which you can easily view information about push notifications.
How to enable push notifications
There are 2 types of Push notifications in phones running Android OS:
- Notifications - notifications about the operating status of system and pre-installed programs;
- Web-push - notifications coming from various Internet sites.
How to enable notifications on Instagram on iPhone
To activate these messages, you will need to complete several steps. They will be discussed further.
Built-in app alerts
System software notifications are often disabled by default. At the same time, it is extremely important for the user to receive information about their work. In such a situation, you will have to enable push notifications yourself.
To carry out this procedure, you can use the following algorithm:
- Go to your phone settings.
- Find the “Notifications and status bar” item in the list of all parameters.
- After clicking this button, the alert menu will open. In it you will need to select “Information from applications”.
- Move the slider for the “Message Allowance” parameter to the active position.
Additional Information! On newer versions of Android, the above names may be slightly changed.
Web push
It is not necessary to install additional software for them to work. To activate web push, it is recommended to follow the following algorithm:
- Register a Google account.
- Update Google Play Market to the latest version.
- Subscribe to the necessary newsletters by clicking on the appropriate button in the settings of a particular application that works with the Internet. For example, Google Chrome, Yandex, Youtube and other online services.
- Activate battery saving mode to increase the battery life of your gadget.
Registering a Google Account
Many people often ignore connecting to a Google account, where all information about the use of sites on the Internet is stored: browsing history, logins and passwords, personal data, etc.
A Quick Way to Add Notifications to an Android App
We have translated for you an article by Brandon Weaver about working with notifications in Android OS.
The programmer explains how to quickly add this functionality to your application. The article, first of all, will be useful to novice Android developers. Notifications are one of the easiest and fastest ways to make your app more interactive, which will attract more users. Notifications provide the user with quick information about what they might need right now. It is also a way to inform about upcoming events. Let's quickly try to add this feature to the application.
Skillbox recommends:
Applied Python Data Analyst Online Course.We remind you:
for all Habr readers - a discount of 10,000 rubles when enrolling in any Skillbox course using the Habr promo code.
Creating a notification
The first step is to create a “Notification” object. To do this we use NotificationCompat.Builder. The minimum notification content that Android developers allow is a small icon. This is good, but small and not very useful for the user. Below is a diagram of a standard notification, which is perceived well.
The small icon will be displayed constantly, and it is important to make it alpha transparent. Without this, you will get a white square instead of an icon.
The notification title is also important. This should be a short description that allows you to understand why the user is being bothered in the first place.
The body of the notification contains detailed text with all the necessary information.
The large icon could be a company logo or something else.
Below are two options for the user.
To display all this you need a short code:
.setSmallIcon(R.drawable.ic_announcement) .setContentTitle(title) .setContentText(body) .build()
Showing the notification
We have created our notification, now the task is to show it. Android gives you the ability to do this using NotificationManagerCompat. To send a notification, you must use notificationID and the notification itself. with(NotificationManagerCompat.from(context)) { if (getNotificationChannel(CHANNEL_ID) == NULL) { createNotificationChannel(context) } notify(notificationId, builder.build()) } Additional code is needed to check for the existence of a notification channel.
Channels and importance
For the first time, users were able to choose the types of notifications from their apps in Oreo. Creating multiple channels is important because if everything goes through one channel, the user will not be able to select the types of notifications he needs and will block everything. teNotificationChannel(context: Context) { if (Build.VERSION.SDK_INT >= Build.VERSION_CODES.O) { val name = context.getString(R.string.channel_name) val descriptionText = context.getString(R.string.channel_description) val importance = NotificationManager.IMPORTANCE_HIGH val channel = NotificationChannel(CHANNEL_ID, name, importance).apply { description = descriptionText } NotificationManagerCompat.from(context).createNotificationChannel(channel) } } The channel must include the following information:
- ID — channel identifier;
- title - it should be short, for example “Messages”;
- importance - it can be high, default, low or minimal;
- description - it will be displayed in Android settings. The developer should take care of the quality of the description.
User interaction
There are several ways a user can interact with notifications.
Fortunately, the APIs that allow you to control the process are quite similar. Intents and PendingIntents are used to communicate back to the application, providing specific processing logic. The easiest way to handle a large number of notifications is to use a BroadcastReceiver. When the user begins to interact with the notification, the Intent will fire and the BroadcastReceiver's onReceive method will be called.
val builder = NotificationCompat.Builder(context, CHANNEL_ID) … .setContentIntent(onContentTapped /** Pending intent */) .setDeleteIntent(onSwipedAway /** Pending intent */) .addAction( R.drawable.ic_announcement, actionTitle, onActionTapped /* * Pending intent */ ) ContentIntent will be launched when the notification is clicked. It's worth remembering that the notification will not be dismissed unless you call setAutoCancel(true) on it. DeleteIntent will fire after the user deletes the notification. Actions are buttons at the bottom of the notification. They also have icons and names.
To create a BroadcastReceiver, you need to extend the BroadcastReceiver class, override the onReceive method and remember to declare the Receiver in AndroidManifest.xml.
class NotificationBroadcastReceiver : BroadcastReceiver() { override fun onReceive(context: Context, intent: Intent) { val action = intent.action when (action) { ACTION_ONE -> { Toast.makeText(context, “Action One hit!”, Toast. LENGTH_SHORT).show() } ACTION_TWO -> { Toast.makeText(context, “Action Two hit!”, Toast.LENGTH_SHORT).show() } } } } object NotificationController { fun pendingIntent(context: Context, name: String, extras: Bundle?): PendingIntent { val intent = Intent(context, NotificationBroadcastReceiver::class.java).apply { action = name putExtra(EXTRA_NOTIFICATION_ID, extras) } return PendingIntent.getBroadcast(context, 0, intent, 0) } } NotificationController - A quick tool for creating PendingIntents for notifications. The most important thing is to give the actions different names in order to correctly handle the user's reactions to the notification. Also if you are going to launch an Activity from BroadcastReceiver you should use IntentFlag NEW_TASK.
This is needed to process all notifications in one place. Intents can also be registered for different BroadcastReceivers, so you can limit the scope to one BroadcastReceiver per notification type.
All this is just the beginning of the work. There are a lot of great examples in the documentation, so be sure to check it out if you have questions or want to do something more advanced.
Skillbox recommends:
- Practical course “Mobile Developer PRO”.
- Online course “Profession of a web developer.”
- Two-year practical course “I am a PRO web developer.”
How to set up push notifications on your phone
There are several options for setting up device alerts that deserve special attention. In general, this setting looks like this:
- Go to the device settings and click on the “Applications and notifications” line.
- A menu of programs installed on the device will open. You need to scroll to the end of the list and click on “Details”.
- All possible parameters that can be adjusted are listed here. Next we will look at adjustments to some modes.
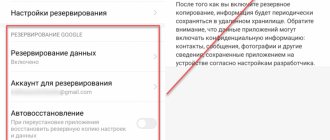
Managing Push Messages in Windows
Notifications can also be configured in the PC operating system. There are no fine settings here, you just turn on and off push notifications from browsers and installed applications.
Go to “Options”.
On the main page, select “System”.
On this page you will see the “Notifications and actions” item.
Choose whether to receive notifications from browsers and applications or not.
How to change the ringtone for incoming notifications
Push sounds are customized using the device's internal tools. Typically, users choose preset ringtones.
The algorithm for changing the ringtone is as follows:
- Open your smartphone settings.
- Go to the “Notifications” item.
- Go to the “Default notification sound” option.
- Music files will open from which you need to select the appropriate sound.
Change ringtone
For your information! You can set other alert sounds by going to the multimedia section.
Firefox
You can also configure the Firefox browser to display notifications. Open the program settings and then the “Content” tab. Here you can set which sites can disturb you and which are prohibited.
The same action can be performed using the icon in the address bar. Click on the i icon and set the permission for the specific site you are currently on.
Increasingly, owners of Android devices have begun to encounter broadcast messages. Moreover, it is not possible to take them and simply get rid of them. Usually you have to delete them because of duty, but after that they still arrive on the device like an avalanche. As a result, such “surprises” bring not only the owner of the device to the brink of madness, but also the smartphone itself begins to slow down terribly.
Do Not Disturb Mode
This function allows you to turn off the sounds of incoming calls, messages, etc. for a certain time. This item can also be adjusted at your own discretion. For example, you can adjust the duration of the mode, and also leave only the sounds of notifications or alarms.
To change the mode, perform the following steps:
- Go to the device settings and select “Advanced settings”.
- In the list that opens, find the inscription “Do not disturb.”
- A menu will open in which you can adjust its operation.
- There is an “Exceptions” item, where you need to click on “Messages and reminders about upcoming events.”
Now, when Do Not Disturb is turned on, alert sounds will be active, and the person will not miss important information.
How to snooze a notification
This function allows you to postpone push notifications for a certain time specified by the user. To activate this technology, you must:
- Go to your phone settings.
- Select "Applications and notifications".
- Go to "Advanced".
- In the list of programs that appears, find and activate the line “Allow to snooze notifications.”
Important! You need to set the delay time. To do this, click on the name of the push notification, after which a timer will appear where you can set the time.
Snooze notifications
What happens when you click the Allow button
Users should be careful when a window pops up in front of them with permission to send push notifications. Sometimes sites are registered in special monetization programs and show not only news from their own resource, but also offers from advertisers.
Therefore, it is better to disable such notifications. But if you accidentally click on the “Allow” button, you can always correct the message settings in the browser settings. Otherwise, the site will start sending push messages to the person’s device.
Why there are no push notifications and what to do
It happens that Android push notifications do not arrive. There are several reasons for this circumstance:
- The person does not have a notification subscription. As an example, consider the YouTube service. A person forgets to subscribe to a particular channel, thereby depriving himself of receiving information about the release of new videos.
- Google account not registered.
- A push notification can block your smartphone. This usually happens on Xiaomi or Honor smartphones.
- Push from software is disabled in the settings.
If your device blocks web push, the problem can be solved by updating the installed version of Android to a more recent one.
This can be done as follows:
- Go to the device settings and select “About phone”.
- Go to the "System Update" section.
- The search for updates will begin. Upon completion, a more recent version of the OS will be offered. In this case, you need to connect to the Internet.
- Install a new version of Android. The download takes a few minutes. During this procedure, the gadget reboots.
Additional Information! Before starting the update, you need to charge the device to at least 50 percent, otherwise restoring its functionality will be problematic.
Android OS update
How to remove push notifications
You can remove alerts using programs that are publicly available on the Internet or on the smartphone itself. The second option is considered the most preferable, because it does not take much time. Both methods will be discussed separately below.
Disabling by system means
This is done as follows:
- Click on the notification received on the gadget and hold for a few seconds.
- Click on the gear sign.
- In the menu that opens, select “Disable notifications.”
Disabling using third party programs
This method can be considered using the NCleaner application as an example:
- Go to Play Market, download and install the software.
- Go into the program and click on NCleaner.
- Now push notifications will be hidden automatically.
Push notifications are an integral feature of a smartphone. With their help, the user will not miss important information. However, the distribution of such information should be configured wisely to ensure that you receive only the information that is truly necessary.
Why Wileyfox
The British company first entered the market with its products in October 2015
To attract the attention of consumers, each Wileyfox family smartphone received the most popular characteristics and functions. All models of the company have the following advantages: stylish modern design, work with two SIM cards, support for 4G LTE data networks, powerful hardware and a stable operating system
In addition, it is worth noting that in comparison with smartphones with the same capabilities and characteristics from other manufacturers, Wileyfox devices have a more affordable price.
Do you want to inexpensively buy a stylish and powerful smartphone with excellent technical characteristics? Pay attention to. Looking at the Wileyfox Swift 2 model, I would immediately like to note its original modern design and distinct style
But when you get acquainted with the technical characteristics, surprise sets in - how was this possible to implement in a budget device? However, judge for yourself
Looking at the Wileyfox Swift 2 model, I would immediately like to note its original modern design and distinct style. But when you get acquainted with the technical characteristics, surprise sets in - how was this possible to implement in a budget device? However, judge for yourself.
The smartphone runs on a powerful, powerful 8-core Snapdragon 430 MSM8937 processor, which, with 2 GB of RAM, guarantees stable operation of several simultaneously running applications. With 16GB of built-in memory and support for microSDXC cards up to 64GB, you don't have to worry about resources to download and install the next app you want.
Note that the device can work with two SIM cards, and any slot can be used to connect to 4G Internet. For users who actively work with various applications, the ability to choose the optimal tariff for the Internet and calls is probably important. And support for two SIM cards is the best way to implement all these options in one smartphone.
Using a large number of applications, you probably noticed that your smartphone battery drains quickly. With Wileyfox Swift 2 this ceases to be a problem - the model is equipped with a capacitive 2700 mAh lithium-polymer battery, which guarantees operation even under the heaviest loads for 9 hours
In addition, it supports Quick Charge fast charging technology, which allows you to fully charge the battery in less than 2 hours, and it takes only 10 minutes to get 25% capacity.
The device is equipped with a high-quality modern 5-inch IPS HD screen with slightly curved 2.5D edges. The smartphone has a fingerprint scanner, navigation modules and an NFC module. Of course, it is worth noting the presence of a high-quality 13-megapixel camera module, with which you can expand your personal collection of wonderful photos and videos.
Today you can order Wileyfox Swift 2 on the official website for only 9,490 rubles.