Laptops with touch screens are easy to use. Touch input provides faster navigation and optimizes your PC for touch functions and applications.
Touchscreen is the default feature on touchscreen laptops and 2-in-1 tablets. But what if you want to disable the touchscreen and use other input methods? Maybe because your PC's touchscreen is unstable or faulty? You can disable the touch screen until you find a solution.
Disable touch screen on HP, Dell, Lenovo, etc.
Although laptops vary in brand and design, the steps to disable the touchscreen are the same on all Windows devices. It doesn't matter what kind of laptop you have: HP, Lenovo, Dell or Acer. The methods described in this guide will work perfectly on your device.
You can disable your laptop's touch screen using three system tools built into the Windows operating system - Device Manager, Windows Registry, and Powershell. We'll show you how to use these tools to disable the touch screen on your laptop.
Note. For this tutorial we used HP and Lenovo laptops. Both devices have a touch screen and run the Windows 10 operating system.
Reasons for shutdown
Touch doesn't work on Windows 10 for the following reasons:
- the screen is cracked or dirty;
- errors when installing the latest updates and drivers;
- conflict between system processes.
Touch issues in Windows 10 can often be resolved using the built-in digitizer calibration feature. This tool is located in the Hardware and Sound - Tablet PC Settings section.
Moreover, to fix the problem in question, it is often enough to download new drivers from the official website of the computer manufacturer. But if this procedure does not restore touch input, you need to restore Windows 10 to the last save point.
Disable touch screen via device manager
Device Manager is a system application that allows you to manage hardware components on a Windows PC. By disabling the touch driver, you can turn off your PC's touch screen.
- Press Windows + X or right-click the Start menu icon and select Device Manager from the quick access menu.
- Expand the “Human Interface Devices” category.
- Right-click on your HID-compatible touchscreen and select Disconnect Device.
Alternatively, select the driver and click the black down arrow icon in the toolbar.
- Select Yes when prompted to confirm to turn off your PC's touchscreen.
If there are multiple touchscreen devices under User Interface Devices, disable them all and see if this disables your PC's touchscreen.
To re-enable the touchscreen from Device Manager, select your touchscreen drivers and tap the green up arrow icon in the toolbar.
You can also right-click the driver and select Enable Device.
We do not recommend disabling your laptop's touchscreen if the display is your only input method. This is because you will not be able to re-enable the touch screen. So, make sure you have other input accessories (external keyboard or mouse) before turning off your computer's touchscreen.
The advantage of a laptop sensor
Until recently, all models were equipped with a standard monitor for displaying images. And the user had to carry out all control actions using the keyboard and mouse.
The sensor function was added relatively recently. But it immediately became popular among users. This control method provides convenience and comfort during operation, and also makes navigation in the system interface easy.
In our article we will talk about ways to connect this option on a laptop.
IMPORTANT! You can turn the touch feature on or off only if your equipment is equipped with this feature. Check the information in advance on the manufacturer's website or ask the sellers.
Disable touch screen in Registry Editor
The Windows Registry stores important configuration files and settings for your computer's hardware and software. You can turn off your PC's touchscreen by creating a "kill switch" that disables touch input in the registry.
This may sound a little technical, but it's simple. Also, this trick will come in handy if your computer's Device Manager is not working properly.
Before showing you the steps, we strongly recommend that you backup your registry or create a system restore point. Deleting or damaging any registry file can damage the Windows operating system and make some system programs unusable.
If something goes wrong when you turn off your touchscreen, the backup allows you to restore missing or damaged files and fix registry errors.
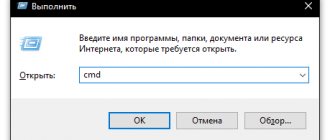
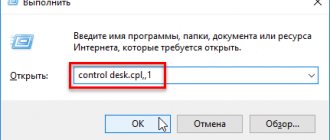
- Press the Windows key + R to open the Windows Run dialog box. Alternatively, right-click the Start menu icon and select Run from the Quick Access menu.
- Type regedit in the dialog box and press Enter or select OK.
- Paste Computer HKEY_CURRENT_USER Software Microsoft Wisp Touch into the Registry Editor's address bar and press Enter.
- To create a kill switch, right-click an empty space in the Touch folder, select New, and select DWORD Value (32-bit).
- Name the new registry value TouchGate and press Enter.
- Double-click TouchGate, make sure Value Date is set to 0, and click OK.
- Restart your computer for the changes to take effect.
To re-enable touch input on your PC from the Windows Registry, go to the Computer HKEY_CURRENT_USER Software Microsoft Wisp Touch folder, double-click TouchGate, set the Effective Date to 1, and click OK.
After that, restart your computer to restore the touchscreen functionality.
Disconnection methods
The touchpad is an element of laptop hardware, therefore, the mechanisms for determining its operating mode are similar to those applicable to other hardware components.
Among such mechanisms are the following:
- use of function keys predefined by the laptop manufacturer that control the operating modes of the device modules;
- through driver settings supplied by system component manufacturers;
- operating system means;
- forever using low-level computer software - BIOS or UEFI;
- physical impact, consisting of manually disconnecting or connecting the device to the corresponding connectors of the motherboard.
The first four methods are discussed below in this article in chapters with corresponding names. But it’s worth talking about the physical method separately.
To replace system components, which does not negate the manufacturer’s obligations for warranty service of purchased high-tech equipment, specialized covers are provided on the bottom panel of the laptop case for removing and installing electronic devices.
The touchpad cannot be physically disconnected from the motherboard without opening the case; there are no special covers for this. Thus, this operation, once performed, automatically removes the laptop from warranty.
To disconnect it from the motherboard, you need to disassemble the laptop and disconnect the touch panel cable from the connector on the board. The reverse operation is also possible: to connect the touchpad after physical disconnection, the cable is plugged back into the motherboard connector.
The operation is not complicated, but requires basic skills in handling modern electronic components.
Disable touch screen via Windows Powershell
In Windows, Powershell is another powerful system tool that you can use to modify your computer's hardware.
- Right-click the Start button or press Windows + X keys and select Windows PowerShell (Admin).
If you can't find "Windows Powershell (Admin)" in the Quick Access menu, type powershell in the Windows search bar and select "Run as administrator" from the search results.
- Paste the command below into the Powershell terminal and press Enter.
Get-PnpDevice | Where-Object{$_. FriendlyName -like '* touch screen *'} | Disable-PnpDevice -Confirm: $false
PowerShell may display an error (like the image below) when you run a command. Ignore the error message. Our test devices (HP and Lenovo laptops) no longer detected touch input despite this error message.
To re-enable the touchscreen via PowerShell, paste the command below into the terminal and press Enter.
Get-PnpDevice | Where-Object{$_. FriendlyName -like '* touch screen *'} | Enable-PnpDevice -Confirm: $false
Again, PowerShell may display a different error message. Ignore the error and tap your PC screen. It should respond to touch input without any problems. Otherwise, repeat the command and restart your computer.
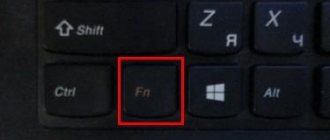
Function keys
Function keys control the operation of the laptop's peripheral components. Control functions are usually activated by holding the Fn
with simultaneous pressing of the
F row key (F1–F12) .
Attention! The location of the Fn key in Figure 1 is shown schematically. On your laptop model, the Fn key may be located in a different location, for example, between the left Ctrl and Alt keys.
The list and functions of control keys do not fall under any international or corporate standard, so each laptop manufacturer is free to assign the functionality of the keyboard buttons based on their own preferences.
A crossed out rectangle on one of the function keys may indicate exactly the function you are looking for. While holding down the Fn button, press the key with a crossed out rectangle. Move your finger across the touchpad. Is the cursor moving? So it's not that simple.
The following list contains standard keyboard shortcuts for disabling the touchpad on a laptop, sorted by laptop manufacturer:
Laptop manufacturer Keyboard shortcut ASUS Fn + F9 , Fn + F7 HP Hold the upper left corner of the touchpad, or quickly double-tap. Lenovo Fn+ F5, Fn+F8 Acer Fn+ F7
Sony
Fn + F1 , Assist Samsung Fn + F5
Attention! Your specific laptop model may not have a keyboard shortcut assigned by the manufacturer to disable the touchpad. In this case, the method of disabling the touchpad using function keys does not apply to your laptop model.
Bios
To completely disable the touchpad, you can use the BIOS function, which controls the settings of the built-in pointer . To enter the BIOS settings configuration mode after turning on the laptop, press the key on the keyboard specified by the laptop manufacturer. So, for most laptops you need to press the F2 key, another common option is the Del .
Attention! Function key assignment information is usually displayed on the bottom line of the screen.
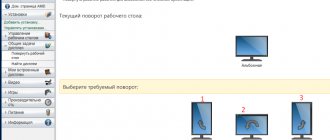
After entering the BIOS settings, you need to find the “Internal Pointing Device” and set its value to “Disabled”
.
If you need to turn the touchpad back on, you will have to enter the BIOS again, find the same option and set its value to “Enabled”
.