Among the methods used to restrict unauthorized access to a PC, Windows OS developers have provided such an interesting solution as a lock screen. Its essence is that if the user has not used the computer for some time specified in the settings, then in order to continue working, he must enter a password.
The lock screen usually appears if the PC was in sleep mode, sometimes when loading the operating system. This precaution is important for office computers or if a home laptop or desktop device is used by several people, but access is undesirable for others.
This option is present in Windows by default, and for many users the need for an extra mouse click, and even more so for entering a password, is annoying. But, fortunately, this mode is optional; you can disable it if you wish, and if the need arises again, enable it. Today we will talk about how to do this, since there are many ways to disable/enable.
What does the lock screen look like?
This interface element is a screen saver with one or more icons for users of a given PC and a proposal (button) to log in to the system by entering a password for password-protected accounts. In Windows 10, this function was diversified by adding several additional elements to the interface (current time/date, for laptops - battery level) and rotating screen savers. But its essence remains the same - user identification to prevent unauthorized access after a long period of computer inactivity, as well as when it is turned on.
Even if there is only one user account and is not protected by a password, the lock screen will still appear.
Appearance of the lock screen on Windows 10
Such an interface element as the lock screen is familiar to smartphone owners. It appears when the device is inactive, so that, for example, when the gadget is in your pocket, the touch control buttons are not pressed. A similar function is implemented in computers based on the Windows 10 operating system.
Of course, the purpose of the special screen here is different. The main role is played by the protection of the user's personal information, but this interface often interferes with the PC owner. The lock is a desktop with reduced functionality. It contains a clock with date and time, as well as icons about the status of Internet connections and battery charge level (for laptops).
The lock prevents you from performing any actions with the computer software. And to return to the Desktop, the user needs to re-enter the password. The most annoying thing about this situation is when the PC goes into a specific mode just a couple of minutes after inactivity.
On a note. Entering a password is required only if a user with Administrator rights has registered an access code. In other cases, just click the “Login” button.
How to disable the lock screen
Usually EB appears after a certain period of inactivity. If the user decides to leave for a few minutes and wants to use this function immediately, there is a hotkey combination for locking the Windows screen (Win+L).
There is an alternative option - through the “Start” menu and then “Task Manager” (you need to go to the “Users” tab, then select “Disable” in the context menu called by right-clicking the mouse). Finally, you can press the combination Ctrl+Alt+Del and select “Lock computer”.
But there are many more ways to disable the lock screen, but it is also more difficult to do than force locking.
Where can I increase the screen lock time?
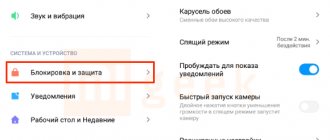
Method one is to change the screen lock time on Android through classic settings. In Android, this parameter is controlled by the “Block” item. Just check the box next to the indicator you are interested in, click “Save below” and reboot the device.
Interesting materials:
How can I make the flashlight blink when I make a call? How to prevent photos from WhatsApp from being saved in the gallery? How to save photos from WhatsApp to a memory card? How can I save photos to a Lenovo memory card? How can I save photos from Viber to a memory card? How to make heroes in Dota speak English? How to make a GIF move in a presentation? How to prevent Google Chrome from opening when you start your computer? How to make Google respond by voice? How to make Google talk?
Disable via personalization
One of the most advanced and functional ways to remove/enable the lock screen in Windows 10, as well as change the lock time and set other parameters, is to use the “Personalization” system section.
To do this, right-click on any area of the desktop and select “Personalization” from the menu that appears. Then we select the “Lock Screen” tab and get access to a window of various settings, with which you can both enable/disable this function and manipulate its parameters (select a background image, set the wait time, personalize these parameters for individual applications, etc. .).
What is auto-lock
Auto-Lock prevents unauthorized access to your computer, thereby protecting your personal files and other data while you are away. Although you can manually lock your computer (press Windows keys + L), it's easy to forget about it every time you log out of your computer. This is when auto-locking comes into play.
Depending on the timer you set, it will turn off the screen and lock the computer. The only way to unlock it is to enter the set password or PIN code. This is a neat concept that I love and use on my laptop all the time. I'm a little paranoid when it comes to privacy and security. Blame it on all the hacking news I keep reading these days.
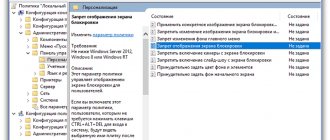
Disable using Local Group Policy Editor
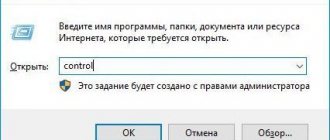
One of the fastest ways to disable/remove the lock screen in Windows 10 is to call the built-in service called “Local Group Policy Editor”.
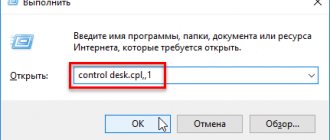
It is called from the program search line (Win + R or through the Start menu), in which we enter the command gpedit.msc.
In the window that opens, click on the “Computer Configuration” item, select the “Administrative Templates” sub-item, then go to the “Control Panel” and select “Personalization”.
We look for the “Prohibit display of the lock screen” branch, double-click on it, after the screen lock settings window pops up, select the desired pointer, confirm the changes and reboot the computer.
Why is this necessary or not?
As mentioned earlier, you should use Auto-Lock on your Windows 10 computer to protect it from unauthorized access. Anyone can steal your data and sell or use it against you or install unwanted software, malware or spyware.
Some people have a nasty habit of spying on other people's personal lives. Auto-lock can prevent this to some extent. It can also save energy, which is especially useful when the laptop is running on battery power.
There are also several reasons to disable auto-lock. For example, you live alone and no one can access your computer. Maybe your office is always locked when you're not home. And you trust your partner not to access your computer without your permission. In such cases, frequently locking and unlocking your computer can be annoying.
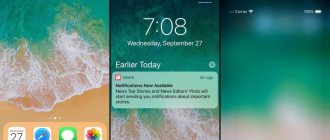
Specifically, you can set Windows to display upcoming calendar events, weather reports, unread emails, and other important information on the lock screen. . It's not just a pretty wallpaper anymore.
Removing system files responsible for the function
Removing a screen lock in Windows is possible using another fairly simple method - by arbitrarily renaming the system files necessary for the built-in function to work. From the operating system's point of view, renaming is akin to deleting, but the user still has the ability to restore the previous names and thereby make the screen lock function available again. If you use standard Windows removal tools, recovery will be available if the necessary files are still in the Recycle Bin. Well, or by importing them, but this is even more difficult, so it’s better to rename rather than delete.
These files are located in the SystemApps\Microsoft.LockApp_cw5n1h2txyewy folder (in the Windows directory). Instead of renaming all files, it is enough to rename this directory, but if you do not have administrator rights (that is, the owner of the computer), you will have to use a third-party Unlocker utility.
Disabling the lock screen in Windows 10 through the registry
Editing the registry is a dangerous operation, since incorrect actions can cause serious problems, from unstable operation of applications or the operating system to a complete crash of the latter with the need to reinstall Windows. Therefore, our recommendations on how to customize the lock screen by editing entries in the system registry apply to trained users. And before using this particular method (the most universal), you should create a system restore point. In this case, if unforeseen consequences occur, it will be possible to return to the original state in order to repeat the operation correctly or use any of the alternative methods.
So, we describe the algorithm of actions:
- Call the registry editor (Win+R, type regedit command);
- select the route sequentially: HKEY_LOCAL_MACHINE, then sequentially Software\Policies\Microsoft\Windows\Personalization;
- the absence of the “Personalization” line in the Windows partition is not fatal, it can be created manually (right-click on the Windows inscription, select “Create Partition”, assign the name Personalization to it);
- in the right window, right-click again and select the “Create” item, in the new menu – the “DWORD Parameter” item, enter its name – NoLockScreen;
- All that remains is to assign this parameter the desired value by double-clicking the mouse: the value “1” will indicate that the blocking function will be deactivated and the changes will take effect after the system is rebooted;
- To open the lock screen, you will need to set the parameter value to “0”.
Disabling via bat file
Those users who had the opportunity to work in the first versions of Windows without a graphical interface (MS-DOS) remember well how important batch files with the bat extension were for this operating system. Oddly enough, the developers left this option in all subsequent generations of the Windows OS, and with its help you can automate many processes when the system starts.
So, to take advantage of the ability to automatically disable the screen lock in Windows versions 7/8/10, we need to follow these steps:
- in any text editor, create a new file, insert the line %SystemRoot%\system32\rundllexe USER32.DLL LockWorkStation into it;
- save the file, change its extension from txt to bat;
- launch it by double-clicking on its name.
Disabling blocking using third-party software
You can also get rid of the annoying screen using software applications created by third-party developers. As an example, let's take a fairly popular utility distributed free of charge - Ultimate Windows Tweaker. With its help, you can change many operating system parameters, including the screen lock function for W7/8/10.
So, to turn off the screen lock, we follow the algorithm:
- find the program, download, install, launch;
- Click on the main menu item “Customization”;
- go to the “Universal UI” tab;
- check the box next to “Disable Lock Screen” (located in the “Lock Screen” block);
- Confirm the changes (Apply Tweaks).
Disable screen lock using Ultimate Windows Tweaker app
This is a third-party application that is freely available and allows you to easily disable the lock screen on the Windows 10 axis. This is only one of the methods of using it, because in fact the utility allows you to configure the entire system. Since the program is not distributed in Russian, carefully follow the instructions for disabling the blocking if you are not confident in your knowledge of English:
- Download the archive and run the program.
- Agree to the changes.
- After installation, a window will appear, click “ok”. After this, the program will open.
- Then everything is simple: click on “Customization”. In the list that appears, select “Universal UI” and on the first line, check the box next to “Disable Lock Screen”, and click on the blue button at the bottom “Apply Tweaks”.
Volga or Pobeda? Are you familiar with the Soviet automobile industry? Test yourself in a fun test!
Via command line
Finally, you can lock the Windows 7–10 screen by entering the required command directly into the command line (you must have administrator rights to do this). This command is the same one that we inserted into the bat file - %SystemRoot%\system32\rundll32.exe USER32.DLL LockWorkStation.
That is, its action is completely similar, but one-time - the screen locker will turn off, but only in the current session. When rebooting, you will need to repeat the procedure or use another method.
So, now you know all the possible ways to bypass the lock screen problem, and all of them are reversible, allowing you, if necessary, to return to the previous settings in order to increase the security of using your computer. Which method did you choose? Share your comments on how successfully you performed this operation, it will be useful to other readers of our site.