What circumstances force you to run the BIOS?
- Integrated computer components need to be turned on or off.
- Replacing the video card. Many laptop computers have two graphics cards built into them. Thanks to the input-output system, the user selects either the first or the second.
- Setting up special laptop modes. Here the computer owner can configure various modes (hibernation, sleep mode).
- Adjusting the time in the system. The system allows you to adjust the time that requires such manipulations, often after resetting the settings.
- The need to check the “well-being” of the computer. Through Bios you can monitor many PC parameters.
- Returning default settings. By opening the control system, you have the opportunity to restore the system settings to their original state.
This article will describe a step-by-step algorithm on how to launch Bios on a laptop. After reading it, you will understand that opening this system on your computer is not difficult.
Running the system on a desktop computer and a laptop does not have any special differences.
Method 3: "Command Line"
Using the “Command Line” you can also get into the BIOS. This method is a little similar to the previous one and makes sense when you do not have the ability to work with a computer mouse.
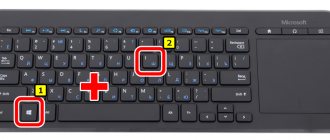
- Use the key combination “Win” + “R” to open the “Run” window, enter cmd in the text field and press “Enter”.
- In the window that opens, run the command to launch the system reboot application shutdown.exe /r/o.
- Follow steps 2 through 5 that we covered in Method 2.
We are glad that we were able to help you solve the problem. In addition to this article, there are 12,719 more instructions on the site. Add the Lumpics.ru website to your bookmarks (CTRL+D) and we will definitely be useful to you. Thank the author and share the article on social networks.
Describe what didn't work for you. Our specialists will try to answer as quickly as possible.
Starting the I/O system
Firstly, to open it, you need to restart your computer. To do this, you will need to click on the “Start” button and find the shutdown/restart key in the panel that appears. The button is located in the lower left corner of the panel.
You can also restart the device by pressing and holding the start/shutdown key, which is (most often) located in the upper right corner of the keyboard. After completely turning off the laptop, you need to press the same key again and start the computer.
You need to open the settings before the computer is fully booted. Most often, when loading, it says at the bottom: Press F1 to enter setup (press F1)
In addition to F1, there can be any other keys, for example:
- DELETE
- F2
- F3
- F10
- F11
- F12
- Esc
Sometimes you need to press a combination:
- Ctrl+Alt+Del
- Fn+F1
- Ctrl+Alt+Esc
- Ctrl+Alt
- Ctrl+Alt+Ins
- Ctrl+Alt+S
- Ctrl+Ins
- Ctrl+Alt+Enter
If you did not have time to press the buttons to log in, you should turn off and start the computer again.
Having completed all the steps correctly, you will see a window open in front of you.
Now let's look at how to run the setup on PCs from different companies.
How to enter UEFI from Windows 8, 8.1 and Windows 10
In the latest versions of Windows on laptops with UEFI, you can enter the I/O subsystem even when the system is already loaded. To do this, you need to go to “Settings” and act depending on the version of the operating system.
For Windows 8
Change PC Settings → General → Special Boot Options → Restart Now → Diagnostics → Advanced Settings → UEFI Firmware Settings → Restart.
For Windows 8.1
Change PC settings → Update and recovery → Recovery → Special boot options → Restart now → Diagnostics → Advanced options → UEFI Firmware options → Restart.
For Windows 10
Update & Security → Recovery → Custom Boot Options → Restart Now → Troubleshooting → Advanced Options → UEFI Firmware Options → Restart.
For Windows 10, there is an alternative way to get to UEFI from the login screen or through the Start menu. In both cases, you need to click on the “Shutdown” icon and, while holding the Shift key, start the reboot. This action will open the section for special system boot options.
After this, you will need to follow the same steps as in the previous method. That is, you will need to go to the “Troubleshooting” item, select “Advanced options” and “UEFI Firmware Settings”, and then click “Reboot”.
How to run BIOS on a Lenovo laptop
You can open the BIOS on a Lenovo laptop using a simple method, that is, by pressing special buttons when turning it on. At the beginning of loading, you need to press and hold the Fn key. While holding it, you also need to actively press F2.
Second method: a special button “Novo Button”. It shows a curved arrow. After turning off the computer, instead of the start button, press the “Novo Button” key.
The “Novo Button Menu” will open in front of you, where you will see various download methods. In second place will be BIOS Setup. We point the arrows at it.
Click. Ready.
Login principles on different operating systems
You can enter the BIOS even without an operating system installed on your PC. But if a “diagnostic” window does not appear (as is done in many laptops), then the user simply does not know which key to press to enter. Therefore, if you have Windows installed, you can simply specify in the boot parameters that the next time you turn it on, the BIOS settings menu will automatically open on the display.
Can you tell a cringe from a crash? Take this fun test and find out!
Entering BIOS on other operating systems
On all other operating systems, it is recommended to enter the BIOS by pressing a key at startup. On some Linux distributions, upon startup, the GRUB menu appears with a choice of operating systems. And there may be a UEFI item there, which will allow you to go to “Hardware Settings”
And there you can run Windows through the BIOS (if the motherboard supports such a function).
What is BIOS and what is it for?
BIOS (BIOS, English BasicInput/Output System) is an information input/output system that communicates between the hardware and the computer’s operating system. It contains information about the composition, configuration and current state of all elements of the computer, determines the boot order of the operating system, and performs dispatch functions for monitoring systems and security. The BIOS code is located on a special chip with corresponding markings located on the motherboard. It can be updated, i.e. re-record, but this undertaking is complex and risky.
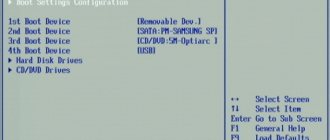
To change the system boot order (used when reinstalling the OS installed on your PC), go to the Boot tab
The most common way a user accesses the BIOS is to change the system boot order. When installing an OS from a flash drive, you must set USB boot as the first number, otherwise after the first reboot the computer will install the old system and the process will go in an endless circle. In addition, other actions can be performed:
- Change or return to factory (optimal) settings.
- Changing the processor operating mode.
- Obtaining information about the processor temperature.
- Fan operation mode control.
- Enable/disable some ports or functions, etc.
After the changes have been made, the program will offer the choice of saving them or leaving the setting unchanged. To do this, you will need to press the appropriate keys.
Attention! Making changes to the BIOS settings can radically change the operating mode of the motherboard and processor. For an unprepared user, such a step is fraught with undesirable consequences, including the complete failure of the components. Without precise knowledge and understanding of the essence of your actions, nothing should be changed.
Do you have an MSI motherboard? Use MSI Fastboot tool
Additionally, users with MSI motherboards can use the MSI Fastboot system utility. It allows you to toggle this setting in Windows so that you can disable it temporarily to enter motherboard settings.
You can download this tool from the official MSI website - just search for your motherboard model, go to the Support tab and look for the Fast Boot tool for your version of Windows.
After downloading the program, it will be placed in the system tray. Just click it with one click and press the "GO2BIOS" button to go to the motherboard settings.
BIOS / UEFIfastbootMSIwindowsWindows 10windows 8windows 8.1emergency mode
Why do you need a BIOS program?
BIOS is a firmware, firmware of a PC/laptop motherboard or tablet monoboard, independent of the operating system installed on the computer. It allows you to use the following features:
- starting a PC from external media (flash drives, memory cards, external storage and CD/DVD/BD-RW drives);
- “overclocking” the processor, adjusting the temperature and PC cooling systems;
- enable/disable and configure hardware interfaces of a computer system or gadget.
The first option is used most often. You may never access the rest of the BIOS functions (there is no need), but you will have to reinstall Windows dozens of times while your PC, laptop or tablet is alive.
Standard method of logging into Bios on devices before 2015
The basic way to enter BIOS on a PC is by pressing a hot key. If the display of the diagnostic window is disabled in the settings (that is, only the logo is shown without any additional inscriptions), then you can first press the “Pause” button. On motherboards from Asus and MSI (mostly those released before 2015), this delays the OS launch by 5 - 10 seconds.
Why do you need to go there?
One type of BIOS
Those who have to log into the system using a laptop and computer have probably wondered why they need to do this.
So, to reinstall systems, you first need to enter this program. And this happens quite often.
In other words, they go there with the goal of changing the boot of their computer from a hard drive to a regular one or to a flash drive.
Often, to protect a computer or laptop from prying hands, users set a new password through the BIOS.
Thanks to a password set in this way, the system will not boot until the user enters the password correctly.
This program also checks the temperature of some components and controls the speed of installed coolers or fans.