In this article, we will tell our readers how to change screen resolution in Windows 10 . The Windows 10 operating system is new, so PC users are encountering problems with the recommended resolution, which is set automatically. Mostly, problems with screen resolution are observed on old monitors and rarely on new ones. Problems usually manifest themselves as a very stretched image on the display, which makes it very uncomfortable to work on the computer. This is due to driver support for both the monitor and the graphics adapter. In order to solve the problem with a stretched image and incorrect resolution, we have prepared examples where we will describe their detailed solution.
Adjusting the display brightness
The brightness level changes more often than other picture settings on the computer. And in different cases (games, watching movies, working in office applications or editors) with different external lighting, you have to adapt it to your needs. This is done in several ways.
Buttons on the monitor
Almost all monitor models have buttons to control its basic parameters. They are often located on the front panel under the screen, on the side edges or on the bottom. Most likely there are two buttons designed to decrease and increase the display brightness, as well as auto-adjust the monitor. Even if there are none, you can change the indicator through the device menu.
Keyboard buttons
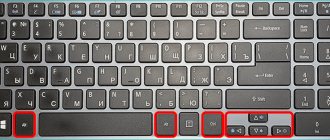
Previously, the option to adjust brightness using keyboard buttons was only on laptops, but now most keyboards support it. On some devices (mainly laptops), you need to look for such buttons among the functional F1-F12 or the cursor keys block, on others there are special buttons for this. On laptops they must be used together with the Fn key if there is a “native” driver for the keyboard.
Notification Center
1. Click on the Notification Center icon in the tray.
2. Expand its tiles by clicking on the link of the same name.
3. By clicking on the scale, the brightness decreases or increases, the same can be done by moving the slider from one side to the other.
Options
1. Open Settings and visit the System section.
2. In the “Display” tab, adjust the value using the slider; all changes will be saved automatically.
The second way to open the window is to select the “Display Settings” option in the Desktop context menu.
Reasons for the problem
If the image on the monitor of a personal device (desktop computer, laptop or tablet) turns out to be disproportionately stretched, it is necessary to identify the reason for this effect. Stretching is carried out along a horizontal or vertical line.
Possible problems with the device:
- incorrect operation of drivers (programs that ensure internal interaction between applications, devices, and interconnected utilities);
- The “Monitor Resolution” block is configured incorrectly.
Attention! Some "firewood" installed on PCs have been working since 2016. Such software may not receive timely updates due to lack of support from the developer. In addition, such utilities do not interact with “ten”. They need to be completely replaced.
Sometimes, due to problems with drivers, users have to return to earlier versions of the PC operating system - the seventh or eighth.
Power settings
In the electrical circuit settings, the brightness also changes, although this takes a long time and is extremely inconvenient (the setting is only relevant for early versions of Windows 10).
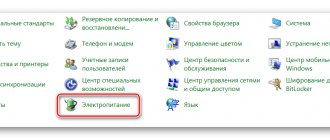
1. Through the Control Panel, open “Power Options”.
If the item is missing, switch the way items are displayed to icons, or visit the Hardware and Sound section.
2. Visit the settings of the current power plan (there is a switch next to it).
3. Move the slider to the desired position (on a laptop computer, the brightness level is indicated separately when the device is powered by battery), and close the window.
Monitor calibration Windows 10 How to increase screen brightness on Windows 10
Increase or decrease screen brightness and contrast
Brightness and contrast are some of the main screen settings. Each user adjusts them individually to their own requirements.
Contrast on laptops and tablets is adjusted automatically. On monitors and displays of personal computers there is a Menu button, with which you can adjust the contrast using the device menu.
There are several options you can apply to change the screen brightness settings.
Adjusting Contrast
There are much fewer ways to change the ratio of the brightest and darkest pixels of a picture: through the menu of the display itself and Windows 10 Settings.
1. Open Settings, visit the “System” block and click “Advanced display settings”.
2. Select the desired display, if there are several of them, then click “Video adapter properties...” at the bottom.
3. In the window that opens, on the “Color Management” tab, click the button with the same name.
4. Go to the “Details” tab, click on the “Calibrate screen” button.
5. Read a couple of pages of recommendations, moving to the next one with the “Next” button.
6. Change the gamma, brightness or skip the steps, the next one will be the contrast edit slider.
7. Skip the white balance adjustment and save the settings.
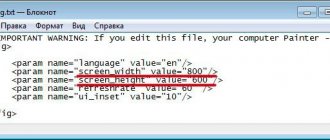
What is screen resolution
Resolution is the number of pixels that display the image entering the screen. The higher the resolution, the denser the pixels are and, accordingly, the sharper the image. If you reduce the resolution setting, you will be able to see even from afar that everything that happens on the monitor consists of squares.
The only negative side of high resolution is the increased load on the video card, since it is responsible for displaying images on the screen. If you have a weak computer, you may have to sacrifice quality to get rid of lags and improve performance.
Monitor image quality improves with pixel densification
The load on the PC also depends on the resolution in games. For example, you can increase FPS in CS GO by 1.5–2 times without changing graphics settings, but by significantly reducing the pixel density.
Of course, the higher the pixel density, the better. But we must take into account that not all values proposed by the system are supported by your monitor. It may happen that the selected resolution is too high, then the message “Unable to display” will appear on the screen. Some indicators will be displayed on the screen, but will blink, twitch, look clumsy and fly off. This means that the aspect ratio of your monitor does not allow you to fully display the horizontal to vertical pixel value you selected.
It is best to read the documentation that came with the monitor. The instructions should indicate which resolution is optimal. Or you can try each value one by one until you find the best one.
Changing resolution for older versions
It’s nice to look at a monitor with the “native” screen resolution set (you can find it in the documentation for the device or on the Internet). To specify a different resolution in Windows 10:
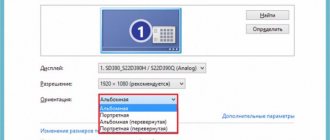
1. Open the Desktop context menu and select “Display Settings”.
2. Specify the appropriate size (near “native” it will be written “Recommended”, it is better to select it) and save the settings. If this is not done within 10 seconds, the old value will return.
The second method is relevant for older builds of Windows 10:
1. Open Control Panel.
2. Switch the view of elements to icons and click on the icon called “Screen”.
3. On the left side of the menu, click “Setting screen resolution.”
Select a value from the drop-down list and apply the settings.
Windows 10 screen resolution problems
We learned how to check the screen resolution on Windows 10 and the reasons why the resolution may be wrong, but what to do if the Windows 10 screen resolution is wrong?
Before changing it, you first need to check the video card driver, since it is the main link in this problem. Open Device Manager (Win+X or enter devmgmt.msc in the Run window Win+R). We need the Video Adapters tab.
Here we can see all the video cards of the device. On devices with a discrete video card, 2 of them are displayed (built-in and discrete), if the processor has a video core.
A discrete video card prevails over an integrated one, as it has greater performance and memory. If it is disabled, the computer will continue to work on the built-in one without any problems. The built-in video card is much weaker than a discrete one and part of the memory for processing graphic information is provided from the RAM. That is why, on some laptops, RAM is displayed slightly less than it actually is (not to be confused with the problem of system capacity, when the x32 system “sees” a maximum of 3.5 GB of memory).
We will categorize the problems as they arise and how easy they are to solve:
After system update:
Sometimes users ask the question: “after updating Windows 10, the screen resolution has changed, what should I do?” The solution is actually quite simple; you don’t even have to install the previous version of the driver and download it. The fact is that this most often happens after installing major updates, as a result of which the system is installed, but with the preservation of data and applications.
As a result, the installation of the video card may fail and, in order not to interrupt the entire process, the driver is reset.
What should be done:
- Open Device Manager – Video adapters and select Update driver for the desired video card.
- Then select "Search this PC."
- Then, “Select from the list of installed...”.
After which a list of versions previously installed on this PC will be displayed. Selecting a driver with an earlier version or date may resolve this issue.
It is worth noting that system optimizers and cleaners can remove unused and previous versions of “firewood,” but this happens in “deep cleaning” mode.
After reinstalling the system:
If after reinstalling the system, when connecting to the Internet and downloading updates, the video driver does not install itself, then you can use this advice. We will perform the installation from the manufacturer's website. There are 2 large manufacturers on the market: AMD and Nvidia, as well as the processor manufacturer Intel, which most often has a built-in Intel HD Graphics video core. First of all, we determine the model in the device manager and go to the manufacturer’s website.
- AMD (also a division of ATI purchased by this company) – Download;
- Nvidia - Download;
- Intel HD - Download.
You need to select the desired model from the list and download it. If the video card is displayed as an unknown device, you can also download an application that can itself determine the device model and load the correct driver version.
Or the simplest option for the lazy - Download any Driver Pack application (DPS, Driver Booster and others) and wait for the application to find and install everything.
After a failed driver installation:
In practice, there have been cases when the driver was installed with errors, as a result of which the settings were not changed, and reinstalling the driver did not change anything. In this case, a clean installation can help; you can do it in 2 ways.
- Clean driver installation. Download the installer from the previous stage and select “Perform a clean installation” when selecting the installation type, in this case the old driver will be completely changed to the new one.
- Clean driver reinstallation. If the installer does not require a clean installation, you can perform it yourself using the Display Driver Uninstaller utility. You can download it from the Guru3D website. After launching the utility, select “Uninstall and reboot”, after which you can install the driver again.
Calibration
The method is relevant for owners of computers with a touch screen when Windows 10 does not respond adequately to taps or pen touches.
1. Enter the word “Calibration” in the search bar on the main “System Parameters”.
2. Click on the option that appears to answer the “Calibrate monitor colors” request.
3. Follow the simple instructions (touch the display in the indicated places).
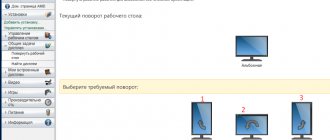
How to change the order of monitors
This characteristic is displayed on the personal computer monitor in the “Parameters” section. To check the settings, you need to follow the instructions in the previous block - at the last stage, the number of connected screens that are currently in use will be displayed.
Numbering allows you to simplify the process of checking identification indicators and organizing personal devices.
Monitor identification
In order to check the numbering indicators, you must complete the following steps:
- Click on the “Start” button, go to the “Settings” block;
- open the “System” subsection, then “Display”;
- In the right part of the working window, click on the line “Change display order” and the item “Identify”.
The open window will display information about the serial numbers of the connected elements.
Monitor detection
If the user has connected an additional screen, but for some reason it is not displayed in the general list under a separate number, it is necessary to start the detection process. Instructions:
- go to the “Settings” section through the “Start” button or the search bar;
- go to the settings tab (as in the previous option - “System” blocks, then “Display”);
- Click "Change order".
At this point you need to click on the “Detect” line. The procedure takes a little time, after which a list of available devices will appear on the screen. If the required element is not present, you need to check that the connection is correct.
Organizing monitors
To work correctly with displays, you need to arrange them correctly. Necessary actions:
- how to go to the settings of additional screens in the previous paragraphs (“Start” - “Settings” - “Display”);
- a list of mechanisms with numbering will be displayed in a separate working window;
- To change the order, you will have to drag the desired object.
Attention! There are no restrictions on establishing order and location. The user can change the purpose of the main and additional screens at any time without restarting the PC.
Working on multiple screens of interconnected devices - laptops, desktop computers, TV, etc. - is necessary to carry out some work processes and projects. The user needs to set the main display and specify the order of tasks for the remaining monitors. This can be done using the instructions provided.
Update your drivers
If none of the fixes worked, your drivers may be to blame. If your display drivers are outdated or damaged, you will need to update or reinstall them.
In most cases, Windows automatically updates drivers. However, you can manually update your drivers or use a third-party program to update your drivers.
You can also reinstall the driver again.
- Press Ctrl + R, type devmgmt.msc and press Enter.
- Find your display in the list.
- Right-click the device and select Uninstall device.
- When prompted, confirm deletion. When the device is deleted, it will disappear from the list.
- You can now restart your computer to automatically reinstall the latest driver. Alternatively, you can select "Action" from the top ribbon and select "Scan for hardware changes."