A touchpad is a device that replaces the functions of a traditional mouse on a laptop. The touchpad is controlled by touching your finger in a specially designated area; the functions of the buttons can be duplicated by touch and/or provided with separate buttons located below the touch area. In this article, we will look at all sorts of ways to enable the touchpad on Windows 10 and other versions. The need for this may arise in the event of an accidental shutdown, software failure, or for other reasons.
Enabling the touchpad using function keys
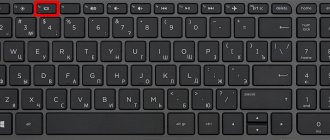
Almost every laptop has a functional Fn key, which is responsible for quick access to controlling additional functions of the laptop. It is usually located between the left Ctrl button and the Windows logo key, and is often painted a different color from the main keyboard keys. The touchpad on Windows 10 and other versions is controlled using function keys, provided that the drivers for it are installed correctly.
In order to enable a function, you need to simultaneously press the Fn key and the key with the required function. In our case, the touchpad power key is usually located in the row of F keys and is symbolized by an image of a touchpad and sometimes a hand touching it. Depending on the laptop manufacturer, the image may differ, but is almost always completely understandable to the user. On a Lenovo laptop, the key looks like in the picture and has a basic value of F6.
After pressing Fn and F6, the state changes (on/off).
If all else fails
If you have tried all the methods above, but the touchpad on your laptop still does not work, then the problem may be a hardware issue. In this case, you should contact the service center, they will determine exactly why the panel is not working and find the best solution. Without sufficient experience and knowledge, you should not try to carry out repairs yourself; even simple disassembly of a laptop can cause injury or be the basis for a complete write-off of the equipment.
You should also think about when the touchpad stopped working and what happened before that.
If everything worked properly and without complaints, but after installing the game, software or updating drivers, problems began, then these actions are probably the reason. Due to drivers, the touchpad buttons and the panel itself often do not work; after adding some programs, the touchpad is simply disabled in the system. It is necessary to revert all changes, remove installed software or updated drivers. It’s also worth figuring out how to enable the panel if it was disabled programmatically. Found a typo? Select the text and press Ctrl + Enter
Enabling or disabling the touchpad using the BIOS
BIOS is software that contains all the information about the computer hardware and control of some of its settings. In order to make sure that the touchpad is enabled in the initial settings of the laptop, you need to go into the BIOS. When you turn on the laptop, a hint appears for a moment on how to enter the BIOS; these can be the F1, F2 and Del keys.
After entering the BIOS, do not change any settings that you do not know about. Rash actions with this tool can disrupt the operation of the laptop.
In the BIOS menu you need to find the “ Internal Pointing Devices ” item, its value should be set to “ Enabled ”. If set to " Disabled ", it means it is disabled. After this, you may need to repeat the activation procedure using the function keys.
What to do if the touchpad stops working?
You should always remember that without sufficient experience, not all manipulations should be carried out independently. If you have the opportunity to contact good specialists, you should take this chance. The good news is that in most cases, it is simple manipulations that you can do yourself that help.
Solution 1: Enable Touchpad with Keys
The simplest and most common cause of the problem is disabling the touchpad using the keys on the keyboard. In any laptop model, you can press one or 2 keys, after which the touchpad will be turned off. The user may do this accidentally and not notice the original cause. You need to repeat the procedure so that the sensor works again and you can control the mouse again.
To perform this procedure, you must press 2 keys on the keyboard. The first one is located in the lower left corner and is designated “fn”. This is a special function key that is responsible for certain quick actions of the system. To execute a specific command, you must select another function button at the top of the keyboard. In most cases, the functions for enabling/disabling the touchpad in laptops look like this:
- Acer – Fn + F7.
- Samsung – Fn + F5.
- Sony – Fn + F1.
- Toshiba – Fn + F5.
- Lenovo – Fn + F8 and Fn + F5.
- Dell – Fn + F5.
- Asus – Fn + F9.
If after selecting the appropriate command on the keyboard the touchpad works, then the problem is solved and you should not worry anymore. If the malfunctions remain, then you should further study the list of solutions.
Solution 2: Activate the panel in Windows 7, 10 settings
The second common cause of failure is the touchpad being disabled in Windows. This can be done by the user himself and not even notice, but sometimes the cause is viruses or third-party applications. When installing any software, there is a risk that it will configure the system and thereby turn off the touchpad. Especially when it comes to connecting a third-party wired or wireless mouse, which downloads and installs its own drivers.
To activate the panel in Windows 7, you need to spend a few minutes of your time:
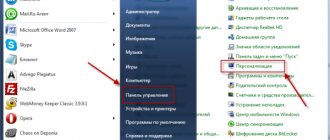
- Initially, go to “Start” and then select “Control Panel”.
- In this window we find an item called “Mouse”, you should enter it.
- At the top of the window, select “Options”. On this tab you will see the name of your touchpad, and here you can enable or disable it.
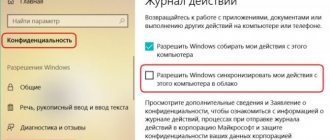
If we are talking about new Windows, then everything is a little simpler:
- Select “Start”, and in the lower left part click on the gear and enter the parameters.
- On the left side there is a list of available sections, there you need to find “Touchpad”.
- By entering this item, you can turn the panel on and off. If there is no such item in the parameters, then this may indicate problems with the connection cable.
Solution 3: Install or update drivers
The touchpad on a laptop is a separate physical device. To ensure that all components interact with each other, manufacturers develop drivers. This element is software that trains the system to correctly recognize signals from the device. The touchpad has its own driver, in most cases it is installed automatically, but if failures occur or they become outdated, then problems arise.
To install or update the driver, you need to go to the website of your laptop manufacturer. In the “Support and Software” section, enter the model and select the operating system. After this, a list of all available drivers will open in front of you; in the touchpad section you need to find the newest version and download it. The installation is standard and will not cause problems even for a beginner. After installing the driver, you need to restart the laptop and check the operation of the panel.
Solution 4: Resolve conflicts with other mouse drivers
Often, to make working with a laptop more comfortable, users connect their own mouse. It can be wired or wireless, but for the operating system it is always a new device for which drivers are needed. In most cases, standard system software is used and connecting a mouse does not cause any problems. But if the device is multifunctional, then it installs its own software. The mouse may have additional keys for more efficient interaction with files. Most often, complex drivers and programs are installed for gaming models.
In order to avoid conflicts between the connected mouse and the built-in touchpad of the laptop, you need to manage the devices. To do this, go to “Device Manager” (can be found through a search) and disable the mouse. If after disconnecting it the touchpad works, then the problem is in the drivers. It’s worth trying to update them or, on the contrary, roll them back.
Solution 5: Clean the sensor from dirt
In order for the touchpad to respond correctly to touches, it needs good contact with your finger. A laptop is a portable device; it often ends up in places it shouldn't be. As a result, dirt appears on the touch layer, which negatively affects the quality of finger contact. This problem manifests itself through slow movements on the screen, twitching, and frequent freezing. At a certain point, the panel simply loses contact with the finger, and the mouse on the screen stops. To solve this problem, cleaning must be done.
This process should be performed with special wet wipes. Do not use a rag or classic hand cleaning products. It's best to use alcohol-based wipes. Do not use sharp or metal objects; damage to the sensor layer will create even more problems.
Solution 6: Enabling the touchpad through BIOS
BIOS is the basic input/output system; it is what triggers the startup of the operating system and can control the operation of all hardware parts of the laptop, including the touchpad. If the BIOS was reset or a failure occurred, the panel can simply be turned off in the settings. To an inexperienced user, it may seem that the procedure for such inclusion is very complicated, but, in fact, everything is much simpler. It is not necessary to contact specialists to perform such manipulations with the settings.
Initially, you need to go into the BIOS itself. To do this, when turning on the laptop, you need to press the keys to enter the basic settings system. In most cases this is Delete or F2, but there may also be a F8 and ESC button, it all depends on the laptop manufacturer. After entering the settings, use the arrows to go to the “Advanced” tab, and there find the “Internal Pointing Device” item. To enable the touchpad, set the value to “Enabled”. After that, press the F10 key and then Y so that the changes are saved and the laptop reboots with them.
Installing and updating the driver using Windows
If for some reason you cannot find a driver on the laptop manufacturer’s website, then you should use the built-in driver update system in Windows. To do this, you will need to open the device manager. The easiest way to open Device Manager in Windows is to press the Win + R key combination and enter the command devmgmt.msc In the window that opens, after clicking OK, the Device Manager will open.
In the “ Mice and other pointing devices ” tab there will be a list of all mice and other pointing devices. Even if your TouchPad is not indicated, but “ PS/2 - compatible mouse ” is indicated, then its driver should be updated. To do this, select the corresponding object and press the context menu key on the keyboard (looks like a list or cursor with a list). Select " Update Drivers... " and press Enter.
In most cases, it is the driver from the manufacturer’s website that solves the problem with a non-working device.
After updating drivers or installing drivers from the manufacturer's website on a Lenovo laptop, the touchpad appears differently in Device Manager, which means the driver has been reinstalled. It is worth noting that a similar method can be used to calibrate a laptop battery.
Disable touch screen input service for hybrid laptops
If your laptop is a hybrid (laptop and tablet in one with a touch display), there is a chance that the touch screen input service, which controls the functionality of the stylus, is interfering with your touchpad.
To disable the service, press win+R, then enter services.msc and find TabletInputService or Tablet PC Input Service . Right-click on it, then disable it. A very inconvenient solution for those who use a touch screen and touchpads, but you can then be smart and try to remove the drivers, roll back, update and then restart the service.
See also:
- Keyboard not working on windows 10 lock screen
- How to create a Microsoft Account for Windows 10
- How to Backup Windows 10 Drivers
- How to fix Windows 10 update errors
- Search doesn't work in Windows 10
Channel Chat
How to set up your touchpad
A properly configured touchpad can make working with a laptop much easier. In order to get into the settings, you need to go to the “ Control Panel ”, select the display of the “ Small icons ” elements and select the “ Mouse ” item. This window will contain all the basic settings for pointing devices and additional settings in the case of installed software from the manufacturer. Here you can turn the touchpad on and off.
Synaptycs allows you to perform many actions with the device through its software, which opens from the Windows tray:
- turn on and off;
- adjust the intensity of the pointer movement;
- configure scrolling options and other settings.
Without installed software from the manufacturer, the device works properly in most cases, but additional functions are not available.
Setting up touchpads from other manufacturers is similar.
Enable in Control Panel settings
You can also enable or disable the touchpad in the Control Panel settings. To check this option, open the Control Panel and go to the “Hardware and Sound – Mouse” section.
After this, a window with mouse properties will open in front of you. Here you need to go to the “Device Settings” tab (sometimes this tab may have a different name, for example “ELAN”). There should be an Enable button on the Device Settings tab. Click on this button and save the settings by clicking on the “OK” button, which is located at the bottom of the window.
It should be noted that on the “Device Settings” tab, the “Disable when connecting an external USB mouse” function may be available. If it is active, the touchpad will not work when a regular computer mouse is connected to the computer. If you want to use the touchpad and mouse at the same time, then this function must be disabled.
Exceptions and nuances
On some laptops, turning the touchpad on and off is done using a specially made indentation (button) in the corner of the touch area or a separate button that does not require pressing Fn.
If none of the software methods work and the device remains turned off, it may be faulty. Remember if you spilled even a small amount of liquid on your laptop or if it was recently completely disassembled to clean it from dust; perhaps the cable was simply not connected during assembly.
If the touchpad does not work after updating Windows 10, then first of all you should update the drivers by downloading them from the manufacturer’s website. In some cases, the touchpad should be removed from Device Manager and the computer restarted. In this case, the installed driver will be reinstalled automatically.
In the settings of some touchpads, when you connect an additional pointing device, it is automatically disabled. These settings should also be found in the manufacturer's software.
Why doesn't the touchpad work on my laptop?
There can be quite a few reasons for such a breakdown. This could be damage to the cable, contamination of the panel, software errors, or even the impact of viruses on the system. It all depends on how the problem manifests itself and what the user is complaining about. The touchpad may not respond to touches at all, may work with delays and jerks, or may simply not respond to quick gestures. In general, these are the main causes of failure.
| Problem | Possible cause of malfunction |
| The sensor does not respond to user touches | Damage to the cable Sensor is disabled in the system |
| Sensor operation is unstable or jerky | Virus interference Dirt on the touchpad The train is leaving |
| Gestures don't work | There are no drivers or manufacturer's proprietary utilities are not installed |
| The keys stick and the panel periodically does not work | Dirt under the panel Mechanical damage |
Complaints can arise in both Windows 7 and Windows 10; almost every laptop user has encountered problems of a similar nature. At the same time, not everyone knows what to do when the keyboard and touchpad do not work, and independent intervention can sometimes cause even more harm. If scrolling or other quick gestures do not respond, then the problem can be solved programmatically. When the sensor does not work well or does not respond to touch at all, but the system settings do not help, then you should turn to professionals.
Below are the most common reasons why the touchpad on a laptop does not work and recommendations are given on what should be done in these situations. If your touchpad is not working correctly, try these tips.
Mouse emulation mode settings on Windows 10
In Windows 10, the names of sections and tabs have been slightly changed. In order to complete the previous steps, define special functions, check the driver version, or move on to other settings, you need to complete 4 steps:
- Open “Settings”, go to the “Start” menu, left-click on properties (gear image).
- Let's stop at "Devices".
- We are interested in the section “Touchpad” - “Related parameters”.
- Open the “Hardware” tab and look for the properties of the desired mouse.
On the tabs of the same name, here you can update drivers, select properties, change parameters, and check the operation of the device.
Hardware failure
The touchpad may break due to the laptop being dropped or liquid spilled on it. In this case, only contacting a service center will help.
As a rule, the cause of a breakdown is a broken contact of the touch panel cable, damage to its connector or oxidation. In this case, you will need the help of specialists who will perform accurate diagnostics and repairs.
From the article we learned the main reasons why the touch panel stops functioning. When trying to find the root of a problem, we recommend moving from the simplest solution to the most complex one. Sometimes pressing hotkeys or reinstalling the driver can fix the situation.
Original article: https://www.nur.kz/technologies/instructions/1713835-ne-rabotaet-tacpad-na-noutbuke-priciny/
Dirty control device
A touchscreen is a touch panel on a laptop. It must be kept clean so that it can always read finger touches.
If the touchpad, like the laptop itself, is not periodically cleaned of dust and dirt, then over time a layer will form that will interfere with the device’s normal functioning. In the most severe cases, when tea or other liquid is spilled on the laptop, the device may stop responding to the user's commands.
If you encounter a similar problem, alcohol and a cotton swab or napkin will help. Dampen a cotton pad with alcohol and wipe the touchpad. Perform this procedure with the laptop turned off.
BIOS settings
When you restart your computer, open the BIOS. Usually, keyboard shortcuts are written on the screen to open it. Here are the popular keys for entering BIOS: Del, F1, F2, F3, F10, Fn+F1, Esc, Ctrl+Alt+Esc, Del, Ctrl+Alt+S, Ctrl+Alt+Ins.
Open the "Advanced" tab and find the "Internal Pointing Device" option. The value should be “Enabled”.
After changing the settings, close the BIOS and save the settings: on the “Save & Exit” tab, click the “Save Changes and Reset” button (confirm “Yes”).
Using operating system software and tools
The instructions are relevant for all modern versions of Windows 10, 8.1, 7, etc.
- Select the Start menu and go to Settings and then to Devices;
- In the window that appears on the left, go to the “Mouse/Touchpad” subsection;
- In the window on the right, click on the line “Advanced mouse options”;
- “Mouse Properties” will open, we need a section with device parameters (marked with a red icon);
- This is where the touch sensor is turned on and off;
- All that remains is to click “Enable (E)” and save the settings;
- After that, try tapping or swiping your finger to see if the cursor reacts.
Asus owners can use the proprietary Asus Smart Gesture application. Just open the software, go to the “Mouse Detection” section and find the item Disable touch-pad when mouse is plugged-in. If there is a checkmark next to it and a regular mouse is connected to the PC, then the touchscreen is turned off. Uncheck the box, click OK and see if the required component works.
You can also check the functionality of the Touchpad in the BIOS settings
Let's figure out how to properly implement our plans.
- Restart the computer; during startup you will need to press F2 or Delete several times (this can also be the F10, Esc buttons);
- When the BIOS menu is displayed in front of you, go to Advanced and press Enter;
- You need to look at the Internal Pointing Device feature;
- Make sure that Enabled is set opposite it, otherwise the touch module is deactivated and needs to be activated;
- After setting the Enabled value, press F10 to save the changes and wait for the computer to restart.
It is noteworthy that viruses can lead to incorrect configurations and a lot of inconvenience in the operation of equipment. Clean the system with an antivirus utility.