Problems with the keyboard on a desktop PC are easily resolved - if important keys do not work and you cannot fix them on your own, you just need to purchase a new device, since its cost is low.
Another thing is a laptop. It is not possible to simply replace the keyboard here for the simple reason that to do this, most likely, you will have to disassemble almost the entire laptop. If the model has already been discontinued, then finding the same keyboard is also a headache. And if you managed to find it, then the cost of a laptop keyboard is much higher than usual, and this does not include replacement costs...
Or maybe the inoperability of one or two buttons is not associated with a fatal breakdown? Let's try to figure out what is fashionable to do in such cases.
Obvious ways to solve the problem
In laptops, the keyboard is equipped with locking mechanisms similar to locking the screen of a smartphone. It's likely that you accidentally enabled the lock, in which case you just need to unlock your input device. It is done differently depending on the manufacturer and model. Usually this is a combination of the Fn key with other buttons (NumLock, Win, Pause), there may even be a special lock key with a picture of a lock. If blocking does not help, we dig further.
Of course, no one excludes a manufacturing defect, but this is a very rare reason for the keyboard to be partially inoperable, and it is discovered almost immediately after purchasing the computer. That is, the laptop will most likely be under warranty. And if 15 days have not passed, then it can be returned/exchanged for another one.
If the keyboard responds to presses with delays, sometimes very long, we can confidently say that this is the “intrigue” of the operating system. That is, the laptop’s memory is overloaded, the processor cannot cope with processing commands, hence the freezes of the computer itself and all the peripherals. Rebooting usually completely solves the problem, and to prevent it from occurring too often, you should clean your computer periodically.
Another software reason is incorrect operation of the driver, although usually the keyboard does not require the use of specialized software for its operation. But if this is so, just update the “firewood” and everything will work.
The situation when individual buttons on a laptop keyboard stop working is also not so rare, and in most cases you need to check whether foreign objects in the form of food crumbs or other debris have gotten under the keys.
Even if you don’t have the habit of eating at the computer, you probably drink cola/juice, and spilled liquid is the most common cause of button failure; sometimes half of the buttons stop working because of spilled tea. Dust settled under the keys can lead to the same consequences.
Try to carefully clean the keyboard with a vacuum cleaner with a thin attachment (there are even special vacuum cleaners for keyboards, and not only laptop ones) or a hard brush. If it doesn’t help, try to unclip the key and clean its working area, but you need to do this very carefully, especially if you have not done this before. The fact is that fastening methods are different, and the use of an incorrect dismantling algorithm can lead to breakdown of the fixing mechanism. Finding it will be an even bigger problem than finding a new keyboard.
Which buttons most often stop working?
Most often, the buttons used during virtual or downloaded games on a PC become faulty. As a rule, these are space, enter, tab, shift, numbers and F series buttons, arrows (down, up), letters, print screen, windows button. The most problematic is repairing the spacebar key. This is the longest button and has a metal bracket attached to it that is inserted into the slots in each key support. The bracket must be placed in the slot without pressing, since if it is deformed, it will not be possible to put the key in place. Thus, this is a complex process that not every repairman undertakes.
As for the other buttons, there are no problems with them: if they break down, they can simply be replaced with others, as well as repaired.
In general, the keyboard breaks for various reasons: mechanical or software. To avoid mechanical breakdowns, you should be as careful as possible with buttons and equipment. To avoid repetition of software errors, it is worth remembering a number of the tips listed above.
Subscribe to our Social networks
Fixing a software glitch
If cleaning and other methods described above do not have any effect, the first thing you need to do is try to make repairs using software. As we have already noted, incorrect operation of drivers or a software failure at the operating system level can lead to part of the laptop keyboard not working properly. What can be done in such cases:
Start the computer in the so-called “Safe Mode”. To do this, reboot the laptop, and immediately after the beep, press the button responsible for entering the download menu. This is usually F8, but it could be another function key or even a key combination.
When a window appears with the words “Additional boot options”, you need to select the option to start the device in safe mode using the up/down arrows (the mouse does not yet work at this stage of the boot). The essence of the method is that the laptop will start without drivers (or rather, with a minimum number of them). If, as a result of checking the functionality of the problematic keys, they work, then the problem is really either incorrectly working drivers, or the presence of system problems at the software level. If part of the keyboard does not work in safe mode, we can conclude that the problem is hardware.
So, we found out that the keys not working have a software reason. Let's describe how to update drivers:
- reboot the laptop in standard mode;
- launch “Device Manager” (Start menu, enter the phrase “Device Manager” in the search console). If some of the letters on the laptop keyboard used to type a phrase do not work, try typing this phrase in the search bar of any browser, it will be able to correct the error and return a grammatically correct result.
- All that remains is to copy it (using RMB) and place it in the console using the same mouse or the Ctrl+V combination. You can do it differently - open any text and “pick out” the necessary letters from it by copying;
- a search result will appear, select the desired service from it, it will be first in the list;
- in the device manager, look for the “Keyboards” branch, open it and right-click on the available device, selecting “Update drivers”;
- A window will open in which you will be asked to choose the option of automatically searching for a keyboard driver on the network or manually on the computer. Choose the first option;
- if the system displays a message that driver updates are not required, simply remove the current version by selecting “Delete” in the same context menu;
- Windows will try to find a suitable driver for your keyboard and install it automatically;
- if the attempt is unsuccessful, simply restart the laptop; during the peripheral scan, the system will detect a device without drivers and try to install them.
Driver updates can also be done using specialized utilities that can independently detect all outdated drivers and replace them with the latest stable versions. If part of the keyboard still does not work as a result of this step, it is obvious that the cause is not a software problem.
Troubleshooting
Quite often, software problems can be fixed at home, without the help of service specialists. To do this, you should watch training videos on YouTube or read articles on the Internet on a similar topic. The reason is incorrectly installed drivers, viruses or a system failure. The problem is solved by rebooting the device, or in more complex cases, by completely reinstalling the system. If your computer is infected with a virus and the antivirus installed on your computer does not help, you will have to resort to reinstalling the system in any case.
Fixing a physical problem
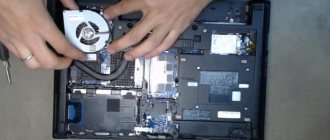
If cleaning with a vacuum cleaner does not help, the only option left is to partially disassemble the laptop, during which you will be able to gain access to the inside of the device, diagnose the problem and try to fix it.
IMPORTANT. If you are not confident in your abilities, it is better to abandon this idea and take your computer to a service center. Otherwise, you can cause even more damage to your laptop, requiring expensive repairs.
Here is an approximate sequence of steps for disassembling a laptop (approximate, since the method of removing the top panel may differ greatly for different models):
- turn off the laptop, do not forget to remove the battery (usually it is located under the cover located at the bottom of the device near the fold of the top cover with the display). Please note that the power cable must be disconnected from the socket; it is also advisable to remove all peripherals connected through external ports and connectors (Ethernet cable, flash drives, mouse, printer);
- We try to unlock the latches on the top of the laptop using any suitable sharp object (knife, screwdriver, knitting needle). As a rule, the latches are located closer to the edges of the top plate; detecting them is not so difficult using the same knife. It may turn out that the latches are missing. Then you should study the fastening mechanism by studying the instructions, or searching for relevant information on the Internet;
- If all the latches are disconnected, do not pull the top of the laptop towards you with all your might - it is connected to the insides via a cable, and you risk tearing it off. Carefully lift the plate and very carefully try to disconnect the cable, holding on to its hard plastic part. It is strongly not recommended to pull the flexible part of the cable with braided wires - you can easily damage them;
- At this stage, it is worth carefully inspecting the cable for defects - if damage is found, then, most likely, they are the reason that some laptop keys have stopped working. A damaged cable must be replaced, and this is not the most difficult operation;
- a microcontroller is hidden under the plate with buttons, which transmits a signal from the keyboard when a button is pressed to the processor on the motherboard. Carefully inspect this place; if dust has accumulated in some places or there are damp stains, they need to be eliminated - perhaps these factors are the reason for the partial inoperability of the keyboard. It is not difficult to find out exactly where the keyboard microcontroller is located - the end of the cable we pulled out was attached to it;
- The next stage is cleaning the non-working (and preferably all) keys. How to detach the buttons depends on the laptop model. Note that it is extremely rare to find a broken key with the same locking mechanism from other laptops, even from the same manufacturer. So we perform this operation very carefully;
- Having cleaned all the keys, we proceed to assembly in the reverse order. To avoid mistakes, it is advisable to record the disassembly process on video, which will help during assembly.
If such a radical repair method also turns out to be unsuccessful, well, you will have to change the entire keyboard or contact specialists, and this is a completely different level of costs.
Wireless
For a wireless device, first make sure that the batteries are reliable (it happens that you forgot to replace dead batteries in time) and that the built-in battery is charging (if available).
Reconnect again
Then you should update the connection. Before doing this, turn off the keyboard and receiver (if equipped), and disconnect it from the computer. And connect again. When working via Blutooth, make sure that the transmitter is turned on and working correctly (sees the device).
Try on another device
If the above steps do not help, check the functionality on another computer or smartphone that you have access to.
Is it possible to do without several broken keys?
If a couple of buttons are broken and cannot be repaired, and replacing the keyboard does not suit you (for example, for financial reasons, or reluctance to change the input device to which you have already become accustomed, or simply because it is difficult to find your keyboard model and couldn’t), then this is not a fatal case. There are several ways to get around this trouble.
Reassigning a frequently used button to another
In principle, all the keys are important, but among them there are some that are used extremely rarely. For example, if the laptop keyboard does not print the letter Z (Z), you can reassign it to a key with two vertical stripes and a backslash (and if you do not want to lose this button, remember that many keys are duplicated - for example, Ctrl / Alt / Shift ). This is done using specialized software, and the principle here is very simple: the reassigned pair can be anything, when you press one button, it is perceived as another, and vice versa.
An example is the free MapKeyboard utility - it is compact, does not take up much disk space, does not require installation, and is very easy to use. The operating principle is as follows: you indicate to the program the two keys that you want to swap places and save the result. There can be any number of such pairs, the main thing is that the same button is not used in two substitutions, otherwise you yourself may get confused. Other similar programs work on the same principle.
Connecting an additional keyboard
Yes, a laptop also has this option. On older models there is a special connector for this (PS/2), but today almost all models have a USB connector. No additional settings or drivers are required: just connect an external keyboard, and it will immediately become working. True, this method is not very suitable for mobile use of a laptop; carrying a keyboard with it is not an attractive option.
Virtual keyboard
A virtual version of the input device will help out - such a software keyboard is built into Windows and in many ways resembles an analogue for smartphones, but better, since its dimensions are much larger.
How to enable the virtual keyboard:
- Through the Start menu, launch the Control Panel;
- select the “Special Features” tab;
- in the “Ease of Access Center” section, look for the “Enable on-screen keyboard” item;
- The size of the buttons can be changed by changing the size of the window itself, the keyboard is always placed on top of all windows, but if at a certain moment it gets in the way, the window can be minimized in the usual way.
ADVICE. If several keys on your keyboard that are often used as hot keys are not working, many applications allow you to reassign them. Of course, this cannot be called an ideal solution, but, say, if you type texts only in Word, then the replacement option will not be so bad.
So, we looked at the main ways to solve the problem with laptop keys not working. How did you solve the problem? Remember that your comments can be very useful, because each model may have its own solution, different from others.
Wired
If the keys on a wired (mechanical or membrane) keyboard do not work, make sure that it is connected to the computer at all. It is possible that you accidentally touched the connection and the USB plug of the cable simply flew out of the connector.
Broken wire
First of all, make sure that the wire through which the connection is made is intact. You need to check it along its entire length. Any kinks or mechanical impacts could disrupt the contacts and lead to rupture.
Check USB connector
The next step is to check the USB connector. To do this, simply plug the cable into the adjacent USB connector. If everything worked, it is obvious that the problem lay in a malfunction of the port. It should be cleaned and wiped with a cotton pad soaked in an alcohol solution. In some cases, the USB socket becomes loose due to frequent and careless use: try to connect all devices carefully.
We use automatic maintenance
"Ten" and other versions of "Windows" are equipped with a special debugging tool that works in the background, eliminating most of the problems found. Typically, debugging runs automatically on a schedule, but you can command it to run manually:
- We find on the “Desktop” a sign called “This PC” (usually used to launch “Explorer”) - right-click on it and select a line in the list to launch properties.
Open computer properties via the shortcut menu - In the system properties, look at the lower left corner - click on the link leading to the “Service Center”.
Go to Security and Service Center - Expand the second drop-down menu “Maintenance”.
Expand the "Maintenance" item - In the “Automatic...” block, click on the “Start...” link.
Start the service using the appropriate link - The display will indicate that automatic maintenance is in progress. Please note that this process will take resources from the PC (RAM, processor, etc.). To ensure that maintenance is completed as soon as possible, it is recommended not to perform any actions on the PC during this period or to minimize them. Otherwise, the PC may start to slow down. After checking, we check the functionality of the Start panel.
Wait for background maintenance to complete
Making changes to the “Registry Editor”
You can force the Start panel to open again by editing the registry. However, this action must be performed carefully and responsibly. Before making changes, be sure to back up your database:
- We launch the “Run” window through the hot combination of R and Windows - type the word regedit and start executing the command. If necessary, we allow the editor to change parameters on the PC (if a system window appears).
Paste and run regedit command - Immediately go to the “File” menu, where we click on the export option.
Click on the "Export" function - In a window similar to “Explorer”, select a location to store the copy and a name for it. Using the special button in the lower right corner, save the registry file.
Save a copy in any folder - Now let's move on to the editing itself: double-click on the second main branch in the left menu HKEY_CURRENT_USER, and in it open the Software folder.
In the HKEY_CURRENT_USER tab, open the Software directory - In the same way, we sequentially display the contents of the following directories: Microsoft - Windows - CurrentVersion - Explorer - Advanced.
The final folder should be Advanced - When we have reached the end point of the directory (opened the Advanced folder), scroll to the end of the list on the right side of the screen and right-click on the free field below - select the creation action, and in the menu - a parameter in DWORD format.
Create a new DWORD entry in the Advanced folder - We take the phrase EnableXAMLStartMenu as the name for the new entry.
Name the entry EnableXAMLStartMenu - Double-click on the created item - make sure that the value field is 0. Close the editor and all previously open windows. We restart the PC using the window that is called up by the combination Alt + F4 - select “Shutdown” from the menu.
Set the value to 0
The side keyboard on a laptop does not work: reasons
It often happens that the main keyboard works, but the side buttons cannot be pressed. This happens due to user inattention. Most likely, the “num lock” button is pressed. You need to release it, or press the “num Lock” and “FN” buttons. After such manipulations, the side keyboard should work. There is everything, the above manipulations did not bring the laptop to life, it is necessary to examine the equipment more deeply.
The side keyboard on the laptop does not work, reasons:
- Hardware . Mainly associated with blockages, as well as the presence of liquid in the keyboard area. This often happens if children who like to drink juice, milk or tea are sitting at a laptop.
- Software . They are associated with the possibility of infecting a laptop with malicious software, in other words, viruses. This often causes drivers to malfunction. These causes can be eliminated quite simply; we recommend that you first resort to their implementation rather than eliminating hardware causes.
Job
