Typically, the system has two layouts installed, Russian and English. But sometimes users of Windows 10 and earlier versions are faced with the fact that an additional layout appears in the language switching menu, which causes inconvenience.
Indeed, if you don’t need some input language, you don’t use it, then it’s easier to delete it than to flip through it every time you switch the keyboard layout. At any time, you can return the layout that you removed. Below in the article I will show several ways in which you can remove the “extra” language from the keyboard layout in Windows 10.
Let's start with something simple!
The reasons for the appearance of unnecessary layouts can be different: a crooked Windows 10 update, synchronization through a Microsoft account, manually adding a language.
As for updates, I personally encountered a problem when the system automatically added a new language based on location. After deleting and rebooting, it appeared again. And this continued until Microsoft fixed the defect.
The second caveat is that if you use the same Microsoft account on different PCs, there is a possibility that the language settings may change.
Let's move on to the instructions:
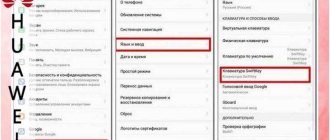
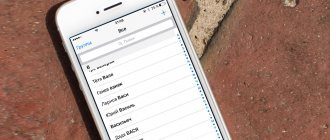
- In the lower right corner, left-click on the icon indicating the selected language and input method. A list will be displayed, and at the bottom there will be a “Settings...” item:
- Now we find an unnecessary element in the list and delete it:
- But how to remove a Windows 10 keyboard layout within one language? For example, it may be English - USA, Indian, Canadian, British. Extra packages can be eliminated by clicking on the “Options” button (see screenshot above), and in the window that opens we get rid of the inappropriate line:
In theory, this all works great. But in practice it’s 50/50. Depends on the version of Windows 10, installed updates and other factors. Next, we will consider more complex but effective solutions.
Theory
In general, you can remove any language that is not the default. For example, if the system has only English and Russian languages, then the first can be deleted if the second is designated as the main one. In this case, it does not matter what the source language of the system (distribution) was, which is easily determined in PowerShell with the command:
(Get-CimInstance Win32_OperatingSystem).oslanguage
The command displays the language identifier, where 1033 is English (US), 1049 is Russian, the rest are here in decimal form or from Microsoft in hexadecimal (insert the values into the programmer’s calculator).
On the problematic OS, this command returned 2057, which corresponds to English (United Kingdom). In combination with the picture from the parameters, this was very strange, because the distribution language should not have any language packs, since it is already in the system.
First, we tried to remove the UK and Canada language packs using the lpksetup commands. However, this did not lead to success, which hinted at the actual absence of these language packs, but did not bring us any closer to solving the problem of phantom languages. I had to go in from the back door.
How to remove a Windows 10 keyboard layout through the registry
Here it is worth understanding that there are displayed and “hidden” languages. The latter are not displayed in the list on the taskbar, but they are often included in the OS settings. However, their deactivation may be blocked.
- Press Win + R on your keyboard and enter the command in the Run console:
regedit
- In the editing window, we immediately create a backup copy so that if unforeseen consequences occur, you can run the reg file and return everything to its place:
- Now we need to find out the language code. To do this, we use PowerShell - right-click on the “Start” icon (Start) and in the menu that appears, select the appropriate option with administrator rights:
- Select, copy and paste the following command into the console window (Ctrl + V):
Get-WinUserLanguageList
- A list of added languages and input methods (InputMethodTips) is displayed. We remember the code of the unnecessary element. Please note that if 0 419 :00000 419 , this is Russian RU, if 0 409 :00000 409 is English US, and with the ending 4009, 11009 - other English layouts (in my case, Canadian, Indian).
- We return to the registry editor (but do not close the PowerShell window yet) and on the left we see a “folder tree”. You need to open them by moving along the following path:
HKEY_CURRENT_USER | Keyboard Layout | Preload
- On the right we see keys with already familiar values. We remove unnecessary ones, restart the computer and check the result.
Did you manage to remove the language or keyboard layout of Windows 10 using this method?
Suddenly it doesn’t help, then you need help from the console:
- We use the command discussed at the beginning of this chapter again. But now it’s worth paying attention to the “LanguageTag” line. For example, ru-UA:
- Enter the commands one by one:
1) Create a variable and place a list of languages in it:
$LangList = Get-WinUserLanguageList
2) Mark the extra element (instead of the word code, insert your value from the “Language Tag” field:
$MarkedLang = $LangList | where LanguageTag -eq "code"
3) Remove the object from the list (after pressing Enter the value should be True):
$LangList.Remove($MarkedLang)
4) Save and update the list:
Set-WinUserLanguageList $LangList -Force
Ready!
Remove an interface language that is not in the settings
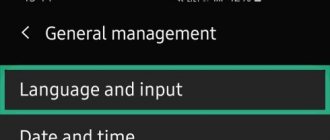
Press Win+R and type Lpksetup and select Remove Language.
In the next step, select the language you want to remove.
Bonus
To ensure that languages and layouts previously added to the system are available when creating a new user and on the welcome screen, you should do the following:
- Go to the “Control Panel”
- Select the “Small Icons” view mode (in the upper right corner), and then open the “Regional Standards” section:
- On the “Advanced” tab, click the “Copy ...” button, then at the very bottom of the new window we activate two options:
about the author
Vadim is the owner of this blog, and most of the entries here came from his pen. Details about the blog and the author are here.
You may also be interested in:
- Tricks for managing language settings from PowerShell and the command line
- How to correctly configure the input language on the Windows 10 login screen
- How to correctly configure the default interface language of Windows 10, store applications and input
- How to remove an uninstallable driver in Windows
- PowerShell: Web Parsing and File Downloading with Invoke-WebRequest
- 8 Useful PowerShell 5.0 Features You Might Not Know About
- How to bulk rename files by mask in PowerShell
- 6 Windows Language Settings That May Confuse You
Sign up for free notifications of new posts and get my book on speeding up Windows startup as a gift!
Yes, this method is probably more understandable (visual) than on Ansverse.
Added a link to the article.
There is also a very simple way to solve the problem. But it doesn't always work. 1) Re-login. 2) Shut down the computer completely (Start>Shutdown>Hold Shift, Shutdown).
At the time of solving the problem there was no way on Answers https://i.imgur.com/R7Kapr8.png And yes, I got by with two commands instead of four