Just like desktop computers, a laptop keyboard can fail. Keys can also stick, fall out or break. Even a simple attempt to clean the keyboard can lead to loss of keys, not to mention spilled tea, coffee or other liquids. If there are pets or small children living at home, this adds two more reasons for the keyboard to malfunction. Below we will consider a method for removing the keys for cleaning, as well as returning the keys to their place and several ways to fix a minor breakdown.
How to remove a key from a laptop
Types of fastenings
Let's look at the types of key mounts in a laptop keyboard
- membrane - the cheapest and most common;
- switches are a more stable, reliable, and at the same time expensive type of key. Much less common than membrane;
- capacitive - transmit a signal by closing contacts. The second most common type after membrane. Not the most reliable type of keyboard;
- touch is the most expensive type. In addition, to repair it, you will need to remove the entire touch panel, and this is impossible to do at home.
Why film
Anyone who has ever tried to clean a laptop keyboard on their own understands perfectly well that doing this is not as easy as with a personal computer. Due to the small size of the device and space saving, as well as due to different types of mounting, problems may arise.
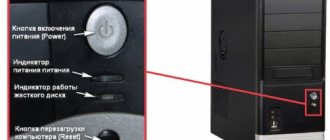
Removing the keyboard in a laptop, disassembling the device completely and disconnecting the cable from the screen may be necessary in cases where it is necessary to perform one of the following operations:
- Solving problems with elevated temperature, including:
- disassembling the laptop to vent the cooling radiator;
- cleaning the fan from dust, hair and debris;
- replacing thermal paste, which promotes better heat transfer between the processor and radiator;
- checking the presence of oil to lubricate fan bearings;
- repair or replacement of a damaged system configuration element;
- solving keyboard problems such as:
- cleaning the keyboard from spilled liquids, dust, debris and hair;
- checking, replacing or repairing a damaged board or button.
Installing regular keys
Important! Record the order in which the keys were located. Otherwise, they will have to be rearranged again.
- Install the “swing” on the membrane. First, place the antennae under the larger part, then - by applying slight pressure - they will go in on their own.
We place the antennae under the larger part and press a little so that they go in further on their own. - Raise the “swing” using a fairly thin object (a paperclip, a thin knife, a screwdriver or a ruler).
- Place the button and press until it clicks.
We put a button
Find out detailed instructions on how to clean your laptop keyboard, as well as the best cleaning methods, in our new article.
Laptop Specifications
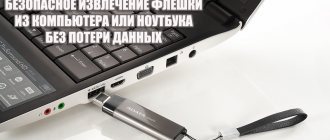
This is exactly what you need to do when you spill liquid on your laptop - turn it off and take it to a service center or disassemble it at home with your own hands. Let's remember why these laptops became widespread in their time. Looking at the specs of the 2011 laptop, we can say that the i7 processor, a decent graphics card for a laptop, and 6GB of RAM are a good balance of features.
Combined with the logo of Acer, a company that has come a long way in the laptop business with its ups and downs, it is a good alternative to its competitors. However, philosophy aside – let’s be closer to technology.
On a flooded laptop, we immediately remove it, because some part of the motherboard is under voltage even when the laptop is turned off.
Keyboard repair
Let's look at ways to repair keys on a laptop keyboard
There are two ways.
First way
If any fastening is broken, you can try to restore it using a needle from an insulin syringe:
- the needle is applied to the damaged part. It is better if it extends two to three millimeters beyond the edge of the breakage;
- Use a soldering iron to heat the needle and carefully fuse it into the plastic;
- Carefully bite off the excess plastic using side cutters.
Second way
If you don't have any tools, you can use superglue:
- heat the needle with a lighter;
- make a groove using lint from a comb or similar objects. The main thing is that the size of the groove allows the lint to enter;
- fix the lint with superglue;
On a note! The result can be checked in about an hour. Typically, the process takes about forty minutes to an hour.
Video - How to repair and insert laptop keyboard buttons
Cleaning Up Spills
If you spill tea or coffee on your keyboard, you should be more careful when cleaning it. In this case, you must immediately disconnect the keyboard from the computer and drain all the liquid. Next you need to disassemble the keyboard. So, remove the buttons and soak them in plain water to remove any remaining sticky liquid. And the place where the buttons were should be thoroughly wiped with a damp cloth. If you are sure that liquid has not gotten inside the keyboard, then you can begin assembly.
It is possible that after assembling the keyboard, some keys began to stick, then you need to continue cleaning. To do this, you need to turn the keyboard over and unscrew the screws. Carefully separate the top and bottom pieces. Of course, there is no 100% certainty that you will be able to fix the keyboard, but it’s worth a try. There is no need to take everything completely apart. You need to carefully wipe with a damp cloth the areas where the liquid may have been. After this, it is better to assemble the keyboard and test its performance.
Warning
- A malfunction resulting from the ingress of liquid requires high coordination, accuracy and attentiveness from self-repair. Too much force or the wrong cleaning agent can completely destroy the conductive path. If you are not confident in your abilities, it is better to entrust this work to a specialist.
- Removing and installing keys does not cost much (around 500 rubles), independent removal requires great skill, care and accuracy. Excessively sudden and careless movements can damage the fastenings. Carry out the procedures only if you have the necessary skills and are unable to take the laptop to a service center
- The fastenings in small keys are also small. If you are not confident in your vision and the necessary dexterity, it is better to entrust the work to a service center
- Working with a soldering iron requires not only care, but also knowledge, skills and experience. Careless movement can lead to damage to the entire device.
- Superglue can get on the conductive path, rendering it inoperative. Work very carefully.
Why you need to clean
The user is in constant contact with the keyboard while working at the laptop. But many people don't think about the fact that it needs to be cleaned. After all, the garbage is almost invisible from the outside. With active use, you can wipe the device after 10–15 days, then it will look like new. But after a year it is necessary to carry out a general cleaning. Over this period of time, not only dust, but also hair and crumbs accumulate under the buttons. And along with them are microbes harmful to health.
A lot of debris accumulates under the keys
Tea, coffee and other drinks spilled on the keyboard are dangerous for the entire laptop. If now the computer works normally without cleaning, then after some time, for example, a couple of months, it can be thrown away. Why? The liquid penetrates through the keyboard into the case, ending up on the motherboard and contacts, which become shorted or oxidized. As a result, not only the board will suffer, but also the hard drive, processor and other components. The accumulation of dust on conductive elements also leads to a short circuit. Excess dirt and sugary drinks cause the keys to stick.
Liquid gets between the keys and can damage the electronics in the case
The most common causes of breakdowns
The keyboard on a mobile PC has approximately the same structure as on a personal PC. It, like any device, is very sensitive to all kinds of dirt, animal hair, crumbs, and especially liquid spilled on it. After a certain time of using the keyboard, the buttons on the mobile PC fail or simply fall off.
Also, the cause of breakage of buttons on a mobile PC can be a simple banal cleaning of the keyboard using a vacuum cleaner for this purpose. Or a small child may accidentally tear off a key. Also, the cause of such a breakdown can be pets that live with you. This also happens quite often. But you don’t need to immediately take your laptop for repair. Very often you can do everything yourself.
Progress
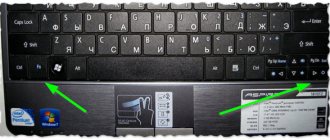
First you need to remove the old button. Take the violin, straighten it, then you need to insert a paper clip under the bottom of the key, and then pull it towards you. Proceed with caution. In almost all cases, the keys can be easily removed. Once you have removed the old key, you can easily insert the new one.
To do this, you should place the new button in place of the old one and press lightly, it will stand up on its own and be fixed with plastic fasteners. The work is ready!
Working with large buttons
For “long” elements (input, tab, etc.), due to their slightly different design, slightly modified installation rules are required. The design differences lie not only in their size, but also in the presence of a stabilizer made of rigid metal wire, which ensures uniform pressure along the entire length of the element. The “Space” even has two metal rocker arms, so installing it is somewhat more difficult.
In places where large buttons are installed on the metal substrate of the input device, there are a couple of additional ears for fixing the stabilizer.
But in general, the whole process, even for the Spacebar button, differs little from that described above:
- Install the first stiffener into place by inserting the ends of its fasteners into the holes on the input device substrate. At the same stage, the second stabilizer must be secured in plastic grooves, which are located directly on the inside of the button cover.
- Place the ends of the second “rocker arm” into the special loops on the keyboard, put the button in place and press the lower part until it clicks.
The remaining large buttons, which are designed with only one stabilizer, are easier to work with. For them, the action is limited only to the last point of the sequence of actions described above.
How to repair broken keys
Typically, any repair of this laptop element comes down to replacing the broken one with a part from the donor device. If you try to fix damage on your own, for example, to plastic fasteners or “elevator” connections, then the smoothness, noiselessness and softness of operation of the restored element may differ significantly from its neighbors.
Sometimes, along with the button, a rubber spring glued to the film of the input device falls out. In this case, before installing the dropped element, it will need to be carefully glued strictly in the center with the wide part to the bottom. It is not allowed to move it to either side, since it must be located exactly under the conductive path and close it when pressed.
Therefore, always carefully study the design before disassembling/assembling them. For example, for the case in the photo, the rule applies - first you need to secure the metal elements to the keyboard, and then put the cover on them. However, for the most part, all modern laptops have a similar design, and all the buttons on them are installed in the manner described above.
The most common causes of breakdowns
The keyboard on a mobile PC has approximately the same structure as on a personal PC. It, like any device, is very sensitive to all kinds of dirt, animal hair, crumbs, and especially liquid spilled on it. After a certain time of using the keyboard, the buttons on the mobile PC fail or simply fall off.
Also, the cause of breakage of buttons on a mobile PC can be a simple banal cleaning of the keyboard using a vacuum cleaner for this purpose. Or a small child may accidentally tear off a key. Also, the cause of such a breakdown can be pets that live with you. This also happens quite often. But you don’t need to immediately take your laptop for repair. Very often you can do everything yourself.