When you open most programs in Windows, they don't run as an administrator, even if you're signed in to an administrator account. This is due to the User Account Control (UAC) feature, which allows you to run applications only with administrator rights when necessary.
This may seem annoying, but it protects your computer. By not granting unnecessary privileges to your account, you avoid a possible security breach.
However, you will often need to run the program as an administrator to make changes or troubleshoot problems. Here's how to run any Windows program as an administrator, and how to fix administration-related problems when they arise.
Method 1: Explorer context menu
This option is suitable in cases where you need to run the program as an administrator through an EXE object or a shortcut on the desktop or in any directory. Then you just need to right-click on the required object and select “Run as administrator” in the context menu that appears.
Work risks
Although running Windows as an administrator is easy and in some places even useful for the user, Microsoft developers do not recommend using this option on a permanent basis. Regular use of a hidden account can lead to the user inadvertently causing harm to the system. This manifests itself in the form of deletion of important files, as well as random changes in parameters. If your system has virus software and you often run administrator mode, then viruses will run as administrator. This will mean that the virus will be able to make changes to each of the documents or partitions of the hard drive. As a result, you will get identity theft, information theft, and ransomware banners. To maximize the security of your operating system, we recommend that you run it as an administrator in the operating system only when it is required for settings of video games and applications and you are sure that changing the settings will not harm the system.
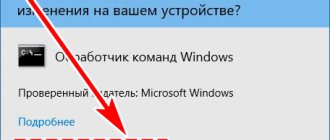
There is another risk of working in admin mode - granting unlimited rights to programs that do not have a certificate. A program certificate is the name of the developer, which is “stitched” into the installation file and guarantees the safety of the software used. When administrator rights are assigned to a program, the application name, certificate and additional information will be displayed in a separate pop-up window of the operating system. If you notice that the application in the “Certificate” section has the value “Unknown”, then this indicates that you are working with a hacked version of the software or a virus that can make unwanted changes to Windows. Now you know how to run the system as an administrator and set up management of all programs with unlimited access. You need to share your options for launching admin rights and ask questions in the comments.
Method 2: Start Menu
Some users use the Start menu to find and launch a program there. There is also an item responsible for opening with elevated rights. To do this, open the menu itself, find the application through the search and click on the corresponding inscription on the right.
Method 3: Taskbar
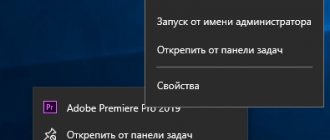
Users are accustomed to adding frequently used applications to the taskbar in order to be able to quickly launch them. In these situations, it may also be necessary to use the highest authority. Then you need to right-click on the icon itself, then again on the program name and select “Run as administrator.”
Warning shots
When you give a user the ability to run tasks with full rights, there is a chance that you will give them control of the system, regardless of the precautions taken. I don't know the vulnerabilities of my solution, but that doesn't mean they don't exist. You act at your own risk.
- Usually, when posing such a task, they immediately remember AdmiLink and the runas / savecred command. AdmiLink is a third-party solution, and my approach uses only the built-in capabilities of Windows. In turn, runas gives the user the opportunity to run any task with saved credentials, other than just those provided by the administrator.
- My solution uses built-in Windows capabilities, but is not an exploitation of vulnerabilities. As an administrator, you create all the necessary conditions for launch with your own hands, so you need to be on the safe side↓
- I strongly do not recommend this approach for running interactive applications
. As a rule, they have an Open / Save As dialog, from where you can easily launch the command line, and then do whatever you want. Running a script carries less risk. - The script to perform an administrative task must be in a location to which the user does not have write permission. This could be an administrator profile, a system folder, or a disk root. In principle, any location is fine, as long as the script is set to a high level of integrity.
- The user should not be able to modify the autonomous system. This can be solved by encrypting the disk, using a BIOS password, prohibiting booting from external media, sealing the PC case, etc.
Method 4: Hotkey
This option is recommended when the user wants to optimize his interaction with the computer using standard hotkeys. The combination Ctrl + Shift + Enter to launch software with elevated rights will work if it was initially selected or, for example, found through a search in the Start menu.
Method 5: "Command Line"
“Command Prompt” is a standard Windows operating system application that allows you to manually perform actions on your computer using various utilities. This also applies to launching software or system tools, which is done like this:
- Open Command Prompt using any convenient method.
Read more about all the possible options in a separate article on our website at the link below. Read more: Open the Command Prompt in Windows 10 - Enter the command there: runas /user:PCName\UserName program.exe, where PCName is the full name of the computer, and UserName is the name of the account with the necessary rights, instead you can use an account called “Administrator”. Replace program.exe with the name of the executable file you want to run, not forgetting about the .exe at the end. If it is not located on the desktop, you will have to enter the full path, for example, “C:\Program Files\CCleaner\CCleaner64.exe”.
- Enter your profile or system account password to launch the program.
Separately, I would like to clarify about the Administrator system account. By default, the average user may not know the password for it, and often it is simply missing. Then the command you enter will not work. You will need to find out the password or reset it by setting a new one. Read more about this in the materials from our other authors below.
Read more: Resetting the password for the Administrator account in Windows 10 Finding out the administrator password on a PC with Windows 7
Programs to run as administrator in Windows 7 and 10
There are the following programs: RunAs, AdmiLink, ExecAS.
RunAs Tool
It is part of Windows, so you can use it. To run it, just open the command line and enter the following command:
runas /user:PCName\UserName msconfig.exe
You will most likely be asked to enter a password. Be sure to enter it.
Next, the system configuration window should appear. Instead of the specified utility, use cmd.exe or other utilities.
Let's create a shortcut on the desktop. Right-click on an empty area and select “Shortcut”. We write the same command as the location:
runas /user:PCName\UserName msconfig.exe
Give the shortcut a name and save it.
After launching the shortcut, a command line will open where you must enter the account password. When you enter the correct data, msconfig or the utility you selected will immediately launch.
In this situation, you or people with access to the PC will have to enter a password every time. This point can be solved by adding the /savecred parameter to the command, then the command will be like this:
runas /savecred /user:PCName\UserName msconfig.exe
If you are thinking about security, then it is better not to use such shortcuts with this option. It’s better to enter your password every time and not worry that some impudent person will use Windows tools without a password to please himself and to your detriment.
Using the ExecAS tool
Running as administrator is possible using the ExecAS program. After launch, a window appears asking you to enter account information (login and password), as well as the program name and path. After entering the data, click “ Write ”.
Our guinea pig appeared in the ExecAS window. Close the program and open it again. The program we specified in ExecAS will immediately open. To add an additional application, you need to enter ExecAS.exe /S on the command line. (In this case, you need to be in the directory with the utility, for example, C:\ExecAS).
Having launched ExecAS, we add some other program. Close the tool and launch it again. The same window appears. But this is not convenient for us, so let’s move on to creating shortcuts:
We make two shortcuts with the following commands:
- C:\ExecAS\ExecAS.exe 1
- C:\ExecAS\ExecAS.exe 2
Numbers 1 and 2 correspond to the program number in ExecAS.
Having launched the shortcuts, we see that they were opened as administrator.
Using the AdmiLink utility
The utility specified in the title is a console utility, and after installation it will be located in the Windows directory.
We launch the tool and see a very convenient window with a Russian interface, so it will be easy to figure it out.
- In the first field, enter the path to the file that we want to run;
- The command line parameters in the second field are optional;
- The third line will be filled in independently, if this is not the case, enter C:\windows\system32
- Window display mode. In line 4 there are 2 parameters: SHOW – standard launch of software with a visible window;
- HIDE – software runs in the background;
Configure the settings on the Account :
- For the domain name, write the name of your PC, or NetBios and test.lan;
- Username – can be selected by clicking on the button with three dots;
- Account password and confirm.
- After entering all the data, click the “ Test ” button.
The utility will check the functionality of the information we specified. Press any key in CMD.
After a successful test, click the “ Generate AdmiRun launch key ” button. If you don't do this, then nothing will work.
- Go to the “Link” tab and do the following:
- Label name – call it by any name;
- Directory – indicate where the shortcut will be located;
- Picture – select an image for the label;
- Click the “Generate command line” button.
- Now click the big “Create Shortcut Now!” button.
The icon will immediately appear on the desktop or directory you specified.
Let's try to launch the shortcut. If everything went well and the program was launched as administrator, then congratulations. Otherwise, actions at some step were performed incorrectly.
If you go to the properties of the shortcut and change the program in the “Object” field to another, it simply will not start. This is a little protection against malware.
Task Scheduler
To run the program as an administrator, just use the “ Task Scheduler ” tool. There is one nuance here - if you are not an administrator, you will not be able to use it.
Enter just two words in the search: “Task Scheduler” and open the result. In the window on the right, select the “ Create task ” item.
Call it an appropriate name, let's say you are launching the command line, then you can call it CMD. We also check the “Run with highest rights” checkbox.
On the “Actions” tab, click the “Create” button.
Select an action (in our case, launch the program). Click Browse and select the utility to launch. If you run the command line, the path will be like this: C:\Windows\System32\cmd.exe. Now click OK.
A new line has appeared on the “Actions” tab. Great, you can click OK.
Shortcut creation stage
Create a shortcut on the desktop and enter the following command:
schtasks /run /tn task_name in scheduler
scheduler_task_name is the name you gave at the very beginning of the task creation process.
Hurray, we made the shortcut, but that's not all. Go to its properties.
On the Shortcut tab, change the icon. Of course, you don't have to do this.
Addition to the task scheduler method
To quickly launch many programs, you can use the Elevated Shortcut utility. You take a shortcut or executable file and drag it onto the Elevated Shortcut icon.
Method 6: "Task Manager"
The method using the “Task Manager” is useful if it is not possible to launch the application through “Explorer”. This tool allows you to create a new task by setting the appropriate privilege level for it.
- Right-click on an empty space on the taskbar and select “Task Manager” there.
- In the “File” section, click on “Run a new task”.
- Enter the name of the program with its extension in the field, and then check the box next to “Create a task with administrator rights.”
Policy Editor
Another method for activating a hidden account is to use the Policy Editor. You need to follow these instructions:
- Open a search for operating system content.
- Enter gredit.msс in the text field and open the group editor in the search results.
- Follow the branch Personal Computer Configuration -> OS Configuration.
- On the right side of the window, click on the “Security Settings” icon.
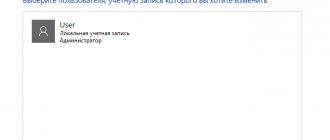
- In a new window, open the list of accounts and click on the “Administrator” icon.
- Now click on “Enable” and confirm the actions.
Let's look at how to run programs as an administrator.
Method 7: Executable File Properties
The following methods will be aimed at setting the parameter responsible for permanently running a specific program as an administrator. First, let's look at the option when the software opens through an executable file.
- Right-click on the object and go to “Properties” through the context menu.
- There you are interested in the “Compatibility” tab.
- Oh and save the changes.
Method 8: Shortcut Properties
If a shortcut was created from the executable file of the program, you will not be able to configure the option in question through “Compatibility”, since this tab is not there. However, you can set additional launch parameters using another method, which looks like this:
- Right-click on the shortcut and select “Properties”.
- In the “Shortcut” tab that opens, go to the “Advanced” section.
- Mark with a marker the corresponding item responsible for launching the program with elevated privileges.
Running a program that requires administrator rights under a regular user account
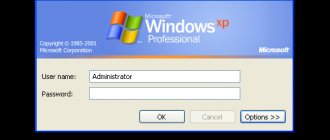
Windows 10, Windows 7, Windows 8, Windows Server, Windows Vista, Windows XP
- Recluse
- 12.04.2016
- 74 745
- 6
- 66,84%
- 76
- 07.03.2019
In any enterprise in which computers/software are maintained by adequate people, ordinary computer users do not have any administrative rights behind them, which significantly reduces the risk of deleting important system files, installing incomprehensible software and other wonders. However, some programs stubbornly refuse to work without administrator rights - and what to do if there is no desire to give the user computer administrator rights, but there is a need to run the application?
The article will discuss how to provide an ordinary user with the opportunity to run an application, and not give him administrator rights on the computer. We will talk about two methods - more or less secure (Issuing rights to the folder with the program), and less secure (the method using the RunAs program).
Article content:
Granting rights to the program folder
Often, a program requires administrator rights to carry out any operations with files in its folder - for example, a certain Program needs to write data to its configuration file in the folder where it is installed (for example, this directory is C:\Program Files (x86)\Programma ). You can try to give the necessary users full rights to this folder. This is done as follows:
- Right-click on the folder and open Properties
- In Properties you need to open the Security tab.
- Depending on your computer settings, it may display either “Add” or “Edit”. In the first case, you need to click the “Add” button, in the second - “Change”, after which you will most likely need to enter the administrator account information. After this, a window will appear with the “Add” button, which you will need to click.
- After clicking the “Add” button, we add all the necessary users. To check that the username is entered correctly, you can use the “Check names” button.
- Then we give full rights to the added user - to do this, you need to check the “Permissions for...” box, the “Full rights” item.
Running the program under an administrator account from a regular user account
The RunAs program, which comes with Windows, is suitable for this purpose. For ease of use, the easiest way is to create a cmd file in which you should place the following:
C:\WINDOWS\system32\runas.exe /user:\ /SAVECRED
Instead of User Domain and User, enter the data of a user account that has administrator rights in the domain or on the computer (in this case, instead of User Domain, you should write the computer name). Instead of Path to program, write the path to the required exe file accordingly.
Save this file and run it. If everything went correctly, then the first time you run the bat file, you will be prompted for a password for the specified user, but when you run it again, no password prompt will be required - the /SAVECRED parameter is used for this.
sysadmin.ru
Method 9: Create a value in the registry
The last possible option for running software as an administrator, which is practically unpopular, is to create a parameter in the Registry Editor. Then the selected application will use elevated rights every time it is launched.
- Open the Run window using the standard keyboard shortcut Win + R. Type regedit there and press Enter.
- Navigate to HKEY_LOCAL_MACHINE\SOFTWARE\Microsoft\Windows NT\CurrentVersion\AppCompatFlags\Layers.
- There, right-click and create a string parameter.
- Assign its name to the full path to the required executable file.
- Then double-click on it with LMB and set the value to ~RUNASADMIN.
In conclusion, we note that sometimes users are faced with a situation where the “Run as administrator” line is simply missing in Explorer. This is most often caused by system glitches, but can sometimes happen due to User Account Control settings. If you encounter such a problem, we first advise you to change the UAC settings, and if that does not work, proceed to restoring system files, which you will read about below.
I don't want to decide anything, I'm tired of pop-up messages. How to remove it?
Indeed, the User Account Control option can be annoying with constant pop-up messages, especially for those users who are not very concerned about security issues. In this case, you can neglect this function, by default giving all programs the maximum possible level of access to system files and settings without limiting their functionality. In this case, messages about choosing a resolution will not appear, but do not forget about the possible consequences of this decision.
How to do it?
Click “Start” - “Settings”.
In the window that appears, in the input field, type “ UAC ” and select the drop-down menu item “Change User Account Control Settings”
Next, from this window you can select the required notification mode (the lowest position is “Never notify” )
You can get to the same menu when starting any program by clicking “More details” - “Configuring the issuance of such notifications”