07/04/2018 Category: SettingsAuthor: Alexey Gerus
It's not so easy to customize the language component of Windows 10. The keyboard layout options are somewhat hidden compared to previous versions. However, with a little understanding, adding a language, changing keyboard shortcuts, and much more will be a piece of cake.
- How to change keyboard layout on Windows 10
Special programsPunto Switcher
- Keyboard Ninja
- Video: how to add and remove a language from a layout
- How to change the combination to switch the language on the lock screen
How to switch keyboard layout in Windows 10
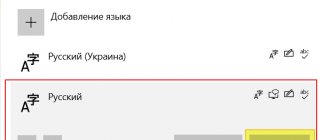
During the installation process or when you turn on a Windows 10 device for the first time, the user is given a choice of keyboard language. Most often we choose the language corresponding to the installed system - Russian. It becomes the main language, and English becomes a secondary language. To add a new language layout, you need to add it to the system.
To do this, follow these steps:
- Open Windows Settings.
- Go to the Time and Language menu.
- Click on Add a language.
- Select the required package and install it.
What is AutoCorrect
See also: “How to make an amount in words with kopecks in Excel: add-on, formula”
Excel keeps in its memory a list of common mistakes that can be made. When the user enters an error from this list, the program will automatically replace it with the correct value. This is exactly what AutoCorrect is for, and this is the principle of its operation.
Using this tool, the following main types of errors are corrected:
Select keyboard layout
The system uses the Shift+Alt key combination to change the default language. You can also change the key combination in Windows 10 to change the keyboard layout to Ctrl + Shift. To do this, open Settings and follow these steps:
- Open Device settings and select the Input tab
- Select Advanced Keyboard Options
- Then go to Language Bar Options
- Next, the familiar Languages and Text Input Services window, which is familiar to all of us, opens, where you can change the keyboard shortcuts.
Previously, changing the keyboard shortcut could be done in the Control Panel, but as we all know, Microsoft has committed to moving everything from the Control Panel to Windows Settings and has successfully implemented part of its plan in build 1803. On the one hand, many people are not very happy with such changes , since the old interface was convenient, logical and easy to remember. On the other hand, system developers not only transfer, but add and rework previously created options for system development.
Note! Regardless of your choice, there is an alternative keyboard shortcut that is always available - Win+Space. When you hold down the Win key and press Space, a small panel will appear where you can see the language switching.
Enable and disable autocorrect
This function is initially enabled in the program, but in some cases it needs to be disabled (permanently or temporarily). Let’s say we need to intentionally make mistakes in some words or use symbols that the program recognizes as erroneous and replaces them, although we don’t want this. If we change the character that was corrected by autocorrect to the one we need, the function will not perform the replacement again. This method is certainly suitable for isolated cases. Otherwise, to save time and effort, the best solution would be to disable the AutoCorrect function.
Note: to reactivate the function, return the checkbox to its place, and then also save the changes by pressing the OK button.
Configure automatic keyboard layout switching in Windows 10
Often we enter text, and then look at the monitor and notice that we forgot to switch the layout. I have to reprint everything again. You can configure automatic switching for each window.
For example, in Google Chrome you write a letter in English and at the same time fill out a table in Excel in Russian. The following setting will help ensure that when switching between windows the language also changes.
To do this, in the previous window we just need to check the box Allow you to select an input method automatically.
Also, if you want the language to change intelligently, depending on the text you type, a wonderful application will help you - Punto Switcher. No more "ghbdtn"! The application will automatically correct the message and change the language to the required one. It is very convenient if the text contains inclusions of a foreign language.
And there is always an alternative in the form of applications - Keyboard Ninja and Orfo Switcher.
Special software
In some cases, using the tools built into the operating system is not possible. In this case, you need to switch to using third-party software - Punto Switcher, Keyboard Ninja programs.
Punto Switcher
It is used to solve the current problem more often than other programs. Main advantages:
- the application recognizes the user’s transition to another language (words are compared and buttons on the keyboard are selected);
- The layout is changed automatically, regardless of the user’s actions.
The utility can not only change the current language on a personal device, but also perform some other functions.
Keyboard Ninja
The second most popular utility that can change the keyboard settings of a personal device. Necessary actions:
- download the specified software from the official website of the product developer company;
- unpack the installation block, start the installation;
- in the working window of the program you need to go to the “Settings” section;
- Select “Keyboard” on the left side.
The right side of the window will display functions that the user can configure independently, including switching the text input mode.
The keyboard layout icon has disappeared in Windows 10
If the keyboard layout icon suddenly disappears, then in this case it is worth checking the settings in Personalization. To do this, follow these steps:
- Open Settings
- Go to Personalization and open the Taskbar tab
- Click on Turn system icons on or off
- Turn on Input Indicator
Editing the autocorrect dictionary
As we mentioned earlier, the purpose of autocorrect is to help correct mistakes or typos. The program initially provides a standard list of correspondences between words and symbols for performing replacements, however, the user has the opportunity to add his own options.
Atomase replacement with mathematical symbols
Go to the tab of the same name in the AutoCorrect options. Here we will find a list of values that will be replaced by the program with mathematical symbols. This option is extremely useful when you need to enter a character that is not on the keyboard. For example, to enter the character “α” (alpha), it will be enough to type “\alpha”, after which the program will substitute the required character in place of this value. Other characters are entered in a similar manner.
You can also add your own options to this list.
Removing a combination from AutoCorrect
To remove an unnecessary combination of words or symbols from the autocorrect list, simply select it with a mouse click and then click the “Delete” button.
Also, by highlighting a specific match, instead of deleting it, you can simply adjust one of its fields.
Windows 10 keyboard layout does not change
There are several reasons why it is impossible to change the layout:
- It is worth paying attention to Sticky Keys. Disabling this option helps resolve the issue.
- Make sure that utilities or third-party software are not interfering with operation. Perform a clean boot on your system
We accept changes
Before telling you how to remove the correction area in Word, you must first familiarize yourself with the toolbar. In the “Review” tab, you are interested in only one group - “Changes”. It is here that you will find the tools that will help you say goodbye to the area of corrections in the document.
So, before you there is a document that has been edited using the Corrections tool. You understand that you need to correct the text and want to remove the reviewer’s comments. To do this, in the “Corrections” tool group, click the “Next” button. You will be taken to the first comment. There are two options: you can click on the “Accept” button or the “Reject” button.
After clicking on the “Accept” button, the changes made by the editor will be accepted and the text will be corrected. If you do not agree with the comments and want to leave the text the same, then click the “Reject” button so that the text correction (Word) does not occur.
So, methodically, one by one, delete the note, accepting it or, conversely, rejecting it.
Keyboard layout missing in Windows 10
If the system is damaged, some options disappear or refuse to work correctly. The ctfmon.exe application, which is located in the Windows/System32 directory, is responsible for the language bar in the system. Sometimes, due to system damage, this application may be lost or stop running along with the system. To possibly resolve this issue, follow these steps:
- Correction or restoration of system integrity. You can find out how to restore the system in this article.
- Sometimes, when a simple recovery (SFC /scannow or DISM) does not help, you can try to create a new profile in which, perhaps, everything will work correctly.
- Another option is to autorun ctfmon.exe.
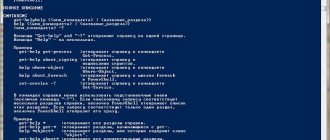
To add the ctfmon service to the startup list, open a Command Prompt or PowerShell window as an administrator and enter the command:
reg add "HKCU\Software\Microsoft\Windows\CurrentVersion\Run" /v CTFMON.EXE /t REG_SZ /d C:\WINDOWS\system32\ctfmon.exe
Then restart your computer and check the system.
Automatic date replacement and possible problems
Sometimes it happens that while entering a number with dots, the program corrects it to the date. Let's say we entered the number 3.19 into an empty cell.
After we press the Enter key, we will receive data in the form of month and year.
We need to save the original data that we entered in the cell.
In such situations, there is no need to deactivate autocorrect. Here's what we do: Note: you need to remember that numbers in cells with text format cannot participate in calculations, since they are perceived by the program differently and the final result will be distorted.
Welcome Screen
Changing the main language of the operating system does not mean that the language of the welcome screen will change. This can only be done in the Control Panel. Here are the ways to enter it.
Let’s go and select the “Regional Standards” section (in view mode, set large icons). Click on the “Advanced” tab and the “Copy parameters” icon. We see that for this action we will need administrator rights.
We place markers opposite the indicated points.
The first is changing the language for the welcome screen. The second is to change the language settings for all computer users, not just the administrator.