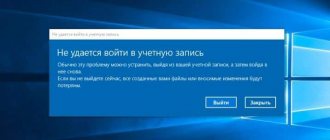
Windows 10 has many different language and regional settings that the user can customize according to their preferences. It often happens that computer owners are faced with incorrect display of Cyrillic (Russian, Ukrainian and other languages) fonts. For some reason, instead of normal characters and Russian letters, cracks are displayed in Windows 10, making working with the operating system virtually impossible. In this case, the system language itself may be displayed normally, but an attempt to open a text file or run an application that uses Cyrillic text will lead to a very dismal result:
The reason for this is an operating system encoding failure. Everything is done extremely simply and will require only a few clicks and one reboot of the computer. In this case, the repair is carried out either in a simple way through the Control Panel, or in a more complex way through the registry editor or substitution of operating system code tables. We recommend using the first method, since in 99.99% of cases the problem is solved this way.
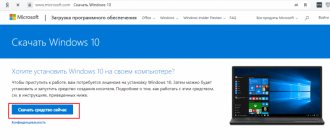
How to fix gibberish and hieroglyphs in Windows 10
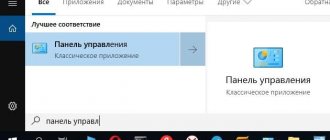
- Click Win + R and enter control. The system will open the classic Control Panel.
- On the main page, go to the group Clock, language and region - Change date, time and number formats.
- On the window that opens Region open the tab Additionally.
- Click the Change system language in the Language of non-Unicode programs .
- In the window that opens, select the language you need from the drop-down list, for example, Russian Russia). Click OK.
- Windows will warn you that you must restart your computer for the changes to take effect. Agree to reboot now and click Reboot now .
Once the computer starts, the text should appear as expected.
Getting rid of scammers through computer settings
The first step that needs to be taken to correct errors in the display of the Russian language is to go to the control panel. This can be done in several ways. One of the simplest is to right-click on the “Start” button, and then select the “Control Panel” option from the list that appears.
In the form that opens, give preference to the “Region, language and clock” subsection. Select this option among other categories in the panel.
When entering the presented menu section, select the “Regional Standards” category.
Here you can configure time and date formats, numeric separators (fractional and integer parts, groups of digits), the number of fractional signs, the format of negative numbers, and the unit system (American or metric). Also in this menu item you can configure the layout for displaying monetary units, their designation, the separator for the fractional and integer parts of a monetary amount, as well as the separator for groups of digits. Moreover, this is where you can configure the regional locale for displaying characters in the operating system. To do this, let's go to the "Advanced" tab.
In the section of the current language of programs that do not support Unicode, click the “Change system language” control.
In the list that appears, select the “Russian (Russia)” option.
After the language selection is made, a warning appears indicating that the computer needs to be restarted.
Let's listen to this advice and reboot the computer, after which the krakozyabrs should be changed to correct Russian-language characters, which we can verify by launching one of the distribution programs in Russian.
This article, of course, does not solve all the problems with correcting the language to be readable. If the above method does not help, you will need to make some changes to the registry.
How to fix encoding in Windows 10 using Registry Editor
For your information : editing the registry is always associated with certain risks of harming the operating system. Carefully monitor the paths of the keys you change, make backups and double check everything. If you are not sure that you can restore everything back in the event of a breakdown, it is better to refrain from editing the registry. To be on the safe side, create a backup Windows 10 restore point.
- Click the buttons Win + R and enter the command regedit. It will open the Registry Editor built into the operating system.
- Now you need to go to the address Computer\HKEY_LOCAL_MACHINE\SYSTEM\CurrentControlSet\Control\Nls\CodePage. To avoid wasting time searching for the thread you need, simply copy the address and paste it into the top address bar of the editor (it's only available on computers running Windows 10 Creators Update and higher).
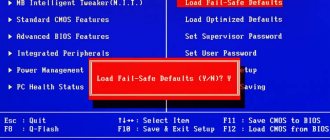
- Scroll down to the bottom of the list and double-click on the key ACP. Change its values to 1251. 1251 is the code for the Cyrillic page.
- Click OK and restart your computer.
After this, Windows 10 will no longer display hieroglyphs instead of text.
Reasons for displaying hieroglyphs instead of Russian letters
Typically, encoding problems do not occur in all text files and software installers at once. For example, when you open a software installer, its name is correct, but the content is displayed incorrectly. Or when writing text in a notepad, questions and gibberish appear.
The reasons for incorrect display of the Cyrillic alphabet include:
- Application Russification error.
- Updates failed.
- Using the English version of the operating system.
- Installing jailbroken Windows 10.
Users rush to fix problems by simply reinstalling the OS. But this doesn't always help. Especially if the problem is not Windows.
A frequent question from users is why in Windows 10 the well-known “Legal Taxpayer” program displays hieroglyphs and gibberish. This problem can be solved simply: install MS Sans Serif in the font system.
How to fix hieroglyphs in Windows 10 by replacing the code page file
The method is far from the most convenient, but it also has a right to exist. In the end, you decide how to fix problems with your computer.
Please note : this instruction shows the substitution of code page 1252 , which is responsible for Western European encoding. If your system uses a different code page, you will need to know its number. In case you are unable to do this, use the methods for changing Windows 10 encoding described above.
- Open Conductor and go to the address C:\Windows\system32. Use the search in the upper right part of the window to find the file c_1252.NLS.
- Right-click on it and select Properties.
- In the properties window, open the tab Safety and then click Additionally.
- A window for changing security settings for the selected file will open. At the top of it, click Change.
- In the new window, enter the email address of your account (it must have Administrator rights) and click Check names. The system should display the user's full name and email address. Click OK.
- Go back to the window Properties file C_1252.NLS. On the list Groups or users click Administratorsand then the button Change.
- A window will open Group Permissions. Again, on the list Groups or users click Administrators. Then check the box Full access in a collumn Allow. Click OKand then again OK.
- , click on the C_1252.NLS file you found and click File Location . Explorer will show you where this file is located.
- Go to File Explorer's View and make sure you have the File name extensions . If not, activate it.
- Now right-click on the C_1252.NLS file and select Rename . Rename it to C_12521.NLS 1 , for example. This must be done so that you have the original file in case you need to roll back changes.
- , find the C_1251.NLS . Copy it and paste it right there. You should now have a copy of the file. Rename it to C_1252.NLS .
- Restart your computer.
This way you force the system to use the code page you need as the default one. The method is all artisanal, but it should cope with the task.
Meta tag charset
If you did what I described in the previous step and your problem is not resolved, then it’s time to try the second method of eliminating cracks.
All we need to do is paste the following code between the tags
site. First of all, check to see if you already have this meta tag. If yes, then look at the value of the charset parameter.
WordPress themes usually have this tag already by default and look like this:
Complex decisions
It’s worth moving on to these solutions if the problem refuses to go away and continues to annoy you. The device prints hieroglyphs instead of Russian letters for reasons that will be discussed below.
The issue may be in system files. Restoring them may solve the problem.
Open the command line as administrator. Type the command “sfc /scannow” and press “Enter”.
Command "sfc /scannow"
We wait a few minutes or seconds. Then we check if the problem is resolved.
Often this error appears due to drivers. The printer is printing hieroglyphs because the drivers are incorrect or malfunctioning. Therefore, you can try to reinstall them. For this:
- In the Control Panel “Hardware and Sound” tab we find our printer.
Hardware and Sound Tab
- Right-click and select “Remove device”.
- In “Programs and Features” we remove all programs related to the operation of our device.
- After removal, we find the disk that comes with the printing device. We reinstall all the necessary programs and drivers.
If you do not have a disk, then Windows 7 or older, as a rule, will offer to install the necessary drivers if you reconnect the printer to the computer. If this does not happen, then you should go to the manufacturer’s website and download the necessary software yourself.
Check your computer with an antivirus. The reason may lie in malware.
Here are the main ways to solve this problem. As a rule, you can limit yourself to simple actions, since this error appears and disappears by itself.
The essence of the problem
As a rule, we cannot observe incomprehensible symbols in every program. For example, characters depicted in Cyrillic in program names are displayed correctly. But if we run the installation program for distributions that support the Russian language, we get a “Chinese letter” unknown to us.
And, perhaps, the main problem lies in the fact that the existing OS, by default, does not support Cyrillic characters. In practice, this may mean that you installed an English distribution with an extended Russification package installed on top of it. However, the latter could not solve the problem correctly.
The first thing users try to do in such a situation is to reinstall the operating system from scratch. However, not everyone will agree to this, because someone may deliberately want to work with an English-speaking environment. And in this environment, Cyrillic characters, in theory, can and should be displayed correctly.
Simple solutions
The solutions below are simple because they do not require any serious action from the user. However, they may be enough to solve the problem. In this case, you can do without any problems.
Most often, hieroglyphs appear instead of text when printing via MS Word. Try printing the text using another program.
To do this, you can save the file in PDF format and open it using Adobe Acrobat Reader or FoxitReader. You can also print through a browser, for example, Google Chrome or Internet Explorer.
Try printing an image instead of text. To do this you need:
- Open a window in the program that is used to send a file for printing.
- Finding the “Advanced” or “Advanced Settings” button on it depends on the program in which printing is performed.
- In the window that opens, find the “Print as image” or “Raster printing” option and check the box next to it.
The machine now prints text as an image. You most likely will not see hieroglyphs instead of Russian letters.
The problem may be with the fonts. The device does not read them, but prints incomprehensible symbols instead of Russian letters. Try simply using different fonts for text. This will be especially true if you chose exotic fonts rather than classic ones (Arial, Calibri).
Also try this: disable substituting Courier New. For this:
- On the Control Panel, find the item with devices.
Devices and Printers
- Find the problematic printer there.
- Open “Printer Properties”, go to the “Device Settings” tab.
- Find the font substitution table and select "Do not substitute" for the font listed above.
Individual programs
We only need to remind you that before using each of the methods described above, it is advisable to make a backup of the system, which will allow you to save all your documents and simply important files. And in this case, you will save yourself from random difficulties that may arise in the process of correcting the situation when hieroglyphs or krakozyabs are displayed on your Windows 10 PC instead of Russian letters.
Source
Notepad+++
The easiest way to open a Notepad document where there are squares instead of letters is to use third-party software. Notepad+++ is popular. This is the same Notepad, but with additional functions. Has the following advantages:
- Distributed free of charge;
- Like Word, it has a button to undo the last action;
- Supports simultaneous work with multiple files;
- Allows you to change or select encryption.
- Automatically adds texts;
- Supports plugins.
- LiveJournal
- Blogger
To convert hieroglyphs instead of Russian letters, open the Notepad document in this program. In the menu ribbon at the top, find the Encodings tab. Click on it. A menu will open listing all their types. It is not always obvious which type of encryption was used, so to choose the right one for transcoding, you need to try several. Select the text before this.
As encodings are applied, the characters in the document can change (one click in the menu) or remain unchanged. As a result, after applying a certain one, the text will become readable.
- LiveJournal
- Blogger
Using the registry if the method above does not help
Let's create a regular file in a text editor, but give it a .reg extension so that later we can apply all the settings stored in it. So, what should the contents of the reg file be?
How to find out which video card is on a Windows computer
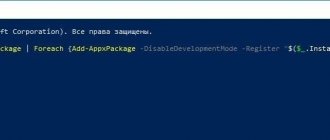
Let's type into it with pens or copy the following values via the clipboard:
Windows Registry Editor Version 5.00
When all the specified lines are in the reg file, run it, agree to making changes to the system, then reboot the PC and look at the results. The krakozyabrs must disappear.
Important note: before making changes to the registry, it is better to create a backup copy (in other words, a backup) of the registry, so that changes made subsequently do not lead to the crash of the operating system, and it does not have to be reinstalled from scratch. However, if you are sure that these actions are safe for your OS, you can skip this point.