The Settings button and function, accessible through the Start menu or notification bar in Windows 10, is an important component in the system for various settings. Thanks to the parameters, the user has a neat, modern interface, unlike the old control panel with a bunch of settings.
Unfortunately, many users are unable to use this feature due to a bug, specifically when the user tries to click on the Settings button and it doesn't work or redirects them to the Microsoft Store. In this guide, we'll look at what to do and how to fix it when settings don't work in Windows 10.
Reinstalling Windows Applications
Settings feature is an official built-in app in Windows 10, just like the usual other UWP-based ones. Therefore, reinstalling should fix any problems you may have with entering settings.
- Launch PowerShell as an administrator by clicking start and searching for powershell. Then right-click and run as administrator.
Enter the following command into the powerShell window to re-register and reinstall Windows 10 applications. I hope that the settings work for you, if not, then move on below.
- Get-AppXPackage | Foreach {Add-AppxPackage -DisableDevelopmentMode -Register "$($_.InstallLocation)\AppXManifest.xml"}
What can I do if updates and settings won't open?
If you are unable to open the Settings app or are facing any other issue listed above, the following steps will definitely help you:
- Install the necessary updates
- Create a new user
- Use Microsoft Security Scanner
- Use the Windows Applications Troubleshooter
- Run an SFC scan
- Reset Windows 10
Solution 1: Install the necessary updates
If updates and settings are not opening, you may be able to fix the problem by simply installing the necessary updates. You can do this by following these steps:
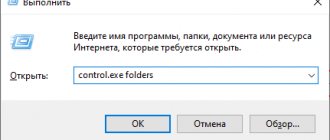
- Run Control Panel . To do this, click Windows Key+S and log in control Panel . Select Control Panel in the list of results.
- In the search box in the top right corner, enter Windows Updates . Once the search is complete, click View installed updates .
- Check and install update KB3036140 if it is not already installed.
- After successfully updating to KB3036140, you will need to restart Windows 10 again.
- Now check if the update and settings feature is working for you.
Solution 2 – Create a new user
Sometimes you can solve this problem by simply creating a new user account. It's relatively simple and you can do it by following these steps:
- Open Control Panel as shown in the previous solution.
- Select User Accounts from the list.
- Left-click or tap the option that says Managing another account .
- Now left click or click Add a new user in PC settings .
- After creating a new user account, reboot your Windows 10 Technical Preview system again.
- Login with the newly created user account and check if you are experiencing the same issue.
Can't add a new account? Solve the problem quickly with this guide!
You can also create a new user account using the command line. To do this you need to do the following:
- Press Windows Key + X to open the Win + X menu and select Command Prompt (Admin) from the list of results. PowerShell (Admin) instead .
- After launching Command Prompt, enter net user NewUser password1/add .
- Now enter network administrators local group NewUser/add.
NewUser account and use password1 to access the new account.
After you sign in to your new account, you need to install any missing updates. To do this you need to do the following:
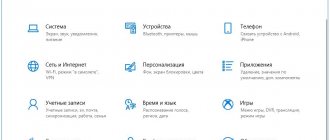
- Press Windows Key + I to open the Settings app .
- When the Settings app opens, select Update and Security .
- Now click the button Check for updates .
Windows will download and install the missing updates. Once the updates are installed, you can go back to your main account and everything should start working again.
You can also create a new account by following these steps:
- Click Windows Key + R and enter lusrmgr.msc . Click Enter or click OK .
- Select Users in the left pane and right-click an empty space in the right pane. Select from menu New user .
- Enter your desired username and uncheck the box The user must change the password upon new login . Now click the button Create .
After creating a new user account, switch to it and check if the problem is resolved. If the problem is resolved, you need to move your personal files to a new account and use it as your primary account.
Solution 3 – Use Microsoft Safety Scanner
Few users reported that they fixed this error simply by using Microsoft Safety Scanner. You can use this tool by following these steps:
- Left click or tap on the link given below to download the Microsoft Security Scanner.
- Download here Safety Scanner
- Left-click or click on the Download Now located at the top of the page, accessed above.
- Follow the onscreen instructions to complete the download and installation process.
- Run a scan and let the application fix any potential threads on your system.
- Reboot Windows 10 after the process is completed.
- Check again to see if your updates and settings are working.
Solution 4: Use the Windows Apps troubleshooter
If updates and settings don't open, you may be able to fix the problem by running the Windows Apps troubleshooter.
This troubleshooter is created by Microsoft and should help you fix any problems you may have with Windows applications.
To fix this problem, simply download the Windows Troubleshooter app and run it. After running the tool, follow the on-screen instructions and the troubleshooting should resolve the issue.
Or use one of these troubleshooting tools to fix your Windows problems quickly!
Solution 5 – Run an SFC scan
If updates and settings are not opening, the problem may be caused by file corruption and you will need to perform an SFC scan to fix it. It's relatively simple and you can do it by following these steps:
- Press Windows Key + X and select Command Prompt (Admin) .
- When Command Prompt opens, type sfc/scannow and press Enter to launch it.
- The SFC scan will begin. Keep in mind that this process may take 10 minutes or more, so do not interrupt it.
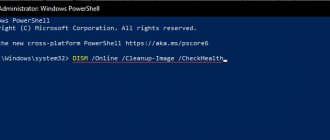
Once the scan is complete, check if the problem is resolved. If the problem still persists, or you are unable to run an SFC scan at all, you can try using a DISM scan instead. To do this, launch Command Prompt and enter the command DISM /Online /Cleanup-Image /RestoreHealth . Keep in mind that this process may take 20 minutes or more, so do not interrupt it.
After the DISM scan is completed, check if the problem is still there. If you were unable to run the SFC scan earlier, be sure to run it again after the DISM scan. Once both scans are completed, the problem should be resolved.
Learn how to run System File Checker like a real technician with our guide!
Running an SFC scan
Let's perform a procedure to scan and automatically restore system files. To do this, open a CMD prompt as an administrator and enter the command:
- sfc /scannow
Important: If scanning does not help, then download a special utility from Microsoft to troubleshoot problems on the site. Expand Windows Update Error Fix, download and run.
What else can influence
In some cases, people note that only one user has a similar problem. However, other accounts work completely correctly. For this reason, it is recommended to try logging in from a different account. If it doesn't exist, you can create it using the command line.
Another reason for the error may be the incorrect operation of the process responsible for OS parameters. In this case, it can be saved even when the settings are not open. Normally it is called “Parameters”.
If there is one, you can try clicking on the “End task” button in the manager, and then re-open the settings (a reboot is not needed).
So, most often the problem can be easily fixed by restoring damaged or lost files, as well as using the Troubleshooter utility. If both methods prove to be useless, you can cancel the process or create a new account.
Scan Windows 10 for malware.
Malware can take over Windows 10 and prevent important apps like the Settings app from working properly. You can run a malware scan using Windows Security.
- Select the Windows security icon on the taskbar.
- Select Virus & Threat Protection > Scan Options.
- Select the Quick Scan option and select Scan Now.
If Windows Security can't find the problem, you should run a full scan and a Microsoft Defender Offline scan. Or use a dedicated malware removal tool like Malwarebytes for a more intensive and thorough scan of your entire computer. For more information, learn how to remove persistent forms of malware in Windows 10.
The main reasons for a black screen
Identifying the cause will allow you to specifically eliminate the problem when the black screen turns on. You just need to be attentive to the little things, for example, when you turn on the PC, is there any noise, whether the indicators on the case light up, etc. Even seemingly insignificant mechanical impacts on a complex device and the appearance of liquids on internal components as a result of temperature changes or careless user operation with the device are most often the causes of problems leading to a black screen.
Also, among the main reasons why a black screen appears, special attention needs to be paid to the following:
- Hardware or software conflicts, as a result of which the graphical interface cannot be displayed;
- Battery malfunction;
- Problems with video accelerator, RAM, motherboard, hard drive, etc.;
- Driver incompatibility;
- Device overheating;
- System failure;
- Problems with the display (monitor).
Fixing an issue with opening Settings
The problem under consideration is already quite well known, and therefore there are several methods for solving it. Let's look at them all in order.
Method 1: Re-registering applications
One of the most effective ways to fix problems with applications is to re-register them by entering a special command in Windows PowerShell. Do the following:
- Press the Win+R key combination, then enter the PowerShell combination in the text field and confirm by clicking on the “OK” button.
Next, copy the command below and paste it into the utility window using the Ctrl+V combination. Confirm the command by pressing Enter.
Note! This command may cause other applications to become unstable!
Get-AppXPackage | Foreach {Add-AppxPackage -DisableDevelopmentMode -Register “$($_.InstallLocation)AppXManifest.xml”}
After using this command, you may need to restart your computer.
In most cases, this method is effective, but sometimes it still doesn’t work. If in your case it was useless, use the following one.
Method 2: Create a new account and transfer data to it
The main cause of the problem in question is a failure in the user configuration file. The most effective solution in this case would be to create a new user and transfer data from the old account to the new one.
- Call "String" as administrator.
Read more: How to open Command Prompt as an administrator - Enter the following command into it:
net user *username* *password* /addInstead of *username*, enter the desired name of the new account; instead of *password*, enter a code combination (however, you can enter it without a password, it’s not critical), both without asterisks.
Next, you need to add administrator rights to the new account - you can do this using the same “Command Line”, enter the following:
net localgroup Administrators *username* /add
Now go to the system drive or the partition designated for it on the HDD. Use the “View” tab on the toolbar and check the “Hidden elements” checkbox.
Problems with Explorer
The first thing to do if the Properties dialog box does not open in Windows 10 is to restart File Explorer. Perhaps there was something different in his work.
- Launch the “Task Manager” using the taskbar context menu or the “Ctrl+Shift+Esc” combination.
- Click on the inscription: “Details” to switch the view of the dispatcher from miniature to expanded.
- In the “Processes” tab, find “Explorer”, select it and click on the “Restart” button.
As a result, the process will be completed and then started again, which may help get rid of the problem associated with the inability to call the “Properties” dialog.
But it is not possible to fix the problem in this way in all cases, so we move on to the next method if yours is not one of the exceptions.
Restoring the Component Store
But what to do if Windows 10 settings do not open even after reinstallation? There is a more advanced and effective way, which is to use the console utility Dism . Open PowerShell or a classic command line (the main thing is that they are running with administrator rights) and run the command Dism /Online /Cleanup-Image /RestoreHealth. Once the procedure is complete, restart your computer and check that the Settings application is working correctly.
Creating a new user
It is possible that “Settings” does not open in any specific account and to correct this situation you should simply create a new one:
- Open the “ Run ” window (win+r combination);
- Enter in the line “lusrmgr.msc" and click "Ok";
- The “Local Groups” window will open, which is what the entered abbreviation means;
- On the “Users” folder, open the context menu and select “New user»;
- In the window that opens, enter all the required information and click “Create»;
- A new account will be created, into which you need to log in and work with system settings.
If this algorithm allowed you to open “Settings,” then you should transfer important files to this account and work through it.
How to install Linux as a second operating system next to Windows 7 or 10