After installing Windows, most people will start using the system with default settings. However, there are some who are tech-savvy and confident enough to optimize their computer by doing certain modifications themselves. Some would add more CPU or RAM to improve performance. Other technical PC users would install additional programs or special utilities to suit their needs.
However, during the process, certain problems may arise in the operating system. One of the problems you may encounter is a black screen in Windows 7. You don't do anything related to changing the wallpaper, but still a black desktop background appears.
Some of the sources of this error:
- Third party app to change display settings
- Damaged file on the system
- Outdated graphics driver
- Windows Update is not installed correctly
If you encounter the same problem, don't throw your computer in the trash just yet. In this article, we will teach you how to remove black desktop background in Windows 10. We will also show you various ways to fix black screen in Windows 7.
Before anything else...
The problem probably occurred right after you installed a third-party application that you had to use to change the user interface or desktop. If this is the case, the first thing you need to do is uninstall this program. This will prevent the app from managing your display settings. However, this step will not completely solve the problem. What it will do is simply prevent the problem from happening again.
If you want to know how to remove black desktop background on Windows 10 and solve the problem completely, follow the instructions below.
Black screen when turning on the computer (without the ability to log in)
If the black screen appears before the login window, you will not be able to boot into Safe Mode using the method described above. To log in, you will need a bootable DVD or USB flash drive with a Windows distribution. You can also create a Recovery Drive on another work Windows 10 computer.
- Connect the bootable media to your computer;
- Set boot priority from the desired media in the BIOS;
- Boot your computer.
After downloading, you can try booting in safe mode and carry out all the same steps that we discussed in the previous paragraph. To select Troubleshooting
, then
Advanced Options
, then
Boot Options
and then reboot into
Safe Mode with Command Prompt support
.
If the problem cannot be solved, you can try resetting Windows to its original state and performing a clean installation of the system.
Source
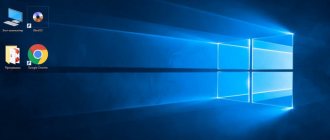
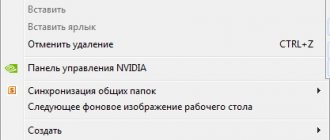
1) Change wallpaper
After disabling a third-party application, try changing your wallpaper. Here are the steps:
- Click the search icon.
- Type “settings” (without quotes).
- Select Personalize.
- Select "Background" from the menu.
- Select "Slideshow" from the drop-down list in the "Background" section. This will allow you to check if uninstalling the third-party app fixed the problem.
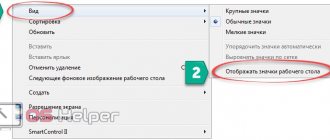
- If the slideshow is working fine, you can change the background to a static image.
You can also try using other images if you have set the corrupted photo as your desktop background.
Remove the cmd.exe pop-up line
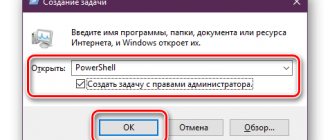
Don't know if it's a virus or not? The extent of the problem is determined using a "Clean Start of Windows":
- Enter in the console Run command – “msconfig” (also without quotes).
- Find the column “Diagnostic run”.
System check via diagnostic run
First, it is recommended to conduct a deep scan and clean the system of residual debris:
- Download the useful CCleaner program from the official website.
- After completing the operation, move on to the second item “Register”.
Install, first select the “Cleaning” function.
Garbage and error removal program – CCleaner
If you are a happy owner of Windows 10, let’s try to solve the problem through the same command line:
- Launch the console window with Administrator rights.
- Enter the following command (without quotes): “sfc /scannow”.
Scanning the system using the sfc /scannow recovery command
For non-advanced users, checking using the “Task Scheduler” is also suitable - through it we try to get rid of the annoying window:
- Find “Task Scheduler” in the program search or use the “taskschd.msc” command in the console.
- After the window successfully appears, look for the “Library” item on the left.
- A list of all scheduled tasks opens (in other words, a script for automatically opening programs at a certain time).
- Select suspicious items and click “Disable” in the lower right corner.
- If suspicions arise, you can simply search the name of the process in a search engine - each system task will immediately reveal itself in the first link.
Disabling processes through the Windows 10 Task Scheduler
2) Removing the damaged TranscodedWallpaper.jpg file
In some cases, a black desktop screen may be caused by a corrupted TranscodedWallpaper.jpg file. This issue may prevent Windows from displaying the wallpaper you select. To recover this file, simply follow these steps:
- Open File Explorer.
- In the address bar, paste the text below and press Enter.
%USERPROFILE%\AppData\Roaming\Microsoft\Windows\Themes\
- Once inside the folder, look for a file named TranscodedWallpaper.
- Change the file name to "TranscodedWallpaper.old" (without quotes).
- If you see a file named Settings.ini, open it in Notepad.
- Delete the contents of the file.
- Save your changes, then close Notepad.
- Follow the instructions from the first method and select a new image as your desktop background.
Black screen after logging into Windows computer (no screen connected)
The first scenario we will talk about is the black screen that appears after logging in.
Force Explorer to start
- The first thing to do is press Ctrl + Alt + Del
, this should bring up
the Task Manager
. If this happens, great! - Click File – Run new task
. - Type explorer.exe
and press
Enter
.
Perhaps this will solve the problem.
Switch to Safe Mode
If removing external devices does not fix the problem, go to Safe Mode.
- Restart your computer.
- On the lock screen, tap on the power icon towards the bottom left of the screen.
- Hold SHIFT
and click on
Reboot
. - After rebooting, you will get additional boot options - select Safe Mode with Command Line Support
.
Perhaps instead of rebooting, you will be presented with a screen with 3 options to continue:
- Continue downloading Windows 10;
- Troubleshooting;
- Completion of work.
Then click on Troubleshooting
, then to
Advanced
.
Next, click on Startup Options
and then reboot into Safe Mode with Command Prompt support.
After booting into safe mode:
- Check to see if the display is configured for a different device.
- Press Windows + P
to launch a panel with projection options.
A Sidebar will appear on the right with a list of displays connected to your computer. Select an output option for the current computer monitor
Reinstall the monitor driver. Open Device Manager and uninstall display drivers:
- Right-click on the Start
, then left-click on
Device Manager
. - In the Device Manager window, find and expand Monitors
. - Right-
click on the monitor, select
Uninstall
. - Reboot to reinstall the driver.
- Perhaps this will solve the black screen problem.
3) Update graphics driver
If you are using an older graphics driver, updating it may fix the black screen in Windows 7. In this case, you will have to check your computer manufacturer's website for updates for your graphics card and motherboard.
Make sure you download the appropriate file because if you install an incompatible driver, you may cause more damage to your computer. Therefore, we highly recommend using a reliable tool such as Auslogics Driver Updater. This program will automatically search for outdated drivers and update them to the latest versions recommended by the manufacturer. The great thing about this tool is that it repairs all the drivers that need attention. This means that at the end of the process, you will be able to fix your desktop background problem and get better computer speed and performance.
Don't uninstall the update
We do not recommend uninstalling the KB4534310 update with an error. This update contains important security fixes for Windows 7. It is better to work around this error using the method described above than to be left without important security fixes.
As long as you don't use the "Stretch" option, there will be no black wallpaper error. In any case, stretching has a bad effect on image quality.
And of course, it’s strange to stay on a system that will no longer develop, the transition is still free, and here I told you how to do it logically and correctly!
comments powered by HyperComments
4) Correction of settings for easier access
If you've been adjusting your Easy Access settings, you may have unknowingly removed your background image. This may be the reason why you are unable to fix the black screen on your computer. You just need to uncheck the box to resolve this issue. Follow the instructions below:
- Click the search icon.
- Type “control panel” (without quotes).
- Click Accessibility, then click Ease of Access Center.
- Select "Make your computer easier to browse."
- Look for the "Remove background images (if available) are unchecked" option.
- If the checkbox is selected, click it to deselect it.
- Click Apply.
- Set a new desktop background for your computer.
What can happen if you ignore an error?
If you use built-in utilities or programs that you can trust, there is nothing to worry about. You can fix the problem on a weak PC only by upgrading it. For example, in the tenth version of Windows, similar bugs are often found, since the system is especially demanding on computer resources.
But if the reason for launching the system utility was a virus, then you can definitely expect a complete failure of the entire file system. To get rid of the “black window” you should take a few simple steps.
Algorithm for solving the problem
First, it’s worth diagnosing the OS using the built-in utilities:
- Launch the “Run” console using the Win+R combination and enter the msconfig line.
- After this, the “Configurations” window appears, in which you need to o.
- Reboot the system.
If after a secure login the line that says system32 in the black bar pops up again, then a specific system process is probably responsible. When malicious code is written to the Start area, the cmd.exe window does not turn on automatically after a diagnostic run.
To get rid of the error, you should first clean the system registry and directories of excess garbage that has accumulated as a result of user actions:
- The best utility for this procedure is CCleaner. You can download the program from the official resource.
- After installing and launching the application, you need to go to the “Cleanups” section, check the system for errors and remove all marks using the “Fix favorites” field.
- After this, you should check the registry in the corresponding menu.
- The Service - Startup section contains all entries about programs that automatically start with Windows. All suspicious applications should be disabled.
- To consolidate the treatment, you can conduct a full scan of the OS for viruses using the easy-to-use AdwCleaner and MalwareBytes utilities.
How to make a dark theme in Windows 10 using the system registry
Dark theme on Android - how to enable it on your phone
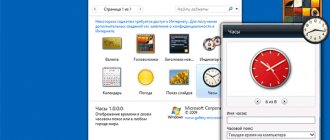
Registry Editor is a utility pre-installed on Windows 10 that allows you to change some OS functions and modes. Using this tool it is also possible to set a different theme. To do this, you need to take a few simple steps according to the algorithm:
- Press the “Win + R” buttons on your PC keyboard at the same time to launch the “Run” window.
- In the “Open” line, type the command “regedit”, then tap “Enter”. A window called “Registry Editor” should now appear on your screen.
- Next, one by one, you need to expand the directories located in the parameters column on the left. We are talking about the folders “HKEY_LOCAL_MACHINE”, “SOFTWARE”, “Microsoft”, “Windows”, “CurrentVersion”, “Themes”, “Personalize”.
- When the user enters the destination folder, he will need to right-click on the empty space in the central part of the menu.
- In the context type window, click on the “Create” line.
- You must select “DWORD (32-bit) Value” from the pop-up list of options as the element to create.
- After performing the previous manipulations, a window should appear in which you need to specify a name for the created parameter. It is recommended to enter the name “AppsUseLightTheme” here.
- There is no need to change anything in the “Value” line of the created key. It will automatically set to zero.
- Reboot your desktop computer or laptop. For your changes to take effect, you simply need to log out of your account and then log in again.
Registry Editor window on Windows 10
Important! The method discussed above for changing the theme on Windows ten is not the easiest. It can only be recommended for experienced PC users.
How to enable dark theme on Windows 10
To complete the task, it is not advisable to use third-party software from the Internet. All the necessary tools that allow you to include different designs are already present in the system itself.
What dark theme looks like in Windows 10
The light or dark theme of Windows 10 is installed in one click, for example, through the standard “Settings” application. This and other common methods for enabling this mode are described in detail in the following sections of the article.
Note! You can change the shade of the dark theme on Windows 10 by selecting it from the presented list of colors.