09.27.2020 windows
When you turn on your computer or laptop, you may encounter the error “Your PC could not boot correctly” or “Your computer needs to be restored” with code 0xc0000001, sometimes with a reference to the file Windows\System32\winload.efi, more often without indicating any problem files, the text “The required device is not connected or unavailable” or the text in English: “Your PC couldn't start properly” is also possible, even in the Russian version of Windows 10.
This instruction details how to fix error 0xc0000001 when loading Windows 10 in various situations, what can cause it, and additional information that may be useful in solving the problem.
- Causes and ways to fix error 0xc0000001
- Entering Windows 10 Recovery Environment to resolve the issue
- Automatic boot repair
- Checking the file system on the disk
- Recovering damaged system files
- Additional methods
- Possible hardware causes of error 0xc0000001
- Video instruction
Why does this error appear?
Error code 0xc0000001 often indicates problems with the computer's boot device or that some boot files are corrupt. The error may also appear if there are problems with the PC boot sector.
The error appears as a result:
- Corruption or corruption of the SAM (system credential store) file. This file is important for Windows to start, and if the file is deleted or corrupted, the boot process will stop.
- Damage to OS system files. The error may appear if key system boot-related files become damaged due to disk writing problems, power outages, or virus attacks.
- File system integrity violations. Sometimes the file system is severely damaged as a result of a virus attack, poor PC power, etc.
- RAM damage. The error can be a result of various problems with the PC's random access memory (RAM).
Reason for error 0xc0000001
The source of the problem in the form of error 0xc0000001 is the Windows Boot Loader, which can no longer function correctly due to some events in the system. Many things could have affected his performance. Let's look at the list of the most common reasons for error 0xc0000001 to appear when loading Windows.
- Damage to the winload.efi file itself, which naturally leads to the inability to log in correctly, which is what the error tells you.
- A previously installed RAM stick could cause problems when starting the system.
- The system has been installed with software or hardware that, for some reason, is not compatible with it, causing it to fail to boot.
- Damaged system files that were important for correct login.
- The presence of errors and damage in the file system of the disk on which the operating system is installed.
As you can see, quite a long list of reasons. Nevertheless, error 0xc0000001 is a completely solvable problem, which we will address in this article.
Restoring OS boot using Windows Recovery Environment
If the error persists, you must perform the following steps using the Windows installation media.
To create installation media with a Windows 10 image, you must use the Media Creation Tool.
Step 1: On another computer, download the specified tool by going to the URL: https://www.microsoft.com/ru-ru/software-download/windows10 and clicking “Download Tool Now.”
Go to the URL, click “Download tool now”
Reference! The downloaded file is usually located in the "Downloads" of the browser.
Step 2: Launch the tool after downloading by double-clicking the left mouse button.
Launch the tool after loading by double-clicking the left mouse button
Step 3 : Click Accept.
Click “Accept”
Step 4. Select “Create installation media” and click “Next”.
Select “Create installation media” and click “Next”
Step 5: Check the media settings and click Next.
Check the media parameters and click “Next”
Step 6. Insert a USB flash drive into the USB port.
Insert a USB flash drive into the USB port
Step 7: Select the USB flash drive option and click Next.
Select the “USB flash memory device” option and click “Next”
Step 8. Select the inserted drive and click “Next”.
Select the inserted drive and click “Next”
Step 9. The system will begin loading onto the USB-Flash.
The process of booting the system onto USB-Flash
Restoring system boot from installation media
Step 1. Restart the computer and press “F8”, “F12” or “Esc” to open the “Boot Menu”.
While the computer is restarting, press “F8”, “F12” or “Esc” to open the “Boot Menu”
Step 2. Select the burned USB Flash installation disk to boot.
Select the recorded USB Flash installation disk to boot
Note! The procedure for selecting the first boot device on a specific PC can be found in its documentation.
Step 3. Press any key.
Press any key
Step 4. When starting from USB-Flash, select the language, system, its bit depth and click “Next”.
Select the language, system, its bit depth and click “Next”
Step 5. Click on the “System Restore” option.
Click on the option “System Restore”
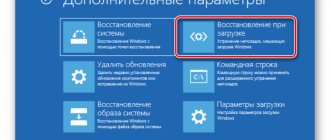
Step 6. Click “Troubleshooting...”.
Click “Troubleshooting”
Step 7: Select Startup Repair.
Select "Startup Repair"
The system will begin recovery.
Step 8. Select an account.
Select an account
Step 9: Enter her password and click Continue.
Enter her password and click “Continue”
Step 10. Click on the “Return to original state” option.
Click on the option “Return to original state”
The system will restore the OS startup.
We are waiting for the recovery process to complete
If the system displays a warning that the recovery has not been completed, restart the PC, boot from the USB-Flash and repeat the steps in this section again.
If the recovery attempt is unsuccessful, perform the same steps again
Step 11. Check your PC for errors.
System Restore via Windows Recovery Environment
Important! System Restore may result in the loss of important files, so if possible, we recommend backing them up to external media first.
Step 1. Follow Steps 1-6 of the section “Restoring system boot...”.
Step 2. Select "System Restore".
Select "System Restore"
Step 3. Click “Next”.
Click “Next”
Step 4. Select a point with the date and time before the specified error appeared and click “Next”.
Select a point with the date and time before the specified error appears and click “Next”
Step 5. Click "Done".
Click “Finish”
Step 6. Click "Yes".
Click “Yes”
The system will reboot and restore the computer to the user-selected point.
File recovery process
Completing System Restore
Review of “Install Windows Error Code 0Xc1”
Experts usually refer to “Install Windows Error Code 0Xc1” as a “runtime error”. To ensure that functionality and operations work in a usable state, software developers such as Microsoft Corporation perform debugging before software releases. Unfortunately, problems such as error 0xC1 may be missed and the software will contain these problems when released.
Windows Installer users may encounter an error message after running the program, such as "Install Windows Error Code 0Xc1". Once the error is reported, Microsoft Corporation will respond and quickly investigate the 0xC1 error issues. Microsoft Corporation will then correct these defective code entries and make the update available for download. Therefore, in these cases, the developer will release a Windows Installer update to fix the error message that is displayed (and other reported issues).
Working with the command line
Checking the hard drive
In case of file system errors, the CHKDSK utility is used, which scans the hard drive (HDD) and corrects its errors.
Step 1. Follow Steps 1-6 of the section “Restoring system boot...”.
Step 2: Click Command Prompt.
Click “Command Line”
Step 3. Type “chkdsk C: /f” in the line and press “Enter”. Wait for the diagnostics and system recovery to complete.
Type “chkdsk C: /f” in the line and press “Enter”
Reference! In place of the letter “C:” there should be a letter of the drive with Windows located on it.
Checking system files
The SFC command is used to check and overwrite system files.
Step 1. Type “sfc /scannow” in the line and press “Enter”.
Type “sfc /scannow” in the line and press “Enter”
Step 2. Wait for the scan to finish and the files from the backup to be overwritten.
SAM file recovery
If the SAM storage is damaged, you can copy its working version from the backup folder.
Step 1. Type: “copy C:WindowsRepairSam C:WindowsSystem32Config” and press “Enter”.
Type “copy C:WindowsRepairSam C:WindowsSystem32Config” and press “Enter”
Step 2. When asked about replacing the file, press the “Y” (“Yes”) key.
Fixing RAM problems
This error may appear after installing a “fresh” line of RAM in the PC, its contamination or poor performance.
To check the RAM, you will need to open the PC case.
Step 1. Turn off the computer and unplug its cord from the 220V outlet.
Turn off the computer and unplug its cord from the 220V outlet
Step 2. Disconnect the connectors of all devices from the PC, remembering or writing down its order.
Disconnect the connectors of all devices from the PC
Step 3. Unscrew the screws holding the PC unit cover on the right (look from the direction of the connectors). It is also possible that the cover is held in place by latches that need to be pulled back.
Unscrew the screws holding the PC unit cover on the right
Step 4. Slide the cover along the system unit 1-2 cm towards the PC connectors, disengaging it, then turn it sideways and remove it.
Move the cover along the system unit 1-2 cm towards the PC connectors
RAM in a PC is installed in the form of strips.
In a computer, RAM is inserted in the form of strips
The RAM strips are inserted into special connectors on the PC board.
Special PC board connectors for RAM sticks
Step 5. Remove static charge from your hands by holding a regular faucet with your hands, preventing the discharge between your body and the PC components. Get started with RAM sticks:
- if there is more than one stick installed on your computer, you can remove one of them and use the others to check Windows boot;
- if the PC has a recently installed bracket, remove it;
- if one stick is installed, you can replace it with a similar one (see the RAM characteristics in the documentation for the PC).
Step 6: Pull the side latches holding the memory stick in place to release it.
Pull the side latches holding the memory stick, releasing it
Step 7. Remove the RAM stick.
We take out the RAM strip
Step 8. Clean the strips from dust and dirt, eliminating overheating and poor contact in their connectors.
We clean the strips from dust and dirt, eliminating overheating and poor contact in their connectors
Step 9. Insert the cleaned or new strip until the connectors snap into place, taking into account the presence of protrusions on the strip that block its incorrect installation.
Insert the cleaned or new strip until the connectors snap into place
Step 10: Reassemble the computer in the reverse order of disassembling it and check for errors.
Additional information and manual repairs
Here are some methods that will help you fix error code 0xc0000001 when you try to install Windows 10. Do not follow these methods unless you are absolutely sure that you can do it correctly. Otherwise, you may make the situation worse.
If you are unsure, consider asking a technician for advice. If you can't afford one, you may want to consider getting automated software to fix the job.
Method 1: Convert disk/partition to GPT
If you need to manually erase the drive and then convert it to GPT, follow these steps:
- Step 1: Turn off your computer and insert the Windows 10 installation DVD or USB drive
- Step 2: Boot your computer from USB or DVD in UEFI mode.
- Step 3: After installing Windows 10, press Shift + F10 keys. This will open a command prompt window.
- Step 4: Open DiskPart tool from CMD. Just type DiskPart and enter.
- Step 5: Then enter the list drive into CMD again. Press Enter. This will allow you to identify the drive of your computer that you want to reformat.
- Step 6: Select the drive and reformat it by entering the following on command line:
select drive (press Enter)
clear (press enter)
convert gpt (press enter)
exit (press enter)
- Step 7: Continue with Windows 10 Setup.
Note: When you are prompted to select the installation type, be sure to select Custom. Then select Unallocated space and click Next. This will automatically start the Windows 10 installation.
Method 2: Use Automatic Recovery Media Creation Tool
Automatic Repair is a Windows feature/utility that allows you to fix certain system issues that are preventing Windows from installing or running. It works by scanning your computer system for possible problems and trying to fix it.
- Step 1: Download the media creation tool
- Step 2: Boot your computer from a Windows 10 DVD or system recovery disc. When asked to press any key to boot, simply press any key on your keyboard.
- Step 3: Select the correct time and keyboard type.
- Step 4: Click Restore your computer. You will see this in the lower left corner of the screen.
- Step 5: Select Troubleshoot from the Select an Option screen
- Step 6: Click Advanced Options.
- Step 7: Select Automatic Repair
This will automatically launch the utility.
Method 3: Check your hardware devices
Another possible reason why you are getting this error while installing Windows 10 is due to the external hard drives you have connected. To fix this, turn off your computer. After that, disconnect and remove all connected external hard drives. If you are using a USB device to install Windows 10, make sure your BIOS is set to boot your computer from USB.
Method 4: Create a new copy of Windows 10 Installer
Another possible reason for this error to occur is that your copy of Windows 10 Installer is corrupt. To fix this, it's best to create a new copy of Windows 10 Installer.
- Step 1: Go to this link
- Step 2: Click the Download Now tool. Select Run as administrator.
- Step 3. What do you want to do? in the section, select installation media for another PC. Click Next.
- Step 4. Select edition, language and architecture (32-bit or 64-bit).
- Step 5: Select the media you want to use. If you want to use a USB drive, make sure it has at least 5 GB of free space. If you are using an ISO file, you need to first save the file on your computer and then burn the file to DVD.
Reinstall Windows
If the above steps do not resolve error 0x0000001, reinstall Windows.
Often, reinstalling the system when this error occurs solves the problem faster than a lengthy search for its causes.
Step 1. Follow Steps 1-4 of the section “Restoring system boot...”.
Step 2. Select "Install".
Select “Install”
Step 3. Click “I don’t have a key...” or enter the key and click “Next”.
Click “I don’t have a key...”, or enter the key and click “Next”
Step 4. Select the OS version and click “Next”.
Select the OS version and click “Next”
Step 5. Oh and click “Next”.
Oh and click “Next”
Step 6 : Click Custom.
Click “Custom”
Step 7. Select the partition to install and click “Next”.
Select the partition to install and click “Next”
Wait until Windows is installed and the PC restarts.
We are waiting for Windows installation to complete and the PC to restart
Step 8. After restarting the computer, carry out the standard Windows setup by clicking on the “Use standard settings” option.
Click on the option “Use standard settings”
Click “Next”
The desktop will open. Windows 10 will be installed.
Windows 10 desktop after reinstallation
The above steps can effectively deal with error 0x0000001 in Windows OS.