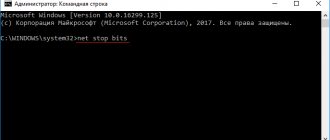
Windows update error 0x80070424 often occurs when required DLL files are not registered on the system. It usually manifests itself when we try to update the system through the Windows Update standalone installer or from a local WSUS server.
The Windows Update Standalone Installer (Wusa.exe) is a built-in utility that uses the Update Agent API to download and install packages. Users have encountered error 0x80070424 back in XP, and it still haunts people from time to time. But there are ways to completely get rid of it. You can find a solution to a problem if the causes of its occurrence are known.
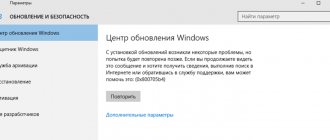
Windows Update Troubleshooter
Microsoft is updating its troubleshooters for a variety of tasks. It's safe to say that these tools are now much better than before.
If error 0x80070424 appears, follow these steps:
- Press the Win + I keys together to enter Settings, go to the “Update & Security” section.
- Open the troubleshooting tab and look for Windows Update.
- Go to it and click the “Run troubleshooter” button.
Additional information and manual repairs
To resolve error code 0x80070424, here are some of the best solutions for you. By following these solutions, you can fix the error yourself.
These are simple, easy and fast PC repair tools that do not require technical knowledge. Just follow simple steps and the error will be resolved in no time.
Reinstall Windows Firewall and Filtering Engine
If the root cause of error 0x80070424 is Basic Filtering Engine File Corruption, then the best way to resolve it is to register the file from a trusted site. Once you download it, extract the zip to your desktop.
- Double-click both files one after the other to confirm their installation on your computer. After installation, restart your computer and click the Start button. Find the file type and run, then press Enter.
- When the Run window opens, type REGEDIT and click OK. After that, from the left sidebar, navigate to HKEY_LOCAL_MACHINESYSTEMCurrentControlSetservicesBFE.
- Now just right click on the BFE folder and select resolution. Once this is done, click the add button and enter everyone, then click OK to confirm the settings. Here you will see the “all” field added.
- After that, in the permission panel below, check the Full Control checkbox and confirm. Now close the window, go to the menu and enter MSC services.
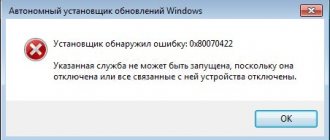
This will open a utility window. In the list, find “Filtering Engine Base File” and right-click on it. Now find Windows Firewall and see if you can change the settings. This procedure will most likely resolve error code 0x80070424 on your computer. It takes a lot of time, but it's worth it.
Use a registry cleaner
However, if the error is caused by registry issues, it is recommended to download Restoro. It is an advanced and feature-rich PC repair program integrated with many utilities including a powerful registry cleaner.
The registry cleaner detects all registry problems on your system and fixes them in seconds. It removes redundant, unnecessary and outdated registry entries and files that are damaging your system, cleans and repairs the registry.
It is convenient and compatible with all versions of Windows. So, whether you are using Windows 7, 8, XP or Vista, you can easily run it on all versions and resolve error code 0x80070424 due to registry issues.
This software also includes other functional and advanced features such as antivirus and system optimizer.
Click to download Restoro and resolve error code 0x80070424 on your computer today!
Registering DLL Files
The update uses certain system files to securely download and install packages. If these files are not registered, an error will pop up. Follow these steps to register DLLs.
Display the Run window (Win + R), enter the following commands one by one:
regsvr32 Qmgr.dll /s regsvr32 Qmgrprxy.dll /s
Restart your computer. Check if the system throws error 0x80070424.
Reason for the error in Windows 10
You can see this code when updating the OS. This happens once every few months. Depends on how often Microsoft rolls out new patches for the system and what changes in them.
0x80070424 is a code that indicates that there is a problem with Visual C++. Something goes wrong and the system cannot see the components required for the OS to function properly.
A common reason is installing another antivirus program. When the old one is not deleted, they come into conflict with each other, affecting other files. The presence of viruses is also one of the options why code appears on the screen.
Checking that Update Center services start automatically
The problem can also occur when the following services are not running: Windows Update, Background Intelligent Transfer Service (BITS), and Workstation. In this case, you need to go to system services and start them manually.
Open the Run dialog box (Win + R), enter services.msc.
Find the services listed and double-click on each. Check that each one is set to automatic startup type and that they all work.
Restart your computer and try updating the OS.
Start the required Windows 10 service and edit the registry
Check if error 0x80070424 appears in Windows 10, it may have already been resolved at this stage. If not, open Microsoft services.
- To do this, press two keys together WIN + R and enter the command in the line to call services: services.msc.
- In the next window, find Windows Modules Installer Service and start this service if it is disabled.
- To start, you need to left-click on the desired service and select “Start service” at the top left.
The following method is based on copying settings from a specific registry branch of the working operating system. To do this, you can use a friend’s computer, but there is one condition - the Windows versions must be the same (Home and Pro add-ons do not matter). If possible, you can copy the settings to a flash drive or phone memory, and then transfer it to your PC.
Correction via Registry Editor
The system registry is an important component of Windows. Sometimes problems arise due to a limitation imposed by the registry. You can fix error 0x80070424 by following these steps:
- In the Run dialog box (Win + R), type regedit.
- On the left side of the window, go to: HKEY_LOCAL_MACHINE\SOFTWARE\Policies\Microsoft\Windows\WindowsUpdate
- On the right side, find the DisableWindowsUpdateAccess option. Double click on it and set the value to "0".
Exit Registry Editor and restart your computer for the changes to take effect. See if update error 0x80070424 was resolved.
Launching Windows 10 Firewall
Error 0x80070424 during update may occur due to Windows Firewall being disabled. If it's off, we need to fix it. Even if you yourself have not disabled it on your computer, viruses often do this to remove interference for further actions in the system.
- Open the Start menu on your computer and select Control Panel.
- Next, find the “System and Security” item here. If there is no such item, select the link at the top right with the small arrow for “View”. Set the value to "Categories".
- In the next window, select Windows Firewall.
- In the next window you should have it enabled. When the Firewall is disabled, you will see red labels for the “Private Networks”, “Guest, Public...” sections. To enable this module, click on the left in the “Turn on or off Firewall” block and activate it.
Reset Windows Update components
When an update is launched, Center components are used to download, store, and install packages. The problem may occur if these components are not working correctly. In this case, you need to reset them.
There are two ways to reset - by entering a series of commands on the command line or using a ready-made script. Let's use a simpler method using a script.
Enter Reset Windows Update Agent into the Google search bar and go to the Microsoft website to download it.
After downloading it, unpack the ZIP archive and run the ResetWUEng.cmd file as an administrator.
Enable Windows Clean Startup.
Error 0x80070424 can also be caused by incompatibility issues. Antivirus or any other third-party software may conflict with Windows services, causing an error. The clean boot feature helps you start your computer with only built-in applications and services. This will help you know whether any third-party application is causing the problem or not. To start in clean boot mode, follow these steps:
- Press Windows Key + R buttons simultaneously and paste msconfig.
- Then in the window that opens, go to Services at the top.
- Check the box next to Hide Microsoft services and click the Disable all button.
- Now go to General and select the Selective startup option. Make sure the checkbox is only checked next to Load system services .
- Click Apply and OK . Then restart your computer.
Now you can try updating your system while in Clean Boot mode. Regardless of whether you were able to install the update or not, you need to return Windows to its normal startup settings. To do this, simply repeat all the steps that were described above, enabling the disabled services and changing the startup options from Selective startup to Normal startup .
Use the Media Creation Tool.
The last method to work around difficulties with updates is the Media Creation Tool. This tool is released by Microsoft to get the latest available updates, especially for users who find it difficult to do so in the traditional way. The update procedure will not affect your personal data, but will simply update your computer. To do this, follow the steps listed below:
- First, you need to download the utility from the Microsoft website.
- Then run the downloaded file.
- Once you agree to the Terms of Use, you will be given two options to choose from. Select Upgrade this PC now .
- Select Keep personal files so they are not damaged.
- Finally, start the process and wait for it to complete.
- We hope this method helped you bypass error 0x80070424.
Methods for solving error 0x80070424
First of all, check your computer for viruses. If there is a System64 directory in the Windows folder on drive C, and the consrv.dll file is present in the System32 folder, the problem is clearly due to a rootkit. It would be ideal if the disk drive was physically connected to another computer and checked there. Next, try the following methods.
No. 1: editing the registry
Download this (MpsSvc.reg) and this (BFE.reg) registry file. Open them - confirm the changes to the registry and reboot the OS. Launch Registry Editor and go to the HKEY_LOCAL_MACHINESYSTEMCurrentControlSetservicesBFE branch. Right-click on it “Permissions” => “Add” and set it to “For everyone”. Click on “For everyone” and set full control there and confirm the action by clicking OK.
- The procedure entry point was not found in the kernel32.dll library. We decide for ourselves!
Hold down the Win+R combination, enter and run the command services.msc. We find services there regarding the standard antivirus and firewall, make sure that they are running, and if not, launch them. If the problem does not go away, then download and open this (wscsvc.reg) and this (WinDefend.reg) file, not forgetting to reboot afterwards.
No. 2: troubleshooting the installer
Launch the services.msc application. Find Windows Modules Installer Service in the window that appears. It must not be turned off - the required state value in the “Startup type” line is “Manual”. Is it turned off? Let's launch. We try to go into the antivirus or firewall and if error 0x80070424 appears, then you need to find a PC that has the same OS version and language as yours.
Launch Registry Editor on the second computer. Go to the HKEY_LOCAL_MACHINESystemCurrentControlSetServicesTrustedInstaller branch. Select the branch, go to the upper left corner, click “File” => “Export” and save the file as “trustedinstaller.reg”. We copy and open it on the problem computer, confirming the changes in the registry. We restart the system and try to cause an error. If it appears again, then you need to go to the second computer again.
We find the file TrustedInstaller.exe in the C:WindowsServicing folder. We copy it to a similar directory on the problematic PC. To do this, you need to have full rights to this folder. Launch a command prompt with administrator rights, enter and confirm two commands:
- takeown /fc:windowsservicing icacls
- c:windowsservicing/grant administrators:F
After this, reboot the system - error 0x80070424 should not appear.
Take part in the Cyberpunk 2077 game giveawayRead more
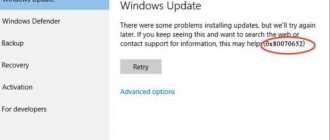
Quite often, users encounter problems when installing Windows operating system updates. Often the updates themselves become the cause of errors in the system. This article will look at error 0x80070424 in Windows 10 and how to fix it.
Fixing error 0x80070424 in Windows 10