The appearance of a blue screen of death with the Kernel Security Check Failure error most often indicates that the integrity of files in Windows 11 has been compromised or some important updates are missing. Less commonly, the problem is associated with RAM malfunctions or lack of memory.
Next, I will consider all the ways to correct this error.
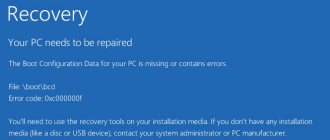
If the operating system does not load at all, and a corresponding error appears on the screen, download an ISO image from Windows 11, write it to a flash drive using any convenient program (you can even use the official one from Microsoft), that is, make a bootable flash drive. Run the recovery tool through it, open Command Prompt and enter sfc /scannow , then press Enter .
Disconnect all unnecessary equipment
First of all, we recommend turning off all peripheral equipment of the computer: additional video cards, sound cards, USB devices, etc. Perhaps the reason for the error is that your power supply cannot cope with so much equipment.
If you have two GPU graphics cards on your computer, such as the integrated Intel HD Graphics and an optional NVIDIA graphics card, try temporarily removing the secondary card and checking if the BSOD appears. If the problem disappears after removing the GPU, then the problem is with the video card itself or its drivers.
Method 3: Check the disk
If after testing the RAM the error persists, proceed further. This method is also associated with an automatic checker, but it will only affect the hard drive. It does not have a graphical menu, so it is launched via the Command Line .
- Open menu "Start" and find the console through the search. You can use any convenient method for launching the Command Prompt if you know one.
- It is important to run the console as an administrator, otherwise the command will not work.
- IN "Command line" enter chkdsk C: /f /r /x and press Enter for use.
- The disk verification process will begin. If you see information that the test is not possible because another process is busy, confirm that testing will begin on the next reboot and send the PC to it.
Analyzing a memory dump using WinDbg
To determine the cause of the error and the faulty driver or system component, you need to analyze the crash memory dump using the standard WinDBG utility (included in the Windows Software Development Kit (SDK) for Windows 10). The utility is called Debugging Tools for Windows . WinDBG allows you to load and analyze a crash dump (C:\Windows\MEMORY.DMP) and find the specific library or driver that is causing the error. This is the most accurate and correct way to determine the system component that is causing the BSOD (but not the easiest for a novice user).
In this article we will not describe how to use WinDBG to analyze a memory dump during BSOD and identify faulty drivers and libraries (this is the topic of a separate large article).
Automatic startup fix
The method is effective only in some cases. But I still suggest using it.
- We start from the installation drive and go to the “System Restore” section, and then move to “Extra options — Troubleshooting — Startup Recovery».
The computer will restart and the automatic problem fixing process will begin.
Check your RAM
Often the Kernel Security Check Failure error occurs due to problems with RAM. If your computer has several memory sticks installed, try removing each one one by one and checking the operation of the system. Then run a full memory test using the built-in Windows memory diagnostics utility, mdsched.exe (Windows Memory Diagnostics Tool).
If your RAM memory is faulty, this test will reveal it.
Method 2: Use a memory checker
Windows 11, like previous versions of operating systems, has a built-in tool for checking RAM. It will find and correct errors, if any. Problems for which there is no solution are most likely hardware related, in which case switching the RAM stick to a different slot or replacing it will help.
- Open "Start" and use the search to find the application "Windows Memory Checker", then run it.
- Close all processes, save changes in other programs and in the new window click on "Reboot and check".
- A window will appear where you will see the testing process. When a list appears with a choice of modes, specify "Regular". Upon completion, you will receive a detailed report on the scan and the problems found.
Update BIOS
Restart your computer and enter BIOS/UEFI settings. Determine the current firmware version. Check the motherboard manufacturer's website to see if there are more recent firmware versions available for your BIOS/UEFI. Download and install the firmware update according to the instructions on the manufacturer's website.
If the kernel_security_check_failure error appears when you connect your phone to your computer via a USB cable, this means that you have incorrect drivers installed for your phone or there is not enough voltage on the USB hub (disconnect other USB devices and try another USB port).
About the “KERNEL SECURITY CHECK ERROR“
The following information on this error has been compiled by NeoSmart Technologies, based on the information gathered and reported by our global network of engineers, developers, and technicians or partner organizations.
Description and Symptoms
The error messages, alerts, warnings, and symptoms below are tied to this error.
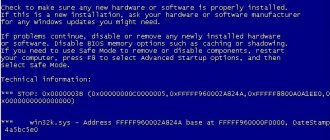
Symptom 1: KERNEL SECURITY CHECK ERROR error screen
The error is usually triggered when the kernel detects a corruption of data and, in most cases, it can be triggered by a USB-related problem or by a corrupt driver or device.
On Windows 8, Windows 8.1 and Windows 10 systems, the error screen looks like this:
Your PC ran into a problem and needs to restart. We're just collecting some error info, and then we'll restart for you. (0% complete) If you'd like to know more, you can search online later for this error: KERNEL_SECURITY_CHECK_ERROR
Causes of this Error
This error has been known to occur as a result of one or more of the following:
Cause 1: System files or drivers are corrupt
The most common cause for this error are corrupt or missing system files or hardware drivers. This may happen because of disk read/write errors, or virus attacks. If that's the case, then it is advisable to scan the system files for errors and restore them if necessary.
Wally's Answer Rating
Quick Solution (How fast can you do it?)
Easy Solution (How easy is it?)
Beginner-Friendly (Recommended for beginners?)
Summary: Every Windows Wally blog post is evaluated on these three criteria. The average of all three elements determines an “Overall Rating” for each blog post.
4
Overall Rating
About the Author
Wally PhillipsWindows Wally is a helpful guy. It's just in its nature. It's why he started a blog in the first place. He heard over and over how hard it was to find simple, plain-English solutions to Windows troubleshooting problems on the Internet. Enter: Windows Wally. Ask away, and he will answer.
Fix Kernel Security Check Failure in Windows 10
Method #1: Use System File Checker & Memory Diagnostic Tool
When Windows fails to start correctly it should automatically detect that something is wrong and ask you what you want to do – here you need to click “See advanced repair options.”
Now click on “Troubleshoot” and then once again go to “Advanced Options.”
- In Advanced Options click on “Startup Settings”, and then click the Restart button on bottom right.
- Now Windows 10 will reboot with the minimum settings, also known as the safe mode – note that if this fails then, you must skip to Solution 2 and ignore everything else in Solution 1.
- If however, it did work, you should be a desktop that might look a bit weird, but that's fine.
- Now open your Start Menu and type “cmd,” once you see Command Prompt, right-click on it and click “Run As Administrator”.
- Now you have to type “sfc /scannow” in the Command Prompt and press Enter.
- Now wait for the scan to finish – if it finds any issues it will attempt to resolve them itself.
- Once the command has finished, you can close Command Prompt.
- Now you have to open your start menu once again and type “mdsched.exe”.
- This will open the Memory Diagnostic tool, where you need to click on “Restart now and check your problems”.
- Now Windows should reboot and start testing your memory for errors.
Once Windows has finished searching for memory errors it should reboot into the normal mode – your BSODs should be fixed now. If the memory test showed you errors then you might need to contact a professional to check your RAM sticks, as you might be in need of a hardware replacement.
If your RAM did not have any errors but you are still getting BSOD's, you might want to try solution 2 – know that you will require the Windows install files for this, which you can download directly from Microsoft. If you are still facing the Kernel Security Check Failure error in Windows 10, follow the Solution 2.
Method #2: Fixing Using BCDEdit
If you are still facing the Kernel Security Check Failure error in Windows 10, then try this method which will definitely solve your issue.
- Once you have a bootable DVD or USB stick ready to boot, restart your PC with the bootable device connected.
- Boot into the Windows setup and click Next.
- Now choose the Troubleshoot option and click Advanced Options.
- In Advanced Options click “Command Prompt” and type “C:” in the window that pops up, then press Enter.
- Now type “BCDEDIT /SET {DEFAULT} BOOTMENUPOLICY LEGACY” and press Enter.
- Wait for the command to execute and when it is finished, type “exit” and press Enter to close the command prompt.
- Now you should be back on the “Choose an option” screen, click Continue here.
- Now your PC should start as normal.
Solution 2 should fix your issue, if it however, does not then you should get some expert help because you will have to check if your hardware is failing or not. If it is failing then you will have to spend some money – you can't really help it if your hardware itself is failing, and the sooner you detect and replace it the less chance of data loss you have.
The issue could either by your RAM or your Hard Disks, but it is hard to determine what exactly is causing this issue. You can also as a really drastic solution try and reinstall Windows – this might or might not work. It will not help you if your hardware is failing, but if you are sure enough that it is not your hardware and no other solutions work, this is your last resort.
If you have any sort of questions, you can get them cleared in the comments section below. We hope that one of the two solutions mentioned above help you is solving the Kernel Security Check Failure issue in Windows 10.
Recovering system files
It is also recommended to check the functionality and data integrity of the entire system. To do this, you need to type the following command in the console.
To start, press the button.
Windows 10 scanning takes quite a long time. So you'll have to wait. It is advisable not to do anything during the scan.
Reasons for the error
This problem can occur both at the boot stage and some time after switching on. In addition, the failure is unpredictable and may not appear even for several days, after which it will remind itself again. You can only know exactly how to fix a malfunction if the cause is known, but since there are a number of provoking factors, in most cases you have to identify the source of the problem by trying to correct the situation. The Kernel Security Check Failure error, typical for Windows 10 and other versions, often appears for the following reasons:
- Damage to system files.
- Outdated or missing drivers.
- An outdated BIOS version that conflicts with other software.
- Other software conflicts.
- Damaged/missing registry entries.
- Overheating of the processor and video adapter.
- Incompatibility of components within the PC assembly.
- Other hardware problems.
There are other possible reasons; in each specific case, there is a possibility that the failure was caused by another factor and it is not often possible to expose the source of the trouble.
4: Scan Hard Disk for Error
Another cause of this blue screen error is faulty hard drive. You should check if you need to get your hard drive replaced:
IMPORTANT: Please make sure you have closed all open programs and files before your disk check.
1) On your keyboard, press the Windows logo key and E at the same time. Click This PC.
2) Right-click the hard drive that you want to check and click Properties.
3) Go to the Tools tab and click Check option.
4) If your hard disk drive is problem free, you will see the notification like this:
If you don't see this notification, please consider buying a new hard disk drive to get this problem solved.
Fixing “KERNEL SECURITY CHECK ERROR” on Windows
Fix #1: Check error log with Event Viewer
Using the Event Viewer tool you can troubleshoot and try to pinpoint the cause for why the error appears.
To access Event Viewer, follow these steps:
- Click Start
- Type in the search box
- Select Administrative tools from the results list
- Choose Computer Management
- Expand the Event Viewer tree from the right side
- Expand the Windows logs tree
- Select System
- Check for any error messages that may help you identify the device or the driver that's triggering this error.If you can identify a device or driver from the error list, disable that device or driver and restart your computer to test if the error appears again.
Event log screen
Fix #2: Run Driver Verifier
The Driver Verifier utility can test all your installed drivers and could help you identify corrupt files and drivers. If the KERNEL SECURITY CHECK ERROR error is caused by a corrupt driver, the Driver Verifier tool can identify the problematic driver.
To access Driver Verifier, follow these steps:
- Start Windows
- Click start
- Type in the search box to open Command Prompt
- Right-click on the Command Prompt item from the search results list
- Click Run as Administrator
- Type in Command Prompt
- Press Enter
- Select the Create standard settings check box and then click Next
- Select the Automatically select all drivers installed on this computer option
- Click Finish
To test against specific drivers, follow these steps:
- Start Windows
- Click start
- Type in the search box
- Select Create custom settings
- Click Next
- Select everything from the Select individual settings from the full list section. If you're running Windows 8/8.1, leave the DDI compliance checking and randomized low resource simulation unchecked.
- Select Select driver names from a list
- Click Next
- From the new list select all drivers that are not listed with Microsoft as a provider
- Click Finish
The Driver Verifier tool will now run in the background and save any error logs if the KERNEL SECURITY CHECK ERROR appears again. If the error appears, open the logs to troubleshoot the driver.
Driver verifier screen
Fix #3: Run sfc
On Windows Vista and Windows 7, it is possible to use the built-in Windows SFC(system file checker) tool to automatically scan a computer's system files and repair them if necessary.
Here are the steps to run SFC:
- Boot from your Windows install disc
- Click on Repair your computer after selecting proper language, time and keyboard input.
- Select the Windows installation drive, which is usually , and click Next
- Choose Command Prompt when the System Recovery Options box appears
- Write the following command and press Enter afterwards: sfc /scannow /offbootdir=D:\ /offwindir=D:\Windows\
Replace D: with the letter of the driver where Windows is installed, and D:\Windows with the Windows folder location .
Here is an example of what the PC's console output should look like once the sfc.exe scan is complete and missing files are successfully restored:
System files restored by the SFC utility
For more information on sfc, read the sfc guide.
Fix #4: Clean boot
A clean boot of your Windows will allow you to trobleshoot if the KERNEL SECURITY CHECK ERROR appears because of a third-party device or driver you've recently installed.
To clean boot a Windows XP, Vista or 7 system, follow these steps:
- Start Windows
- Click Start and type in the search box or open Run > type
- Press Enter
- Go to the General tab
- Check Selective Startup radio button
- Uncheck the Load startup items check box
- Go to the Services tab
- Check Hide all Microsoft service check box
- Click Disable all
- Click OK
- Restart your computer
To clean boot a Windows 8 or 8.1 system, follow these steps:
- Follow the same steps from Windows XP/Vista/7 above
- Go to the Startup tab
- Disable all startup items
- Restart your computer
Msconfig utility screen
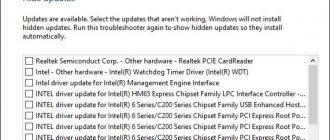
Fix #5: Install all pending updates
Make sure your Automatic Updates option is turned on and you have the latest updates install for your system.
Follow these steps:
- Windows Vista, 7 users can type in the search box to open Windows Updates.Windows 8 users can open the Charm Bar by pressing Windows key and the C keys and then go Settings > Change PC Settings
- Click Update and Recovery
- Click Choose how updates get installed
- Select Install updates automatically at the Important updates section
- Check Give me recommended updates the same way I receive important updates check box under Recommended updates
- Click OK
Windows Update setting screen
Run System Restore
There is a strong chance that either you or a third-party application made certain changes to your Windows configuration, which led to this problem. This could have been caused by the installation of a particular program, the installation/uninstallation of a hardware device, alterations to important registry keys etc.
Fortunately, you can use Windows System Restore to undo these changes, however this tool is limited in what it can and cannot undo; which is usually determined by the severity of the problem.
With that said, for step by step instructions on how to use Windows Restore, I suggest you check out my post on repairing CRITICAL_STRUCTURE_CORRUPTION issues.
Posted in: Errors
Are you looking for a way to repair all the errors on your computer?
If the answer is Yes
, then I highly recommend you check out Advanced System Repair Pro.
Which is the leading registry cleaner program online that is able to cure your system from a number of different ailments such as Windows Installer Errors, Runtime Errors, Malicious Software, Spyware, System Freezing, Active Malware, Blue Screen of Death Errors, Rundll Errors, Slow Erratic Computer Performance, ActiveX Errors and much more.