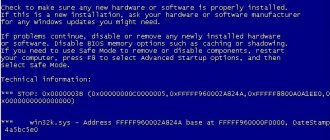
Supporters of PCs on various other operating systems often argue in disputes with Windows users that Windows computers are bad because the user is constantly terrorized by blue screens of death. Not true. If the computer is in good condition and is used normally, you will not have any blue screens of death. Nevertheless, exceptions sometimes happen, since no one is immune from banal errors, especially in such a complex product as an operating system, drivers for it and other software. Sometimes it happens that the user’s work is interrupted by a blue screen of death with the error code Critical Process Died.
Cause of failure
An error with the code “CRITICAL_PROCESS _DIED” is most often caused by device drivers that do not work correctly or were downloaded and installed through the Update Center, while the installation of original drivers is required (for example, from the manufacturer’s website or a disk/flash drive that was in included in the delivery package).
Less commonly, the source of the problem may be:
- cleaning the computer using special programs, as a result of which the necessary system files were deleted;
- damage to system files and/or registry (for example, if they are located on a damaged area of the hard drive with the OS);
- malware that interferes with the normal functioning of a PC or laptop;
- Incorrect completion of the update download and installation process.
Prohibition of driver installation
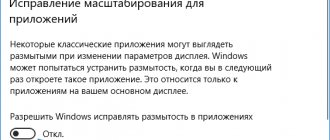
As mentioned at the beginning of the article, the root of the problem may be automatic driver updates using Windows 10. To disable these updates, do the following:
- Download the standard “ Show and hide ” utility from the link https://support.microsoft.com/ru-ru/help/3073930/how-to-temporarily-prevent-a-driver-update-from-reinstalling-in-window ( located in the center of the article).
- Launch the utility, click “Next” in the first window, then go to “Hide updates”.
- The user will see list of drivers, the automatic updating of which can be disabled. This is easy to do: you need to check the box next to all “problem” devices and click “Next”.
- Drivers are no longer updated automatically.
Troubleshooting a running operating system
If the error does not prevent you from loading the operating system and entering its usual workspace, first of all we check the records of dumps that have occurred, which are automatically created when serious problems are detected. There is an important nuance here - this function (creating records) must be enabled in the system settings.
To view recordings, a special program is used, for example, BlueScrennView , which can be downloaded for free from the page at the link: https://www.nirsoft.net/utils/blue_screen_view.html.
Buttons for downloading software are located at the bottom of the page. There are several download options: an archive for a 32/64-bit system that does not require installation, or an installation file for installing the program yourself.
So, having installed and opened the program, do the following:
- Using dumps with the name of our error (“CRITICAL_PROCESS _DIED”), we check files with the “SYS” extension at the bottom of the window (with the “Address on the stack” parameter filled in).
- We search the Internet for information on the found file(s), incl. We determine which driver it is responsible for.
Once the problematic driver is found, we fix the problems that arose with it or because of it. It could be:
- Roll back a driver to a previous version if it was recently updated and an error occurred. For this:
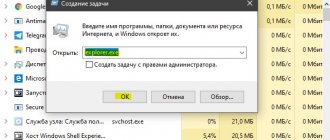
- Launch Device Manager (for example, through the Search bar).
- We find a device whose driver has stopped working properly. Let's take a sound card as an example. Double click on it to open its properties.
- In the window that opens, go to the “Driver” tab and click the “Roll Back” button. If it is not active, then this method will not work, and you will not be able to roll back the driver.
- Completely removing the driver and reinstalling it from scratch. It is recommended to download and install drivers only from the official website of the device manufacturer in order to avoid various problems. This operation is described in detail in the second method of our publication - “Blue Screen of Death in Windows 10: how to fix it, error code.”
- Disabling the device. This may only be a solution (temporary or permanent) if the device is minor and does not affect the operation of the computer (or its impact is minimal).
Note: when installing drivers, the anti-virus program (if it is installed on the computer) should be disabled (or uninstalled), because it may interfere with normal installation.
Other steps to resolve the “CRITICAL_PROCESS _DIED” error:
- Some users prefer, instead of searching for a specific problematic driver, in case of any malfunctions in the operating system, to remove and reinstall the drivers of all devices. This approach is also applicable to our situation, but it is worth considering that it takes much more time. It is recommended to start with the motherboard driver, because... it is quite often the cause of failure. We emphasize once again that you need to download installation files from the device manufacturer’s website, and not from third-party resources. It is not recommended to use the “Update driver” button in the hardware properties in Device Manager, because as we mentioned above, this may cause the problem.
- We scan the system using an antivirus program. The error may be caused by malware.
- You can also use some utility for cleaning system garbage, for example, Ccleaner . Detailed information about this program is presented in section 4 of our article - “Where temporary files are stored in Windows 10: how to delete.” In most cases this is unlikely to help, but it's worth a try. In any case, this is a useful procedure that can be performed periodically on a fully functional computer.
- If any programs are used to “overclock” the system characteristics of the computer, they should be disabled or removed.
- We check and restore the integrity of system files, as well as system registry files.
- If none of the methods above solved the problem, you can roll back the system to an earlier state using restore points. If suddenly there are no such points, then you can try to return the computer to factory settings.
Note: In rare cases, the error may not be related to device drivers, but to the performance of the devices themselves (for example, a faulty power supply, damaged hard drive, RAM, etc.). In such cases, the most obvious and, most likely, only solution is to replace the failed device.
Fixing the problem
Usually, when the “critical process died” error and a blue screen appear, the OS restarts after some time. If the system starts in normal mode and does not crash, first of all you need to do the following manipulations:
- Disable unnecessary antivirus programs and leave one working one if there are 2 or more installed on your PC.
- If you overclocked your PC settings using BIOS, you need to return them to factory settings.
- Turn off the computer and clean it from dust, check the functionality of the cooler, connectors, parts should not fit tightly to each other.
- Check the heating temperature, in case of high values, ensure good air circulation in the system unit and take care of additional cooling.
If the problem occurs on a laptop, then you should not open it, these actions will void the warranty. It is recommended to take it for repair, and before that simply leave it turned off for a while. Especially in the case when the case is clearly overheated.
Ways to resolve the error if Windows does not start
If the error “CRITICAL_PROCESS _DIED” appears before entering the usual “tens” workspace, launch Safe Mode. Here you can already try to follow the steps described in the section above (if possible).
You can also use the Recovery Environment if for some reason you cannot enter Safe Mode, or actions in it did not lead to anything. To do this, you need a recovery disk (or bootable flash drive) created earlier on your computer or on another computer with a similar version of the operating system, respecting its bit capacity. Information on how to create a disk and how to use it to launch the Recovery Environment is described in our article - “How to create a recovery disk in Windows 10: on a flash drive, CD and DVD.”
- After starting from the recovery disk, click the “System Restore” button.
- The Recovery Environment will appear, where we are interested in the “Troubleshooting” item, then – “Advanced options” – “System Restore”.
- Thus, it will be possible to roll back the system using restore points. If they are not there, launch Command Prompt here, then check and restore the integrity of system files (a link to a separate article on this operation is provided in the section above).
- Also, through the Recovery Environment, you can start the procedure for returning your PC or laptop to its original state (“Troubleshooting” – “Return the computer to its original state”).
Note: After several unsuccessful attempts to start Windows 10, the Recovery Environment should appear without using a recovery disk/bootable USB flash drive.
More options
In addition to the basic solutions to the problem, there are additional options. They will help eliminate many errors in Windows, including “ critical process died ”
.
Reset
Resetting the system will roll back the PC to its original state. This solution will allow the computer to become the same as when purchased. A system reset is the best alternative to a complete OS reinstall. This procedure will allow you to save all user data on your PC.
To reset the OS to its original state, do the following:
- Call the “Options
” menu with the keyboard shortcut
“ Win + I ”
. - Go to Updates and Security
. - Go to the "Recovery"
. - In the window that appears, click the “Start”
. - In the pop-up window, select one of the options: “Keep my files”
or
“Delete everything”
.
After which the computer itself will do all the work. After the process is completed, standard programs will appear on the PC. The OS will work correctly.
Registry recovery
Since the computer worked correctly the last time it logged into Windows, it is most likely that there were no changes in the OS that caused the error. Therefore, the most logical solution in this situation would be to roll back the registry to its previous state.
But this will not be possible if the user has disabled the automatic creation of restore points. If this does not happen, then the OS independently creates ways for itself to return to previous states. You can roll back the system as follows:
- Go to “Settings”.
- Go to "Updates and Security".
- Click on "Recovery"
.
After which the recovery window will appear. To do it correctly, just follow the instructions on the screen.
Removing the latest Windows updates
If the error appeared immediately after downloading the updates, then the best solution would be to remove them. To do this you need to follow the path:
- Options ( Win+I ).
- Update and security.
- Windows Update Center.
- View the update log.
- Remove updates.
In the window that opens, you need to remove the latest installed updates. They can be identified by the date indicated in the log.
Reinstalling Windows
To completely remove all problems, you can simply do a clean installation of Windows on your PC. In the case of OS version 10, the license will be saved if you install the same version on a PC. You can do this as follows:
- Create a bootable USB flash drive with Windows from a clean PC using a special utility;
- Connect the flash drive to the problematic PC and restart;
- Skip the item about product activation;
- Select formatting only the system partition;
- Select the cleaned partition to install the new Windows on it.
After which the OS will be installed on the PC. The main thing is to make sure that Windows works stably and without errors. To free up disk space, just delete the windows old
.
Virus check
The problem sometimes lies in malware. To check this and fix it, you can use:
- Full-fledged, paid anti-virus programs - Dr.Web, NOD 32, Kaspersky and the like.
- Free utilities – Dr. Web Cureit and others like it.
The difference between a utility and a full-fledged antivirus is a single scan versus constant protection. Thus, antiviruses will prevent repeated problems associated with viruses and eliminate existing ones. Dr. utility Web Cureit – will check the hard drive for threats and remove them once.
Black screen appears when loading Windows OS
Fix the “Critical Process Died” Stop Code 0x000000EF in Windows 10
Are you experiencing CRITICAL_PROCESS_DIED BSOD on Windows 10? Have you noticed decreased system performance or frequent blue screen error after recent windows updates? The Critical Process Died bug check has a value of 0x000000EF, indicates that a critical
Windows system
process
fails to run properly.
Basically the Windows operating system ensures that only authorized applications can access certain data and parts of the system. But when a critical component of Windows detects an unauthorized modification to its data, it immediately steps in, causing the Critical Process Died blue screen error.
Your PC ran into a problem and needs to restart. We're just collecting some error info, and then we'll restart for you. If you'd like to know more, you can search online later for this error: CRITICAL_PROCESS_DIED
Most of the time Windows 10 blue screen error can be caused by buggy drivers. Again corrupted system files, Disk drive Error, low-level software issues, or the default value in the Boot Loader section of the Boot.ini file are missing or invalid. Whatever the reason here some solutions you may apply to get rid of this windows 10 Blue screen error.
Checking the disk and RAM
One of the reasons for the “CRITICAL PROCESS DIED” problem may be incorrect operation of the RAM modules or hard drive. Unfortunately, in this case, the problem can be fixed only by replacing the hardware, but detecting faults is very simple:
- In the search bar, enter “Diagnostics” - you will see the standard utility “Diagnosing RAM problems».
- Launch the program, select " Reboot and check ".
- After the reboot, the following diagnostic window will appear.
- When the system restarts, the scan result will be displayed in notifications.
To fix the problem (if there is one) in this case, it will be necessary to replace incorrectly functioning RAM sticks with new ones.
The hard drive is checked via the command line :
- Run Command Prompt as Administrator.
- Enter the command “chkdsk _”, where “_” is the local drive letter.
- The verification process will begin. Upon completion, the result will be displayed in the console window.
It is worth noting that this is a rather lengthy process. It is advisable to leave the PC connected to the outlet for 2-3 hours if it is a laptop.
General recommendations
To avoid error 0x000000ef, it will not hurt to follow these recommendations:
- Be sure to use an antivirus and regularly scan your PC for malicious files.
- Do not use questionable links to download anything.
- Do not trust auto-updates: it is advisable to purchase updates on developer sites.
- Configure automatic creation of memory dumps.
- In the process of troubleshooting the problem, try all possible methods, and only if they do not help, resort to a complete reinstallation of the system.
- Just in case, create a bootable USB flash drive in advance.
Clean boot
If the error is in the software, then you can identify it by “Clean Boot Windows”.
- Open the search bar and write there “msconfig"(or press Win+R and enter the command).
- Go to the "Services" Check the box next to “Hide Microsoft services,” then click “Disable all.”
- In the “Startup” tab, click on “Open task manager».
- Select the tab "Autoload", next to each element, check the box and click "Disable". Afterwards, close the task manager.
- Afterwards, return to the “ System Configuration ” window, click on “Ok”, and then restart the PC.
If everything is fine, look for a problem in the installed software.
Run the Hardware and Devices Troubleshooter
Windows now offers a wide range of specialized troubleshooting tools. One of them is specifically designed for hardware and device problems. To run the troubleshooter, follow the steps below.
- Go to Settings > Update & Security > Troubleshoot > Scroll down and select Hardware and devices , then click Run the troubleshooter . Your system will spend a few minutes searching for problems and reporting the results.