Появление синего экрана смерти с ошибкой Kernel Security Check Failure чаще всего свидетельствует о том, что в Windows 11 нарушилась целостность файлов или отсутствуют какие-то важные обновления. Реже проблема связана с неисправностями ОЗУ или ее нехваткой.
Далее рассмотрю все способы, позволяющие исправить эту ошибку.
Если операционная система вовсе не загружается, а на экране появляется соответствующая ошибка, скачайте ISO-образ с Windows 11, запишите его на флешку через любую удобную программу (можно и официальную от Microsoft), то есть сделайте загрузочную флешку. Запустите через нее средство восстановления, откройте Командную строку и введите sfc /scannow, после чего нажмите Enter.
Отключите все лишнее оборудование
Прежде всего, рекомендуем отключить все периферийное оборудование компьютера: дополнительные видеокарты, звуковую карты, USB устройства и т.д. Возможно причина ошибка в том, что ваш блок питание не справляется с таким количеством оборудования.
Если у вас на компьютере имеется две видеокарты GPU, например, встроенная Intel HD Graphics и дополнительная видеокарта NVIDIA, попробуйте временно извлечь дополнительную карту и проверить, появляется ли BSOD. Если после извлечения GPU проблема пропала, значит проблема с самой видеокартой или ее драйверами.
Способ 3: Проверка диска
Если после тестирования оперативной памяти ошибка сохранилась, переходите далее. Этот метод тоже связан с автоматическим средством проверки, но затронет оно именно жесткий диск. У него нет графического меню, поэтому запуск осуществляется через «Командную строку».
- Откройте меню «Пуск» и отыщите консоль через поиск. Вы можете использовать любой удобный метод запуска Командной строки, если знаете такие.
- При этом важно запустить консоль именно от имени администратора, иначе команда не сработает.
- В «Командной строке» введите chkdsk C: /f /r /x и нажмите Enter для применения.
- Начнется процесс проверки диска. Если вы увидите информацию о том, что проверка невозможна из-за занятости другим процессом, подтвердите начало тестирования при следующей перезагрузке и отправьте ПК в нее.
Анализ дампа памяти с помощью WinDbg
Чтобы определить причину ошибки и сбойный драйвер или компонент системы нужно проанализировать аварийный дамп памяти с помощью стандартной утилиты WinDBG (входит в комплекс Windows Software Development Kit (SDK) for Windows 10). Утилита называется Debugging Tools for Windows. WinDBG позволяет загрузить и проанализировать аварийный дамп памяти (C:\Windows\MEMORY.DMP) и найти конкретную библиотеку или драйвер, которые вызывает ошибку. Это самый точный и правильный способ для определения компонента системы, который вызывает BSOD (но не самый простой для начинающего пользователя).
В этой статье мы не будет описывать, как использовать WinDBG для анализа дампа памяти при BSOD и выявлении сбойных драйверов и библиотек (это тема отдельной большой статьи).
Автоматическое исправление запуска
Метод эффективен лишь в некоторых случаях. Но все равно предлагаю им воспользоваться.
- Запускаемся с установочного накопителя и заходим в раздел «Восстановление системы», а затем перемещаемся в «Дополнительные параметры — Поиск и устранение неисправностей — Восстановление при загрузке».
Компьютер перезагрузится и начнется автоматический процесс исправления проблем.
Проверьте оперативную память
Часто ошибка Kernel Security Check Failure возникает из-за проблем с оперативной памятью. Если в компьютере установлено несколько планок памяти, попробуйте поочередно извлечь каждую и проверить работу системы. Затем выполните полную проверку памяти с помощью встроенной утилиты диагностику памяти в Windows — mdsched.exe (Windows Memory Diagnostics Tool).
Если ваша RAM память неисправна, эта проверка позволит выявить это.
Способ 2: Использование средства проверки памяти
В Windows 11, как и в прошлых версиях операционных систем, есть встроенное средство для проверки оперативной памяти. Оно найдет и исправит ошибки, если такие присутствуют. Неполадки, решения для которых нет, скорее всего, связаны с аппаратным обеспечением, и в этом случае поможет переключение плашки ОЗУ в другой слот или ее замена.
- Откройте «Пуск» и через поиск отыщите приложение «Средство проверки памяти Windows», после чего запустите его.
- Закройте все процессы, сохраните изменения в других программах и в новом окне нажмите на «Выполнить перезагрузку и проверку».
- Появится окно, где вы увидите процесс тестирования. При появлении списка с выбором режимов укажите «Обычная». По завершении вы получите детальный отчет о проверке и найденных проблемах.
Обновите BIOS
Перезагрузите компьютер и войдите в настройки BIOS/UEFI. Определите текущую версию прошивки. На сайте производителя материнской карты проверьте, имеются ли более свежие прошивки для вашего BIOS/UEFI. Скачайте и установить обновление прошивки (firmware) по инструкциям на сайте производителя.
Если ошибка kernel_security_check_failure появляется при подключении к компьютеру телефона через USB кабель, это означает, что у вас установлены некорректные драйвера для вашего телефона или недостаточно напряжения на USB хабе (отключите другие USB устройства и попробуйте другой USB порт).
About the “KERNEL SECURITY CHECK ERROR“
The following information on this error has been compiled by NeoSmart Technologies, based on the information gathered and reported by our global network of engineers, developers, and technicians or partner organizations.
Description and Symptoms
The error messages, alerts, warnings, and symptoms below are tied to this error.
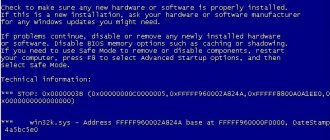
Symptom 1: KERNEL SECURITY CHECK ERROR error screen
The error is usually triggered when the kernel detects a corruption of data and, in most cases, it can be triggered by a USB-related problem or by a corrupt driver or device.
On Windows 8, Windows 8.1 and Windows 10 systems, the error screen looks like this:
Your PC ran into a problem and needs to restart. We’re just collecting some error info, and then we’ll restart for you. (0% complete) If you’d like to know more, you can search online later for this error: KERNEL_SECURITY_CHECK_ERROR
Causes of this Error
This error has been known to occur as a result of one or more of the following:
Cause 1: System files or drivers are corrupt
The most common cause for this error are corrupt or missing system files or hardware drivers. This may happen because of disk read/write errors, or virus attacks. If that’s the case, then it is advisable to scan the system files for errors and restore them if necessary.
Wally’s Answer Rating
Quick Solution (How fast can you do it?)
Easy Solution (How easy is it?)
Beginner-Friendly (Recommended for beginners?)
Summary: Every Windows Wally blog post is evaluated on these three criteria. The average of all three elements determines an “Overall Rating” for each blog post.
4
Overall Rating
About the Author
Wally PhillipsWindows Wally is a helpful guy. It’s just in his nature. It’s why he started a blog in the first place. He heard over and over how hard it was to find simple, plain-English solutions to Windows troubleshooting problems on the Internet. Enter: Windows Wally. Ask away, and he will answer.
Fix Kernel Security Check Failure in Windows 10
Method #1: Use System File Checker & Memory Diagnostic Tool
When Windows fails to start correctly it should automatically detect that something is wrong and ask you what you want to do – here you need to click “See advanced repair options.”
Now click on “Troubleshoot” and then once again go to “Advanced Options.”
- In Advanced Options click on “Startup Settings”, and then click the Restart button on bottom right.
- Now Windows 10 will reboot with the minimum settings, also known as the safe mode – note that if this fails then, you must skip to Solution 2 and ignore everything else in Solution 1.
- If however, it did work, you should be a desktop that might look a bit weird, but that’s fine.
- Now open your Start Menu and type “cmd,” once you see Command Prompt, right-click on it and click “Run As Administrator”.
- Now you have to type “sfc /scannow” in the Command Prompt and press Enter.
- Now wait for the scan to finish – if it finds any issues it will attempt to resolve them itself.
- Once the command has finished, you can close Command Prompt.
- Now you have to open your start menu once again and type “mdsched.exe”.
- This will open the Memory Diagnostic tool, where you need to click on “Restart now and check your problems”.
- Now Windows should reboot and start testing your memory for errors.
Once Windows has finished searching for memory errors it should reboot into the normal mode – your BSODs should be fixed now. If the memory test showed you errors then you might need to contact a professional to check your RAM sticks, as you might be in need of a hardware replacement.
If your RAM did not have any errors but you are still getting BSOD’s, you might want to try solution 2 – know that you will require the Windows install files for this, which you can download directly from Microsoft. If you are still facing the Kernel Security Check Failure error in Windows 10, follow the Solution 2.
Method #2: Fixing Using BCDEdit
If you are still facing the Kernel Security Check Failure error in Windows 10, then try this method which will definitely solve your issue.
- Once you have a bootable DVD or USB stick ready to boot, restart your PC with the bootable device connected.
- Boot into the Windows setup and click Next.
- Now choose the Troubleshoot option and click Advanced Options.
- In Advanced Options click “Command Prompt” and type “C:” in the window that pops up, then press Enter.
- Now type “BCDEDIT /SET {DEFAULT} BOOTMENUPOLICY LEGACY” and press Enter.
- Wait for the command to execute and when it is finished, type “exit” and press Enter to close the command prompt.
- Now you should be back on the “Choose an option” screen, click Continue here.
- Now your PC should start as normal.
Solution 2 should fix your issue, if it however, does not then you should get some expert help because you will have to check if your hardware is failing or not. If it is failing then you will have to spend some money – you can’t really help it if your hardware itself is failing, and the sooner you detect and replace it the less chance of data loss you have.
The issue could either by your RAM or your Hard Disks, but it is hard to determine what exactly is causing this issue. You can also as a really drastic solution try and reinstall Windows – this might or might not work. It will not help you if your hardware is failing, but if you are sure enough that it is not your hardware and no other solutions work, this is your last resort.
If you have any sort of questions, you can get them cleared in the comments section below. We hope that one of the two solutions mentioned above help you is solving the Kernel Security Check Failure issue in Windows 10.
Восстанавливаем системные файлы
Также рекомендуется проверить работоспособность и целостность данных всей системы. Для этого в консоли нужно набрать следующую команду.
Для запуска нажмите кнопку .
Сканирование Windows 10 длится довольно долго. Поэтому придется подождать. Во время сканирования желательно ничего не делать.
Причины возникновения ошибки
Данная проблема может возникать как на этапе загрузки, так и спустя некоторое время после включения. Кроме того, сбой непредсказуем и может не проявляться даже несколько дней, после чего снова напомнит о себе. Точно знать, как устранить неисправность можно только, если известна причина, но поскольку существует целый ряд провоцирующих факторов, в большинстве случаев приходится выявлять источник проблемы путём попыток исправить ситуацию. Ошибка Kernel Security Check Failure, характерная для Windows 10 и других версий, часто появляется по таким причинам:
- Повреждение файлов системы.
- Неактуальные или отсутствующие драйверы.
- Устаревшая версия BIOS, конфликтующая с другим софтом.
- Прочие конфликты ПО.
- Повреждение/отсутствие записей реестра.
- Перегрев процессора, видеоадаптера.
- Несовместимость компонентов в составе сборки ПК.
- Прочие аппаратные неисправности.
Причины возможны и другие, в каждом конкретном случае существует вероятность, что сбой спровоцирован иным фактором и разоблачить источник неприятности удаётся нечасто.
4: Scan Hard Disk for Error
Another cause of this blue screen error is faulty hard drive. You should check if you need to get your hard drive replaced:
IMPORTANT: Please make sure you have closed all open programs and files before your disk check.
1) On your keyboard, press the Windows logo key and E at the same time. Click This PC.
2) Right-click the hard drive that you want to check and click Properties.
3) Go to the Tools tab and click Check option.
4) If your hard disk drive is problem free, you will see the notification like this:
If you don’t see this notification, please consider buying a new hard disk drive to get this problem solved.
Fixing “KERNEL SECURITY CHECK ERROR” on Windows
Fix #1: Check error log with Event Viewer
Using the Event Viewer tool you can troubleshoot and try to pinpoint the cause for why the error appears.
To access Event Viewer, follow these steps:
- Click Start
- Type in the search box
- Select Administrative tools from the results list
- Choose Computer Management
- Expand the Event Viewer tree from the right side
- Expand the Windows logs tree
- Select System
- Check for any error messages that may help you identify the device or the driver that’s triggering this error.If you can identify a device or driver from the error list, disable that device or driver and restart your computer to test if the error appears again.
Event log screen
Fix #2: Run Driver Verifier
The Driver Verifier utility can test all your installed drivers and could help you identify corrupt files and drivers. If the KERNEL SECURITY CHECK ERROR error is caused by a corrupt driver, the Driver Verifier tool can identify the problematic driver.
To access Driver Verifier, follow these steps:
- Start Windows
- Click start
- Type in the search box to open Command Prompt
- Right-click on the Command Prompt item from the search results list
- Click Run as Administrator
- Type in Command Prompt
- Press Enter
- Select the Create standard settings check box and then click Next
- Select the Automatically select all drivers installed on this computer option
- Click Finish
To test against specific drivers, follow these steps:
- Start Windows
- Click start
- Type in the search box
- Select Create custom settings
- Click Next
- Select everything from the Select individual settings from the full list section. If you’re running Windows 8/8.1, leave the DDI compliance checking and randomized low resource simulation unchecked.
- Select Select driver names from a list
- Click Next
- From the new list select all drivers that are not listed with Microsoft as a provider
- Click Finish
The Driver Verifier tool will now run in the background and save any error logs if the KERNEL SECURITY CHECK ERROR appears again. If the error appears, open the logs to troubleshoot the driver.
Driver verifier screen
Fix #3: Run sfc
On Windows Vista and Windows 7, it is possible to use the built-in Windows SFC(system file checker) tool to automatically scan a computer’s system files and repair them if necessary.
Here are the steps to run SFC:
- Boot from your Windows install disc
- Click on Repair your computer after selecting proper language, time and keyboard input.
- Select the Windows installation drive, which is usually , and click Next
- Choose Command Prompt when the System Recovery Options box appears
- Write the following command and press Enter afterwards: sfc /scannow /offbootdir=D:\ /offwindir=D:\Windows\
Replace D: with the letter of the driver where Windows is installed, and D:\Windows with the Windows folder location.
Here is an example of what the PC’s console output should look like once the sfc.exe scan is complete and missing files are successfully restored:
System files restored by the SFC utility
For more information on sfc, read the sfc guide.
Fix #4: Clean boot
A clean boot of your Windows will allow you to trobleshoot if the KERNEL SECURITY CHECK ERROR appears because of a third-party device or driver you’ve recently installed.
To clean boot a Windows XP, Vista or 7 system, follow these steps:
- Start Windows
- Click Start and type in the search box or open Run > type
- Press Enter
- Go to the General tab
- Check Selective Startup radio button
- Uncheck the Load startup items check box
- Go to the Services tab
- Check Hide all Microsoft service check box
- Click Disable all
- Click OK
- Restart your computer
To clean boot a Windows 8 or 8.1 system, follow these steps:
- Follow the same steps from Windows XP/Vista/7 above
- Go to the Startup tab
- Disable all startup items
- Restart your computer
Msconfig utility screen
Fix #5: Install all pending updates
Make sure your Automatic Updates option is turned on and you have the latest updates install for your system.
Follow these steps:
- Windows Vista, 7 users can type in the search box to open Windows Updates.Windows 8 users can open the Charm Bar by pressing Windows key and the C keys and then go Settings > Change PC Settings
- Click Update and Recovery
- Click Choose how updates get installed
- Select Install updates automatically at the Important updates section
- Check Give me recommended updates the same way I receive important updates check box under Recommended updates
- Click OK
Windows Update setting screen
Run System Restore
There is a strong chance that either you or a third-party application made certain changes to your Windows configuration, which led to this problem. This could have been caused by the installation of a particular program, the installation/uninstallation of a hardware device, alterations to important registry keys etc.
Fortunately, you can use Windows System Restore to undo these changes, however this tool is limited in what it can and cannot undo; which is usually determined by the severity of the problem.
With that said, for step by step instructions on how to use Windows Restore, I suggest you check out my post on repairing CRITICAL_STRUCTURE_CORRUPTION issues.
Posted in: Errors
Are you looking for a way to repair all the errors on your computer?
If the answer is Yes
, then I highly recommend you check out Advanced System Repair Pro.
Which is the leading registry cleaner program online that is able to cure your system from a number of different ailments such as Windows Installer Errors, Runtime Errors, Malicious Software, Spyware, System Freezing, Active Malware, Blue Screen of Death Errors, Rundll Errors, Slow Erratic Computer Performance, ActiveX Errors and much more.