All program files for the Android operating system are in the “.apk” format. Most applications on our phones are installed from the official site - Play Market. This is a huge store that collects all the services available to users of Android devices.
However, it happens that the required program or game is not listed in the Play Market. Then you can download and install the application from the Internet and using a personal computer by connecting your Android device to it via a USB cable.
How to run an android application on an emulator
Whether you use Android Studio, Eclipse, or the command line, to run your app on an emulator you must first create an Android Virtual Device (AVD). AVD is a device configuration for Android emulator that allows you to simulate various devices.
To create an AVD:
- Launch Android Virtual Device Manager:
- In Android Studio, click the AVD Manager icon in the toolbar.
- In Eclipse, click Android Virtual Device Manager in the toolbar.
- From the command line, go to the /tools/ directory and run:
1 android avd
To run an application from Eclipse:
- Open one of your project files and click Run on the toolbar.
- In the Run As that appears, select Android Application and click OK .
Eclipse installs the application on the AVD and runs it.
What is background mode
Owners of inexpensive or obsolete smartphones based on Android may, over time, notice the aging of their device, which is accompanied by accelerated battery consumption or the appearance of “lags.” This happens because the processor (the heart and brain of any phone) begins to not cope with the loads placed on it.
In order for us to appreciate the beauty of the times in which we live, a lot of applications on the device work even when we do not launch them. Thanks to this, they can send us timely reminders about unfinished tasks, appointments, or notify us about the release of a new episode of their favorite talk show. Convenient, isn't it?
The problem is that for these notifications to work, applications must work even when we do not launch them (that is, always ), and only the desktop screensaver is visible on the smartphone screen. Thanks to this, they can exchange any data with their servers and load the information that we need.
For example, if you activate the “Enable notifications” function in any mail service, the application will wait for new messages to appear every second, regardless of whether it is currently open on the device. And as soon as a new message appears in the mailbox, a special trigger (event) will be triggered in the system, which will force the program to display a corresponding notification.
Thus, a background process on Android is the activity of applications and system resources while the phone is idle.
Reset Settings to Default
If you are tired of links being opened by one browser or another and you want to change it. Or change similarly any other action and program, then go to
Settings > Applications
Select a program that opens files automatically by clicking on it.
In the “About the application” window that opens, at the bottom you will see the item
Startup Defaults > Remove Defaults
That's it, the settings are reset. Now, the next time you try to open a file or link, you will be asked - with what? And you will need to either choose the one-time option or set new default program settings.
When opening music, photos or text documents, the first method does not always work properly. In this case, you need to work with a file manager. Be sure to thoroughly familiarize yourself with the desktop before you begin. All services and widgets are located on the screen. There is a “quick menu” at the bottom. It displays frequently used platforms. Now let's move on to the main steps:
How to install and enable an application on Android with the .apk extension
If you found the required application not in the Play Market, but on some third-party resource on the Internet, you should first change some parameters of your Android device.
By default, the smartphone system does not allow you to install and enable unknown apk downloaded from the Internet outside of Google Play. This is due to the fact that, together with an apk file from the Internet, you can introduce a virus into the system, which will endanger the data available on your Android phone.
If you are sure that the downloaded apk is harmless, you should change some security settings. This is done as follows:
- open the main settings of your Android phone;
- go to the “Security” ;
- In the “installation from unknown sources” , check the enable box (give permission to install) so that the system does not prevent further installation of apk files from the Internet.
Disable and enable background mode on Samsung with Android 7.0 and above
The algorithm for working with later operating systems differs from setting up previous operating systems.
How to enable background mode on Samsung with Android version 7 and above:
- Launch the Settings app.
- Find the "Connections" item. Depending on the translation, it may be called “Network and Internet”. Connection Item
- Tap on the “Data transfer” button. Item Data Usage
- Go to the "Traffic Saving" page. If this mode is turned off, you won't need to do anything else. Where is the Traffic Saving option located?
- However, if your phone uses this function, tap on the phrase “Unlimited mobile Internet”. Or click on the “Save traffic” button. Setting and disabling restrictions on the operation of applications in the background of a Samsung phone
- If you downloaded the application from GooglePlay, find a button with this name in the list. Click on the service that you want to allow to run in the background. Enabling applications from the general list
On Samsung with Android OS versions 5-6, to enable and disable the background mode, you need to perform a similar sequence of actions. However, after the third step, click on the “Mobile Data Transfer” button. Then select the network you want and find the Google Market button. In the "Background" section, click on the "Unlimited data transfer" option.
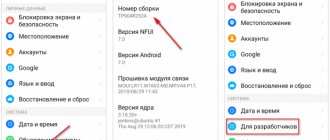
You can disable all background applications by going to developer mode. To do this, click 7 times on your firmware number in the “About phone” section. Then in the “Applications” menu, tap on the line “Background process limit”. Set restrictions according to your preferences.
This may be useful: How to remove the password from a Samsung phone.
Preparing for launch
How you run your application depends on two things: whether you have a real Android device and whether you are using Android Studio or Eclipse. This tutorial will show you how to install and run your app on a real device and on an Android emulator, both using Eclipse or command line tools.
Before running your application, you should be aware of several directories and files in an Android project:
The AndroidManifest.xml manifest file describes the main characteristics of the application and defines each of its components. You will learn about the various declarations in this file as you progress through the tutorials. One of the most important elements that your manifest should include is the element. It declares your app's compatibility with different versions of Android using the android:minSdkVersion and android:targetSdkVersion attributes. For your first application, it should look like this:
| 1 2 3 4 | <manifest xmlns:android=»https://schemas.android.com/apk/res/android» … > <uses-sdk android:minSdkVersion=»8″ android:targetSdkVersion=»19″ /> … </manifest> |
You should always set android:targetSdkVersion as high as possible and test the application on the appropriate platform version.
For more information, read Support for different platform versions. src/ The directory for your application's main source files. By default, it includes an Activity class that is launched when your application is launched using the application icon. res/ Contains several subdirectories that contain application resources. Here are just a few: drawable-hdpi/ A directory for drawable objects (such as bitmaps) that are intended for high-density (hdpi) screens. Other drawable directories contain sets designed for other screen densities. layout/ Directory for files that define the user interface of your application. values/ A directory for various other XML files that contain a collection of resources such as strings and color definitions. When you build and run a default Android app, the default Activity class created runs and loads a layout file that says "Hello World". The result is nothing exciting, but it's important that you understand how to run applications before you start developing.
Installing the apk file of the required application
- Connect your Android to your personal computer via a USB cable.
- In the window that opens on your computer monitor, select the “data storage or removable disk” . Once the computer has finished detecting the device, open the folder to view the files.
- Move the apk file downloaded from the Internet to one of the folders of your Android smartphone connected to the PC. Wait for the copying process to complete before disconnecting the USB cable.
- Open the Play Market and write “file manager” , install any suitable service from the list of suggested ones. The file managers available on the Play Market have the same set of functions, so any utility you like will do. Wait for the installation to complete.
- After the application is installed, open the file manager and find the apk file you copied earlier, run it and confirm the installation. After this, the icon of the newly installed application will appear on the desktop. You can enable the application by clicking on it.
- You can enable any stopped or disabled application by going to Settings - Applications - All Applications . Next, find the program you need, go into it and click “Run” .
First actions
The easiest way is to reset the program cache, which could be clogged with all sorts of rubbish that interferes with the operation of the software. Since the systems of different companies may differ slightly, I will not give clear instructions, but recommendations.
In order not to clear everything, remember what program you used, during which the error appeared. If you cannot find the exact software, then we clear everything. If the problem persists with programs that work with synchronization and Google account such as photos, contacts, etc. – try going to “Settings” – “Accounts” – completely delete your current account and log in again.
Set default Android apps for file types
The previous method does not allow you to specify how certain types of files will be opened. However, there is also a way to set default applications for file types.
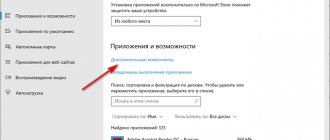
To do this, just open any file manager (see The best file managers for Android), including the file manager built into the latest versions of the OS, which can be found in “Settings” - “Storage and USB drives” - “Open” (the item is located at the bottom of the list).
After that, open the desired file: if the default application is not set for it, then a list of compatible applications for opening it will be offered, and clicking the “Always” button (or similar in third-party file managers) will set it as the default for this file type.
If the application for this file type was already installed on the system, you will first need to reset the default settings for it.
After these steps, you can again choose which program to open a certain type of file and set it as the default.
The first thing we will consider is how to set the default program for a specific file type in the Android OS.
The path to the settings may differ and depends on the device and OS build.
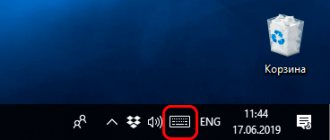
To do this, open the notification area and go to “ Settings (gear icon) → Applications ”. the gear icon again . This will take us to the menu for selecting default applications. In some models (most) you also need to open the “ Default Applications ” menu item.
Please note that in this menu there is little opportunity to assign specific functions to a particular program. Basically, this is the ability to choose a browser, launcher, application for making calls and working with SMS messages, etc. Their number will depend on the build of the operating system and your smartphone model.
The easiest way to choose default programs is to open a certain type of file from a file manager, and when asked which program to open the file with, you need to select the application and select Open “ Always ”.
But sometimes you inadvertently select “Always” for the wrong program that should open such a file. In this case, you need to reset the default program assignment for this file type.
I had this need when setting the default Google Photo program, which did not serve the purpose I needed.
To reset “ Default Destination ” you need to go to the settings of a specific program (in my case, it’s Google Photo). To do this, go to “ Settings (gear icon) → Applications ”. We find what we need, open it and go to “ Default Actions ” and select “ Delete Default Assignment ”.
Again, note that the path and names may differ on your smartphone, but the principle remains the same.
After these steps, you can again choose which program to open a certain type of file and set it as the default.
It may be a little confusing, but after these steps you will be able to re-assign the necessary actions to file types and programs.
That's it, now after clicking on a link or file, you will see the treasured dialog for selecting the program with which your command will be processed. Next, you can either set a new default program, or select the appropriate application from the list each time.
Many novice users of the Android OS often encounter such an unpleasant situation when, after accidentally selecting the wrong application for the first time, the desired link or downloaded file opens in an application that is not intended for this.
For example, photos open not in the gallery, but in Facebook Messenger. This state of affairs confuses many inexperienced users, despite the fact that it is actually very simple to correct the situation.
The ability to choose an application with which you can open a particular type of file or link by default is one of the advantages of the Android operating system. Moreover, if the need arises, you can reset the defaults and make sure that every time you have the opportunity to select an application when opening a file or link, and also set a new application that will open a file or link of this type by default.
The fact is that in the Android OS, the default settings for opening a link or file are stored not in the settings of this type of link or file, as is implemented in “large” computer operating systems, but in the settings of the application that opens it.
To change this setting, go to the menu of your tablet or smartphone, go to the “Applications” section, find in the list the program that now opens files of the type we need automatically, and tap on it.
A window with the properties of this application will open:
Scroll down the contents of the window until you see the "STARTUP AS DEFAULT" option. To reset the default settings for this application, click on the “ Remove Defaults ” button.
That's it, now after clicking on a link or file, you will see the treasured dialog for selecting the program with which your command will be processed. Next, you can either set a new default program, or select the appropriate application from the list each time.
In order to quickly select the desired application to once , without then pressing the “Only now” button, double-click on its icon.
The appearance of pop-up menus and application settings menus may look different depending on the device and version of Android, but the general idea of changing the default program remains the same - at any time you can clear the defaults in the application settings menu, and then set them again.
Similar articles:
- What is root on Android and what is it for? Read more about What is root on Android and for.
- What is a launcher and why is it needed on Android? Read more about What is a launcher and why is it needed.
- Red cross on the Android screen and notifications in Chinese - solutionRead more about the Red cross on the Android screen and notifications.
- Skype is always online - a solution to the problem Read more about Skype is always online - a solution to the problem.
- How to connect an NTFS drive to Mac OS XRead more about How to connect an NTFS drive to Mac OS.
Leave a Reply Cancel reply
This site uses Akismet to reduce spam. Find out how your comment data is processed.
Then go to Settings / Apps & notifications / Show all apps
, find and open
Google Play Music
.
If you don't know how to change default applications in Android, for example for messages, calls, links, music or videos, then use our instructions.
All you need to do is download a new app from Google Play and set it as default. And now we’ll tell you how to do this.
How to change default app in Android
Go to Settings
».
Tap Apps & Notifications
" and select "
Advanced Settings
".
Open Default Applications
» select the one you need (in our example it will be a web browser) and install yours. From now on, the program you just selected will be the default.
How to change the default app in Android for media files
For example, music files are played using Google Play Music
, and you want a different player.
Then go to Settings / Apps & notifications / Show all apps
, find and open
Google Play Music
.
Select "
Open as Defaults
" and click "
Remove Defaults
".
Click on the audio file, in the window that appears, select the player with which you want to listen to music and click “
Always
”.
Very often, beginners who have just discovered the amazing and endless world of Android are faced with the most trivial problems, be it changing the ringtone or setting default programs.