Hello, friends! In this article we will set up together Windows 7 firewall. We will also learn how to turn it on and off. Firewall and firewall are synonymous words. This concept now refers to a program that controls network interfaces and helps protect our computers from viruses, Trojans and other evil spirits. Currently, many antivirus solutions come with a firewall. When installed, the firewall built into Windows is disabled to avoid conflicts. There are also antiviruses without a built-in firewall, for example Microsoft Security Essentials. When installing it, it is desirable to have a built-in firewall or one installed separately from a third-party company. By default, Firewall in Windows 7 is enabled and configured universally. This is suitable for most users, as are all installed solutions. Here, together we will figure out how we can increase the security of our computers by indicating which traffic to allow and which not.
Turn Windows 7 Firewall on or off
To manage the firewall, you must open it. To open it you need to find it. Use Windows 7 search. Open the Start menu and write “bra” and select
.
On the left side of the window select
.
In the window that opens, you can
for the network you select or for all at once.
In this window you can also
. Alerts are very convenient because you can promptly deny access to the Internet to an unknown and, most likely, malicious utility.
If you know the program and need to give it access, then check the boxes on which networks to allow communication and click Allow access. By default, the checkbox is in the network you are currently on.
Afterwards, you need to turn it off
. Let's use the search from the Start menu.
IN
find the Windows Firewall service and double-click on it with the left mouse button - 1. In the Properties window that opens, click Stop - 2. Then in the Startup type field from the drop-down menu, select Disabled -3. Click OK.
Let's edit the system configuration. Open Start and write “con”.
.
In the window that opens, go to the Services tab and look for Windows Firewall.
.
Will come out
. Close all open programs and documents and click Restart.
Windows 7 Firewall is disabled.
To turn it on, you must repeat all steps in reverse order.
Setup recommendations
The recommendation for using the Windows 7 firewall is very simple - it should always be turned on unless you are using a third-party firewall. This way you will protect yourself, for example, from the penetration of common network worms. In most cases, home users will be fine with the default firewall settings. If you are using a third-party firewall, then when you install it, the built-in firewall will most likely be disabled to avoid conflicts between two programs that perform the same function.
Allowed programs and factory reset
If the firewall has blocked some program (I’ve probably never had this happen), then you can, without getting into advanced settings, give access to the selected network (public or private). To do this, in the firewall window, select
.
In the window that opens, you can
Allow the program to connect through the firewall on the appropriate network.
If the program you need is not available, then using the Allow another program... button you can easily add it.
It is not possible to block any program from accessing the Internet here. (At least it didn’t work for me. I unchecked the µTorrent program and it still downloads).
In the window for allowing programs, you can experiment and not worry that the browser will not have access to the Internet (my case). Everything can be returned back with
.
By default everything should work fine.
How to open a firewall in Windows 7
In order to get to the menu in the Windows 7 firewall settings, where you can disable and enable it, you need to open it.
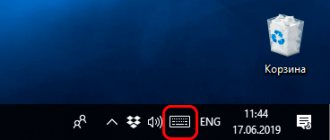
The easiest way to find a firewall in Windows 7 is to use the search through the start menu. To do this, click on the “Start” button in the lower left corner of the screen and type Firewall into the search bar and click on the “Windows Firewall” icon that appears, which is highlighted in the screenshot below:
Blocking outgoing traffic
If we want to achieve greater security, then one of the possible options would be to block outgoing traffic completely and set permissions for the programs and services we need. It should be noted here that an outgoing connection is considered to be one that was initiated by a program on your computer. That is, if your browser requests any page on the Internet and this page is sent to your computer, this is an outgoing connection.
To do this you need to select
in the Firewall window.
In order to block all outgoing connections, you need to select in the left column
and in the right column click Properties.
In the window that opens, go to the tab with the settings of the desired network (public network - general profile, home network - private profile).
From the drop-down menu, select Block. Click OK or Apply.
For greater security, you can block outgoing connections on both networks.
How to turn off or turn on the Windows 7 firewall
Once the firewall page opens, select “Turn Windows 7 Firewall on or off” from the left menu.
By clicking on the tab enable or disable the Windows Firewall, you will be taken to a page where you can both enable and disable the Windows 7 firewall by simply selecting the menu item “Disable Firewall (not recommended)”, and you can choose to disable it only for your home network , and for everyone else.
As you understand, you can turn on the Windows 7 firewall (if it is turned off) in the same way, you just need to check the “Turn on Windows Firewall” menu item.
In the same window you can also uncheck various notifications when the firewall blocks new programs.
Permission for programs
After blocking outgoing connections, we need to give Internet access to the programs we use. For example, the Google Chrome browser. To do this, go on the left side to
and in the Actions column on the right click Create Rule...
In the wizard that opens, select
. Click Next >
Using the Browse button...
. (Using the Google Chrome browser as an example).
If you don’t know where the program installation file is, you can use the search in Windows 7 or right-click on the program shortcut and select Properties.
the path to the program will be indicated.
You can copy and paste it into the rule creation wizard, just remove the quotes if necessary.
Having specified the path to the program, click Next >
In the next step we select
. Apply the rule to all profiles and click Next >
set the name and, if necessary, description of the rule. Click Finish.
(marked with a green tick).
Now we can access the Internet in Google Chrome.
In the same way, you need to create rules for other programs.
Exceptions, problem-solving, isolation
Again, if after all the settings the work has returned to normal, but not completely (for example, torrents are downloaded, but not distributed), then perhaps it makes sense to configure the permission for incoming firewall connections for this particular program (it is configured in the same way, just on the next tab, namely on tab "Rules for incoming connections").
After spending a certain amount of time, you will sit in an isolated environment and nothing unnecessary will knock on your door from the outside or, on the contrary, upload your data to the side.
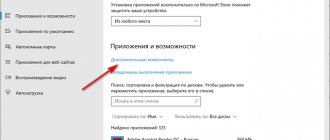
Permission for Windows services and gadgets
For gadgets to work in Windows 7, you need to give the program access to the Internet
C:\Program Files (x86)\Windows Sidebar\sidebar.exe
the same as for the Google Chrome browser in the previous section.
To give access to the Internet to the Windows Update service, you must do the following:
.
Specify the path to the program:
%SystemRoot%\System32\svchost.exe
since the update is performed under this process. In the Services section
In the window that opens, select Apply to service and in the list
(short name: wuauserv). Click OK.
When you click Next >
. We agree.
Then we press all the time Next > without changing any settings, just don’t forget to set Allow connection.
After this we have
and Windows will be updated freely.
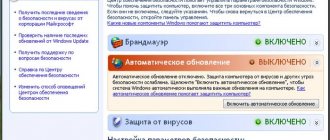
Method #1: Enabling Firewall via Action Center
What is the fastest way to enable a firewall on your computer in Windows 7? Open it in the Action Center by logging in through the taskbar. For this purpose:
- click on the program access shortcut on the taskbar;
- right-click on the “Support Center” icon;
- Select “Open Support Center” from the menu that appears:
In the system window that appears, in the “Security” section, find the “Network Firewall” item and click the “Enable Now” button opposite it:
As a result, the firewall in Windows 7 will turn on automatically.
Ping Command Permission
. From the drop-down list, select File and Printer Sharing and click Next >
In the rules section, select
( echo request - outgoing ICMPv4 traffic ) and click Next >
Then we allow the connection and the same Next >
After this we will be able to “ping” whatever we want.
How to fix "incoming traffic blocked" on Hamachi
After I explained what “Incoming traffic is blocked in Hamachi”, let’s move on to the question of how to get rid of the error “Incoming traffic is blocked, check your firewall settings.” I recommend doing the following:
- Restart your PC. If the error was of a random nature, then it will disappear;
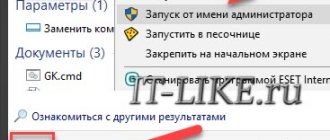
- Run Hamachi as administrator. Right-click on the program icon on your desktop and select “Run as administrator”;
- Temporarily disable your firewall (what is a firewall?). Click on the “Start” button, enter “firewall” in the search bar, and among the found results that appear, click on “Windows Firewall”. In the window that opens, select “Turn Windows Firewall on or off” on the left, and then on the next screen, check the boxes next to the “Turn off Windows Firewall” options for public and home networks. Click on “Ok” and check if this error occurs again;
Temporarily disable your firewall
- Temporarily disable your antivirus program. There are times when the normal operation of Hamachi is blocked by an antivirus program. Disable the latter, and then check whether the dysfunction described in the article appears;
- Reboot your router. Turn it off for a few seconds and then turn it on again;
- Reinstall the Hamachi program. Remove Hamachi from your computer, reboot, and then install the latest version of Hamachi from scratch. Usually, in this case, the network settings in the program will be entered correctly, and the error I am considering will no longer occur.
Fixing problems with Hamachi on your PC
The appearance of the “Hamachi: Incoming traffic blocked” problem is usually caused by the functionality of the firewall and antivirus program blocking the incoming network connection of the user’s PC. To fix the “Incoming traffic blocked” problem in Hamachi, I recommend temporarily disabling your firewall and antivirus, and if this does not help, use the alternative tips I suggested above. Usually this allows you to normalize the operation of the specified program, and then enjoy the stable functionality of “Hamachi” on your PC.
With the release of the new OS from Microsoft, the issue of protection has become acute. Old firewalls require improvement or do not work at all. Especially if you have a 64-bit version installed. Luckily, Windows Vista and Windows 7 have their own firewall.
In the new operating system, Microsoft took into account the mistakes of past years and improved its built-in firewall, but getting to it is not so easy. The squalor that we saw back in XP is revealed as standard.
To get to the advanced settings, you need to go to the administration tab:
Here you need to select “Windows Firewall with Advanced Security”. This also works in Windows 7.
We find ourselves in such a wonderful window:
Everything is quite simple here:
- Inbound rules (rules for incoming connections)
- Outbound rules (rules for outgoing connections)
- Connection Security Rules (Settings for IPsec secure connections)
- Monitoring (current active rules, logging, connections, etc.)
By clicking the monitoring item, we get a wonderful picture of what is happening. By default, Windows has 3 network profiles. Having established a new connection, we answer the question of what our new network is, but not knowing what is behind these names, we choose a pig in a poke.
Unfortunately, Microsoft did not give us the opportunity to create profiles ourselves, so we will have to make do with what we have.
Personally, I see 2 developments: If you have a desktop computer, then you can get by with 2 profiles:
- Public – for connecting to the Internet.
- Private – for a local network connection.
If you have a laptop or many different connections.
- Domain is your home grid. Minimum restrictions, support for all kinds of network drives and other Windows gadgets
- Private is your connection to the Internet through a cheap or free connection. Here you can allow checking for updates, downloading large amounts of data from the Internet, etc.
- Public is your expensive connection (for example, via a mobile phone) to prohibit everything, leaving only the essentials for work: browser, mail, IM.
Let's look at setting up a firewall based on a public profile.
The first thing that catches your eye:
Here we see that the profile is active. The firewall is turned on, unknown incoming connections are prohibited, and outgoing connections are allowed to all. But this is not a buzz, because you want to know what you have and where it’s going.
To do this, go to the firewall settings:
A window appears in front of us in which we select the desired profile and prohibit unknown connections:
Now the Internet connection is available only to authorized applications, but how can you find out who is not given the Internet? To do this, you need to configure connection logging:
Here we can specify the path to the log. Limit the size and, most importantly, enable logging of canceled connections:
Now we must allow programs that we trust to connect to the rest of the world:
Let's create a new rule using IM Miranda as an example:
We will select the rule type for application (Programm). Thus, we give the selected program complete freedom of action. This is useful when you don't have time to fine-tune the rule and you trust the application.
A port rule allows you to open one or more incoming ports on your computer.
Creating more complex rules will be described below.
We indicate the path to the .exe file that we want to put on the network.
Here we select the action: allow/deny.
Here we select a profile for which this rule actually applies.
For example, we can prohibit all downloading and updating programs if the connection occurs through an “expensive profile”.
Well, the final touch: profile description.
With this sequence of actions, we allowed one program to access the Internet. Having done these steps for other programs, we can be sure that only trusted applications have access to the Internet.
Creating More Complex Rules
There are times when you need to create complex rules. To do this, we use a manually created rule (Custom Rule).
For example, let's create a rule that will allow any application on our computer to connect to port 80 of a remote server (usually this port is used for WEB servers). This will allow you to view regular websites with any program (this port can also be used by some viruses, I generally do not recommend creating global rules)
The next step is to choose which application to apply this rule to, or make this rule global for all applications:
We select “All Programs”
The next step is to select the protocol and ports:
Selecting the protocol type
Protocol Type: TCP
Local Port:All Ports (we don’t know in advance which port the program will open to connect to the server)
Remote Port: Specific Ports (But we know the standard port for a Web server; you can also specify port 443 for SSL connections. Ports can be listed separated by commas, but you cannot specify the range of ports from and to)
This item provides ample customization options. Here you can specify your IP address (for example, if you want to make different rules for the internal address and for the external one)
Customize the interface types which this rules applies to
Here we can select all interfaces, or one of three types: Local Area Network (Your connection directly through the network card), Remote Acess (This is a connection via VPN, or via Dial-up), Wireless (This is a connection via a wireless interface)
Remote IP addresses. We can create a rule that will control connections to one or more remote computers. This will be useful if you want to restrict access to a known attacker.
At this point we choose what the rule does: allow or block traffic.
Select which profile the rule belongs to.
In the last paragraph we indicate the rule name and description (optional)
Security is one of the main criteria for the quality of online work. A direct component of its provision is the correct configuration of the firewall (firewall) of the operating system, which on Windows computers is called a firewall. Let's find out how to optimally configure this protection tool on a PC running Windows 7.
If you need to open a port
There are situations (for example, with games) when it is necessary. The Windows 7 Firewall allows you to do this.
Go to Control Panel and open the firewall section. Select "Advanced options" from the menu on the left. You should see a separate window where you will need to select “Rules for incoming connections”. In the right menu, click “Create Rule”. Select the “For port” option and specify the protocol suitable for your case. Enter the port number in the appropriate field. If there are several of them, they are written with a hyphen.
In order to check whether the port is open or not, you can go to the site where you can do this. There are quite a lot of such services on the Internet. Google or Yandex will help you find them.
What is a firewall
Many users (especially beginners) learn about the existence of a firewall only when a message appears on the screen indicating an unsuccessful attempt to install an application or with a danger warning. Here questions arise - what is it and why, how to disable it or configure it correctly. In this article, you will learn important things about the firewall and learn how to use it yourself. The information will be clear even to beginners in the computer world.
The meaning of the word "firewall"
The concept came to the IT sphere from the field of construction. There, “firewall” means “fire wall” and is a solid non-combustible wall that prevents the spread of fire. The program of the same name performs a similar function on a computer - it protects the OS from unauthorized penetrations (hacker attacks).
The German version is brandmauer, the English version is firewall, the Russian version is network or firewall. Advanced users prefer to call third-party programs a firewall, and a standard Windows utility a firewall. The definitions “firewall”, “bordermere”, “firewall”, “firewall” are also quite common. The concepts are consonant, although this pronunciation is incorrect. But this does not interfere with understanding, since the meaning of these words is extremely clear.
The firewall does not start. Options for solving the problem
If the Windows 7 firewall does not turn on, there are several ways to solve this problem. For example, you can paste a specific file into Notepad and then save the document, naming it Repair.bat. In this case, the file type must be specified as “All files”. After that, run this document as an administrator. You can do this by right-clicking on it and selecting the appropriate item.
Alternatively, go to the website. There at the bottom, select the language that suits you and go to the “Support” section. Use the search box on the site where you can enter the question you are interested in.
Here you will find a file that needs to be pasted into Notepad, and other options for solving the problem with the firewall. Sometimes, for the firewall to start, you just need to scan the system with an antivirus program and delete malicious files.
So, you already know how to open the Windows 7 firewall. Do not forget to follow all the recommendations for using the firewall:
- If your computer is quite old, then use the built-in firewall, as more powerful firewalls consume a lot of system resources.
- When you have an antivirus installed that has its own firewall, the built-in one must be disabled so that they do not conflict with each other.
- Do not add programs that you downloaded from dubious sites to exceptions, as this may harm the system.
- For a home network, the firewall does not need to be enabled, but for public networks, its activation is required, since information may leak from your computer, or a virus may enter the system.
- Quite a lot of information on troubleshooting firewall problems can be found on its “native” Microsoft website.
All about local networks and network equipment
In general, a firewall (also known as a firewall) is a specialized hardware and software complex that allows you to minimize the possibility of harmful influence from the outside on the section of the network entrusted to it.
Of course, more reliable protection is provided by firewalls in the form of separate modules, which are usually located in the server room and are very solid equipment.
However, such complexes cost several thousand dollars and “mere mortals” (including most system administrators) make do with ready-made software solutions, such as the Windows 7 firewall.
Essentially, a firewall acts as a checkpoint on the gateway or computer where it is installed.
Brandmauer determines which packet to let through and which to block using rules built into it in advance. These rules vary depending on the software version, and users can also customize their rules during operation.
The need to create your own rules for the firewall arises provided that the firewall is enabled, but special permissions are required for some programs (primarily for incoming traffic). Restrictions may also be placed on outgoing traffic.
The technique for working with the on-board firewall does not change much from version to version of Windows. So…
Windows7 Firewall is the topic of our article today, in which we will look at it and find out the answers to the following questions: How to disable the firewall in Windows 7 , How to enable the firewall in Windows 7 and how to configure the firewall. A firewall or Firewall is the same thing, a firewall is also called a firewall, so after learning how to work with a firewall, you will learn how to configure the Firewall and Firewall in Windows 7.
Do you need a Windows 7 firewall?
The Windows 7 firewall is a special utility program designed to control network interfaces, controls the access of programs to the Internet, is a kind of protection against viruses and prevents their spread. For many computer users, the firewall seems completely unnecessary, so they immediately disable it, just as they immediately disable the annoying User Account Control in Windows 7.
Almost all modern antivirus programs come with a firewall. When you install a third-party antivirus, the built-in firewall stops working in order to prevent problems associated with conflicts between 2 programs.
There are also simple antiviruses that do not contain a built-in firewall, the same antivirus from Microsoft - Security Essentails, does not contain a built-in firewall.
When Windows 7 is installed, the firewall is automatically enabled and configured by default. For many PC users, these settings are enough.
We'll look at ways to improve your computer's security by making changes to your firewall settings, determining what it should allow through and what it should block.