Starting with early releases of the Windows operating system, this OS began to support such a useful feature as multiboot. In practice, this means that you can have not one, but several Windows distributions installed on your computer. For example, you can install Windows 2000, XP, and Seven at once on the same hard drive. Information about all systems is contained in special entries in the ntldr bootloader file, as well as in the boot.ini startup configuration text file.
By editing boot.ini you can control the list of operating systems available for launch, which are shown to the user during the startup of the machine. If you have 2 or more systems installed, then you may be faced with the question: how to remove old unnecessary Windows if there is a new one? Let's say you installed Windows 98 to perform some specific work and no longer need its services. Or you have 2 copies of the same OS (one of them may not be working) and you want to remove the second copy from your computer.
We will describe one way to solve this problem. This method will be based on the ability to manage the OS list in boot.ini and the use of a bootable USB flash drive - this method is good for the still numerous users, “piggy”. It is also specific to Windows 7, although it does not use its graphical user interface. It is advisable that the system to be removed be installed on a FAT32 partition.
Method one (Windows XP)
The boot.ini file is located in the root of the C: drive and is a regular text file that can be opened with Notepad. In order to make changes to it, you must first uncheck the “Read Only” checkbox in the file properties. Having opened boot.ini, you need to delete all entries in this file corresponding to the operating systems being deleted. That is, you need to remove all lines except the one that corresponds to the working OS. There should be one line left starting with "default=" in the section and a corresponding line in the section. After installation, each subsequent OS makes an entry about itself in boot.ini, so the described step is necessary to clean the boot list. But that's not all there is to it. After a new installation, each such OS creates a specific set of folders on the disk: “Windows”, “Program Files”, etc. It is advisable to remove all of them from the hard drive.
And here an unexpected problem arises: Windows does not allow you to delete not only its system folders, but also the folders of other installed operating systems of this family.
Loading the MS-DOS environment on your computer will help you cope with this problem. What is the easiest way to remove old Windows from DOS.
To do this we proceed as follows:
- Download the “HP USB Disk Storage Format Tool” utility from the network from here https://tro.net.ua/images/File_Archive/USB%20Flash.zip.
- We use it to create a bootable DOS flash drive. To do this, you need to run the utility and check the boxes as shown in the figure. Slip the “2 DOS” folder from its archive into the program and format the flash drive. Next, you need to copy the contents of the “3 DOS” folder from the archive with the program to the flash drive.
After that, we boot from the flash drive, holding down the “F8” key when starting the computer. We have two “Volkov Commander” windows in front of us and all we have to do is find the system packs to be deleted and destroy them by pressing “F8”. VC may have different settings; it is best to set those that allow you to delete folders and files automatically, without issuing a request to the user. You can install other system software on such a flash drive to control your computer from DOS, but this is not the topic of our conversation. Now you know,
How can I remove the old Windows if there is a new one?
Removal using Windows
Now you have already figured out the BIOS settings on your computer, your new system is running and you are ready to work. But to make it uncomplicated, Microsoft has already thought about how to remove old Windows after installing a new one in a convenient way for the user, so they added such an item to the standard software as “Disk Cleanup”. We will perform all work performed in the Windows 7 operating system. In other operating systems of the Windows family, the procedure will be the same. Let's take a step-by-step look at how it works:
- Click the Start button (bottom left corner of the screen).
- Type “Cleaning” into the search bar.
- At the top of the window, select “Disk Cleanup”.
- The application selected in the previous step will open.
In the window that appears, select the drive where the operating system was previously installed and click OK. Next, the program will estimate how much disk space can be freed up and open the following window, in which you need to check the box “Previous Windows installations” and click OK. The program will ask again if you want to delete the files. Agree, click “Delete Files”, and in a few minutes the files from your previous Windows installation will be deleted.
There is another way to open a program that will clean up the disk. Click “Start”, then “All Programs”. Then select “Standard”, then “Service”, and then “Disk Cleanup”.
An elementary method for removing a second OS
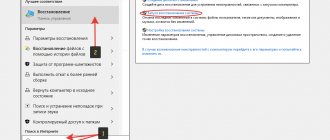
- So, we need to enter “System Configuration”. To do this, we will call the “Run” command by clicking on the two Win + R keys. In the window that opens, enter the msconfig , then click OK;
- The “Configurations” window will open, where we need to select the “Download” menu. Next, we now need to select Windows 10, since that is what I am going to leave and delete the seven. Therefore, I select this system, and after that, click on the “Use as default” command;
- Then, click “Apply” and then OK;
- We launch the utility again and enter the configuration, and now the main point begins. We are removing Windows To do this, first of all you need to select it and click “Delete”;
- After this, only a dozen remained on our list of systems. Click “Apply” and Ok to save the changes we have made;
- A new window appears where we will be asked to reboot. We agree and press reboot;
- When the reboot is complete, when the computer starts, we will see only one window with the system.
But that’s not all, we still have junk from Windows 10 in our system, so now we’ll start removing it.
Manually removing an old Windows installation
If for some reason you want to delete the folder with the old version of Windows manually, you will have to tinker a little and make a number of settings.
First, you need to log in with an administrative account with full rights. Otherwise, you will not be able to delete the pack.
Now let's make the settings step by step:
- Open My Computer.
- Open the drive with the operating system installed (for example, local drive C).
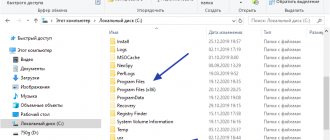
- Find the "Windows.old" folder.
- By right-clicking on the folder, open the context menu and select the “Properties” line.
- In the window that opens, select the “Security” tab.
- Click the "Advanced" button - the "Advanced security settings for Windows.old" window will open in front of you.
- Go to the Owner tab and click the Edit button.
- In the next window, select your account as the owner, that is, the account from which the deletion will be performed, and click “Apply”.
- You will see a message stating that you have become the owner of the Windows.old folder - click OK and close the properties window.
- You can start deleting the folder with the old Windows operating system.
There are also two ways to delete a folder. The first is to right-click on the folder icon and select “Delete”. Agree that you want to delete the folder. Then empty the trash. The second is to select the folder by left-clicking the mouse, simultaneously pressing the Shift+Del keys on the keyboard, and agree to delete. The folder will be deleted bypassing the trash, that is, it will not need to be emptied.
After you have completed installing the new OS and deleting old files, we recommend reading the article about drivers for Windows 10, since not all of them are included in the installation package. If you have not yet switched to a new system, then you can find out how to download drivers for the “Seven”.
Removing from your computer
Fortnite can be removed from your computer using Windows, an uninstaller, or third-party programs.
Before deleting, you need to close the launcher, exclude the game from startup and create a backup in case of errors.
After uninstallation is complete, you should check for hidden files and clean the registry.
Closing the launcher and excluding it from startup
The software will not be completely removed if it is involved in active processes.
So first you need to close the Epic Games launcher and clear the processes:
- Open “Task Manager” in any convenient way:
- In the “Processes” tab, right-click on the launcher and “End task”.
How to exclude the launcher from startup:
- go to the “Startup” tab in the “Dispatcher”;
- right-click on the launcher and “Disable”;
- in the “Run” window (opened by the Win + R key combination) enter the msconfig command;
- go to the “Services” tab and select “Do not display Microsoft services”;
- find Epic Games in the updated list and click “Disable”.
In Windows 7/8/10 the process is similar.
You can prevent software from starting automatically through third-party utilities, for example Autorun Organizer, Autoruns, Sysinternals Suite, Windows in Startup Delayer, etc.
Creating a restore point
A backup will allow you to roll back changes if errors occur during the process.
Step-by-step instructions for creating a backup:
- find the “System” menu (“Control Panel” - “System and its maintenance”);
- in the “System Protection” tab, go to the “Create” item;
- enter a description of the backup file and click “Create”.
To roll back the system, you need to go to “Control Panel” - “System and Maintenance” - “Backup and Restore” and select “Restore my files”. You can find the backup file by clicking on “Browse Folders”.
Setting up extended rights
If you are using a Windows guest account, errors may appear when uninstalling the game.
You can get extended rights like this:
- Windows 10: Find Windows PowerShell in the Start menu;
- Windows 8/7: press Win + R and enter cmd;
- in PowerShell (in Windows 10) or Command Prompt (Windows 8/7), enter “net user Administrator/active:yes” and press Enter;
- restart your computer.
After uninstalling the game, you need to launch PowerShell or Command Prompt and set the “net user Administrator/active:yes” parameter to no instead of yes.
2 removal methods
You can uninstall Fortnite using Windows or through the uninstaller in the game folder.
Removal through the system occurs as follows:
- Click “Start”, go to “Applications” - “Install and Uninstall”;
- find Epic Games Launcher in the list of programs and select “Uninstall”;
- in the “Uninstall Wizard” window, check the box next to “Remove Fortnite components”;
- follow the instructions of the “Uninstallation Wizard” (click “Next” - “Finish”);
- restart your PC.
You can delete all game files manually:
- go to the directory where the software elements are installed (to the Games folder on drive C);
- find the Uninstaller.exe file and double-click on it with the left mouse button (LMB);
- follow the prompts of the “Uninstallation Wizard”;
- After removing the software, restart your computer.
Checking the file system for hidden objects
You can check for hidden objects associated with the game and launcher using Revo Uninstaller, CCleaner, etc.
You can clean your system using CCleaner as follows:
- open the tab “Cleaning” - “Applications” - “Analysis”;
- wait until the scan is completed and click “Clean”.
Cleaning the boot menu
After you have installed a new operating system on the same partition, you may have a problem in the form of a menu that prompts you to choose which OS to select when booting. This problem is quite easy to solve.
- Click "Start";
- In the search bar, type msconfig;
- Select this program in the search results;
- In the next window, go to the “Download” tab;
- Select the old operating system;
- Click the “Delete” button, after which the program will inform you about the need to reboot;
- Restart your computer.
After all the above steps, the operating system will boot in normal mode and the menu for selecting the operating system will no longer appear.
There is nothing complicated about how to remove old Windows installations; the main thing is to decide on the method of execution. Now you can start setting up the sound on your computer, setting up drivers, networking, and other things with peace of mind. Remember: in order to avoid the procedure of uninstalling previous versions of operating systems, it is recommended to install Windows on a pre-formatted partition. Thus, you will save your new operating system from garbage in the form of programs and files of the previous version of Windows.
Read also: - How to set up headphones on a Windows 7 computer - How to set up a local network between two computers - Setting up a Windows 7 network - How to set up a microphone on a Windows 7 computer - How to share wifi from a Windows 7 laptop - Setting up Skype on a Windows 7 laptop
The Windows.old folder is nothing new to Windows 10. But, before Windows 10, you would only see it if you purchased a new version of Windows and then used it to upgrade a PC with an older version.
Step-by-step instructions for removing the Opera browser from a PC
To completely remove this program from your device. You will have to follow the appropriate procedure. In practice, this operation differs slightly depending on the operating system, which is why two key points will need to be addressed, namely:
- Removing programs and components from Windows 10 OS.
- Uninstalling the utility from Windows 7.
The essence of the procedure itself is similar in both cases, however, there are some distinctive features, which is why each individual point must be considered in detail so that subsequently, users do not make mistakes, and also other unnecessary actions.
Important! Before uninstalling this browser, it is recommended to check your hardware for viruses so that during the removal process nothing prevents you from completing all the necessary steps.
For Windows 10
Of course, you can clean your personal computer or laptop using auxiliary file managers, but this is not always available to the average user. Typically, for the uninstallation process, you need to open the Start menu, and then select Programs and Features. Here you will find the system file of the program that provides access to the Internet. At the final stage, all that remains is to click on the appropriate option and confirm making changes to the system. After completing the procedure, it is recommended to reboot the system.
For Windows 7
As for this older operating system, the procedure for clearing memory from the Internet browser looks a little different. You will need to open the “Start” section, and then find the folder with the corresponding program. The deletion shortcut will be located here. You need to run it, and then confirm the upcoming changes to the OS. Upon completion of the manipulations, you should also restart your computer or laptop to prevent failures or errors during subsequent work.
How to delete the Windows.old folder
The Windows.old folder can take up quite a lot of space. At best it's 12 GB. But it can hold tens of gigabytes or more, depending on how large your previous Windows installation was.
If you try to delete the Windows.old folder from Explorer like any other folder, you will receive an error message. You can work around this error message by changing the permissions of the Windows.old folder. However, you shouldn't worry so much.
To remove this folder in an easy way, use the Windows Disk Cleanup tool. In Windows 10, click the Start button, search for Disk Cleanup, and launch the Disk Cleanup app. You can also right-click the C:\ drive in File Explorer, select Properties, and then click Disk Cleanup.
Click the Clean up system files button. A "Previous Windows Installations" option will appear in the list of files you can delete, and Disk Cleanup will tell you how much space these files take up. Select this option and use Disk Cleanup to erase previous Windows system files. You can also use this tool to remove other unnecessary files that are taking up space on your system drive.
There is nothing wrong with deleting the Windows.old directory. If you are happy with your current Windows system, if you are sure that you have saved all your important files, then there is no point in keeping the Windows.old folder, you can safely delete it. And remember that Windows will automatically delete the Windows.old folder a month after the update.
How to format a disk when reinstalling the operating system
Before uninstalling Windows, you should prepare a bootable USB flash drive or disk, since a computer without an operating system will not be able to boot. After this, you can begin formatting the disk before installing a new operating system, following the step-by-step plan.
How to remove a second operating system from your computer's hard drive
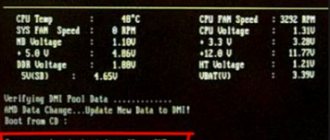
First you need to enter the BIOS or UEFI; to do this, you need to press a special key while the computer is booting. Most often this is Del or F2, but there may be other options depending on the manufacturer version and motherboard model. For exact information, see the documentation for the device.
For your information! Often, during the loading process of the operating system, a line appears with the name of the desired button; it looks something like this: “Press ... to enter setup.”
The following is the procedure:
- In BIOS, set the priority to boot from external media rather than from the hard drive.
- After the reboot, start the installation process of the new Windows.
- You should skip the step where you need to enter data by selecting the “I don’t have a key” button in the window.
- Click on any version of the operating system and press the “Next” button.
- Check the box to agree to the license agreement.
- Activate the custom OS installation option.
- Having selected the partition on which Windows that is no longer needed is installed, click on the “Settings” item.
- Select the “format” option, in which case all data from the hard drive will be deleted.
Formatting the selected partition
Note! If your computer has several operating systems on different drives, you can format one of them by right-clicking on it in Explorer and selecting “Format” in the context menu.
What is the Windows.old folder?
This folder appears when you upgrade from one version of Windows to a newer version, starting with Windows Vista. The Windows.old folder contains all the files and data from the previous version of Windows that was installed before the upgrade. It can be used to revert (roll back) to a previous version of Windows in case the new version does not work. To recover data after reinstalling Windows, read the article.
If you need to find a special file that was not copied correctly when updating Windows, you can also rummage through the Windows.old folder and find it.
Essentially, the Windows.old folder contains the old version of Windows. From Windows system files to installed programs, from user account settings to simple files, everything is here. The new version of Windows keeps this information in case you want to go back to the old version of Windows or if you need to find a file.
But, don't hesitate too long. Windows will automatically delete the Windows.old folder to free up disk space after a month.
Conclusion
The process of installing the Windows 7 operating system over the previous version is necessary only if the user wants to keep all the programs and settings installed earlier, or use the second OS as an additional one and use it freely, switching between OSes. In other situations, it is better to format the disk during installation. This will reduce the effort and time required to perform the above operations. It is also possible, when reinstalling the OS, to format the disk partitions, thereby deleting old systems.
Video - How to remove a second Windows 7 from a computer
Did you like the article? Save so you don't lose!
How to return to a previous version of Windows?
From Windows 10, going back to Windows 7 or 8.1 is very easy. After installing Windows 10, you can simply open the Settings application, select Update & Security, and click Recovery. In this section we will see the option Return to Windows 7 or 8.1, depending on which version of Windows you upgraded from.
After we click the “Start” button, Windows will restore the previous version of the operating system using the Windows.old folder as a source.
Before Windows 10, this could also be done. Here, for example, are instructions from the official Microsoft website on how to restore Windows 7 to a previous version of Windows using the Windows.old folder. With Windows 10 everything is much simpler.
But again, as noted in Windows Settings, this feature is only available for a month after upgrading to Windows 10. After a month, Windows will automatically delete the Windows.old folder in order to free up disk space. So you have a month to decide whether you want to continue using the new version of the system or not and evaluate whether all the files you need were copied correctly.
Acronis Disk Director
A convenient program from a world-famous developer allows you to demolish Windows 7 by deleting a logical partition with a slightly greater level of comfort - and with some additional options. The user needs:
- Start the working operating system from which you want to remove Windows. Download (link - acronis.com), install and run the program. Select the partition with Windows installed in the list that appears.
- From the context menu that appears when you right-click on the logical drive icon at the bottom, select the “Format” option.
- And, having defined the operation parameters, click on “OK”.
- Or "Delete Volume".
- As usual, having previously agreed to the complete destruction of data.
Tip: The user can attach the resulting unallocated space to any remaining partition using the Resize Volume command.
How to recover individual files from the Windows.old folder
If you need to restore individual files from an old Windows installation, you can restore them from the Windows.old folder. To do this, you just need to open the Windows.old folder in File Explorer: C:\Windows.old. Your personal files will be located in the C:\Windows.old\Users\USERNAME folder.
But keep in mind that even on the official Microsoft website it is indicated that, if desired, you can restore all files or (Attention!) some of them from the Windows.old folder. To prevent data loss, Microsoft strongly recommends that you back up your files and settings to an external drive before restoring, reverting, updating, or reinstalling Windows.
That is, there is a risk of data loss when updating Windows and/or returning from Windows 10 to the previous version. Moreover, Microsoft does not provide for the recovery of data lost in this way using standard Windows tools.
In this case, the only option for data recovery may be third-party software. If, when updating or restoring Windows, any data or files are lost, regardless of their type or extension, scan drive C: using Hetman Partition Recovery from Hetman Software, and restore them to a convenient location or storage medium.
How to delete the Windows.old folder to free up disk space
The Windows.old folder can take up quite a lot of disk space. At best it will be 12 GB. But its volume can reach 20 GB or even more. It all depends on the size of your previous version of Windows.
Try to delete the Windows.old folder in the same way as any other folder, and you will receive an error message. You can work around the error message by changing the permissions of the Windows.old folder. But this is the wrong way to delete this folder.
To remove the Windows.old folder, you can use the Windows Disk Cleanup tool or a third-party program. On Windows 10, open the Start menu, search for Disk Cleanup and launch the application. You can also open this application by right-clicking in the “This PC” folder on drive C, selecting “Properties” from the pop-up menu, then clicking the “Disk Cleanup” button.
Click the “Clean up system files” button. “Previous versions of Windows” will also appear in the list of files to delete, and Disk Cleanup will show how much space these files take up. Select this option and click Clean up disk, the old version of Windows will be removed. This function can also be used to clean the system disk from other unnecessary files.
By deleting the Windows.old folder you do not risk anything. If you are satisfied with the new version of Windows and have no desire to return to the old version of the operating system, and are also sure that all the files you need have been copied from the Windows.old folder, you can safely delete it.
Windows will still automatically delete the Windows.old folder a month after the update. All computers that have upgraded to Windows 10 will still be able to use the space occupied by the Windows.old folder, even if their users are unaware of the folder and are unaware of its existence or the ability to use Disk Cleanup.
Formatting a partition is the simplest and most obvious way
This is an easy way to remove a second operating system that you no longer need. The point of the procedure is to format the partition containing the extra operating system on the hard drive.
Before starting any actions, download information that is important to you onto removable media or one of your hard drives.
- Boot your computer into the version of Windows you plan to keep.
- Click on the computer shortcut using the right mouse button and go to the “Disk Management” section.
How do you know which Windows folder to leave and which to keep? For these purposes, go to the Start menu and select “Run” there. You need to enter the following command into the line - %windir%. Now click "OK". As a result of your actions, a folder will appear. You need to remember it - this is exactly the folder that cannot be deleted. It may look like this: “C: Windows”. This working folder cannot be deleted or moved to other partitions, otherwise the operation of the entire system will be disrupted and you will have to roll back.
Reboot the system and make sure that the second OS is no longer there. If, when trying to format a disk, the system gives an error, then you can try using additional utilities for such operations, for example, the Acronis Disc Director program. It needs to be downloaded, installed and launched. It will delete everything itself, and then automatically reboot the system.
Two ways to extract files from the Windows.old folder
Method 1: Windows Explorer
Perhaps the easiest way to return files from an outdated version of the operating system is to use the Explorer utility. To do this, we will need to use simple instructions, which we will consider below:
1. Open the My Computer folder.
2. Go to the system partition (in most cases this is the C: drive).
3. Find the Windows.old folder.
4. Go to the following path: C:\Windows.old\Users\UserName.
5. Open the folders whose contents interest you and restore the necessary data.
Ready!
If the folder is completely missing or only certain files are missing, proceed to the next method.
Method 2: Starus Partition Recovery Tool
Unfortunately, Microsoft has not provided built-in software for recovering deleted data. Therefore, the only option available to us is to use third-party software.
We recommend using the Starus Partition Recovery application. The program is designed specifically to work in difficult conditions of a damaged HDD, when all other data recovery methods lose any effectiveness.
Features of Starus Partition Recovery:
- Compatible with all versions of the Windows operating system.
- Intuitive Russian-language interface.
- Ability to work with both physical and logical disks.
- Availability of a “Recovery Wizard” that will guide you step by step through all the nuances of working with the program.
- Deep scanning capability.
- Possibility of sorting by file signature (format).
- Presence of a preview window. You can study in advance any document that needs to be restored.
- Availability of all types of data export.
To recover deleted data, follow the quick guide below:
1. Launch the Starus Partition Recovery application.
2. Select the disk you want to work with.
3. Select the type of scan you want to scan.
4. Wait for the scan to complete. This may take some time.
5. Select the necessary files and restore them.
Ready!
Note: Under no circumstances should you export the found data to the drive from which you are recovering it. This action can lead to permanent loss of files and the inability to further work with them.
We hope the article was useful to you and helped you get the necessary files back from the Windows.old folder.
Owners of computers that have switched to a new operating system from Microsoft with index “10” by updating “Seven” or “Eight” always find the Windows old folder in the system partition of the hard drive. This directory takes up a significant amount of memory on the hard drive, amounting to gigabytes, and for some users, tens of gigabytes of disk space. However, this directory cannot be uninstalled in the usual way.
Below is a detailed description of the causes of Windows old, what kind of large folder it is and what it is needed for. At the very end of the article, the user can read a step-by-step guide on how to correctly get rid of Windows Old and free up precious gigabytes of hard drive memory space on the system drive.
The procedure for getting rid of “Windows.old”
Due to the significant amount of memory occupied by this directory, many users, having verified that the new system is functioning properly, decide to get rid of it themselves. For some users, this directory takes up more than 10–20 Gb.
You should perform the following actions with system administrator rights:
- While holding down the “Win” button, click on “R”;
- In the window that appears, type “cleanmgr”;
- Click “Ok”;
- Wait until the standard Windows disk cleanup utility opens;
- In the window that appears, click on the “Clean up system files” button;
- Next, check the box “Previous Windows installations”;
- Click “Ok”;
- Wait until the process is complete;
- Ready! All files stored in the directory in question are deleted.
If the first removal option did not work, you can use another method. To do this, you need to call the context menu from “Start” and enter “Command Prompt (with administrator rights)”. Next, type “RD /S /QC:\Windows.old” and click “Enter”. After this, the directory will be completely deleted.
Deleting an account in Fortnite
After uninstalling the launcher, the player can download the software again and continue playing after logging in with his account information. Deleting an account in Fortnite cannot be undone. Once this process is complete, account-related purchases, game progress, and items are permanently deleted.
How to completely close your Fortnite account:
- login to Epic Games;
- go to the “General settings” page;
- find the section “Delete account” - “Request to delete account”;
- enter the security code (it will be sent to the email associated with your Epic Games account);
- click “Confirm deletion request”;
- select the option that most accurately describes the reason for deletion - “Continue”.
15 seconds after completing these actions, the account will be disabled, and after 14 days it will be completely deleted.
Instead of deleting, you can temporarily disable your Epic Games account through support. The account can be re-enabled at any time.
How to remove Windows.old
It can be seen that this Windows.old folder takes up a significant amount of space on the hard drive; its volume usually starts at 10 gigabytes or more; 20 gigabytes or more is considered a completely normal size. If you try to delete this folder in the standard way (via Explorer), you will receive a system error message. Of course, you can try to get around this message by changing the attributes of this directory and its attachments, but, in any case, this is not a completely correct way.
- The system disk cleanup tool will help us delete the Windows.old folder. In Windows 10, click on the “Start” button, find “Disk Cleanup” in the start menu, and launch the Disk Cleanup application.
- You can also choose a different path by right-clicking on drive C, selecting “properties”, and then clicking on the “Disk Cleanup” button (this is also true for other versions of Windows).
- In the menu that appears, click on “Clean up system files”. You'll see a "Previous Windows installations" item indicating how much space they take up. Select this item and delete the files of the previous OS version.
- Usually this is enough to remove it. If for some reason this directory is not deleted, launch a console with administrative rights and type there: rd /s /qc:\windows.old.
You can visually watch the removal process in the video:
As you can see, it’s quite easy to correctly delete the Windows.old directory in question; you just need to use the built-in Windows OS tools to clean up the disk. In this case, there is no need to try to delete this folder in the standard way or play with its attributes - it is better to choose a proven option recommended by experts.