In addition to the user with administrator rights, Windows 10 has a hidden built-in administrator account. This account often saves users who have forgotten the password for their account, and in today’s article we will tell you how to enable (disable) it in various ways.
It can be enabled (disabled) both from the system itself in several ways, and through additional boot options. That is, if you simply decide to enable or disable it, you will have several methods from the Windows system itself, and there is one method that will save you if you have forgotten the password for the account under which you log into Windows.
User Accounts in Windows 10
Standard User is a limited user account that allows you to use most programs and change system settings without affecting the settings of other users or the security of your computer. The account can be either a local or Microsoft account. If you try to run some program that requires elevated rights, a window will appear asking you to enter administrator credentials.
Administrator user is a user account that is created during Windows installation and has administrative rights. The account can be either a local or Microsoft account. The account has full access to the computer and can be used to make any changes.
Built-in Administrator - a hidden built-in elevated administrator account, local only and has full unrestricted access rights to the computer. This account is not recommended for permanent use, because if other users receive notifications about permissions for actions while installing programs or changing the system, then in this account you will not see any notifications about permission to perform any actions. It is recommended to use the built-in administrator for one-time actions, in cases of emergency.
Enable (disable) the built-in administrator account when Windows starts
If you just want to enable the built-in administrator account and you can log in as a user with administrator rights, skip this method and go to the ones described below, which are performed from Windows itself.
1.You want additional boot options to appear when you turn it on. Let's assume you can't log into Windows and enable reboot with additional options:
- press and hold the computer's power button until it turns off;
- Press the power button to turn it on and Windows just starts loading - press and hold the power button until it turns off. Do this several times, after the 3rd time just turn on the computer => “Automatic recovery” should appear in front of you => select “Advanced options;
2.Select “Troubleshooting”;
3. Go to “Advanced settings”;
4.Select “Command Prompt” (if you cannot launch the command prompt because it asks you for the password for your account and you don’t know it, do everything using the recovery disk, described at the beginning of the article How to reset your account password in Windows 10 );
5. Enter the regedit and press Enter => in the registry editor that opens, left-click on HKEY_LOCAL_MACHINE.
6.Go to “File” at the top left and select “Load Hive”;
7.You need to open the system drive and go to the folder \Windows\System32\config\ Even if you had the Windows folder on drive C, then through the command line it can be on another drive, for example, mine is on C, but here I can find it on drive E. That is, it turned out that I went to E:\Windows\System32\config\
8. In the config , select the SAM and click “Open”;
9. In the window that opens, write REM_SAM and click “OK”;
10. In the Registry Editor, go to the HKEY_LOCAL_MACHINE \REM_SAM \SAM\Domains \Accounts \Users\000001F4 and double-click the left mouse button for the F (see the figure below).
11. Go to line 0038 and change 11 to 10 then click “OK”
12.Close the Registry Editor and Command Prompt and click “Continue” in the window that appears.
That’s it, now when Windows 10 boots up, you can log in as an administrator.
If you need to disable the built-in administrator account in the future, you will need to install 11 instead of 10. But it is better and faster to use the methods from Windows described below.
Built-in Windows Administrator account
Administrator account is created automatically during Windows installation and is used to initialize the system. This account is then disabled and the user is prompted to create their own account, which is added to the local Administrators .
The built-in administrator account has full, unrestricted rights on the computer. This account is not subject to UAC (User Account Control), and all programs are executed without a UAC prompt (this is an important difference from user accounts with administrator rights). The built-in Administrator in Windows is to some extent similar to root in Linux - it has maximum rights in the system (not System, of course, but close).
You can enable UAC for the built-in Windows administrator; to do this, use the User Account Control policy setting: Admin Approval Mode for the Built-in Administrator account .
By default, the built-in Administrator is disabled in Windows 10 and Windows Server 2016. This account cannot be deleted or removed from the Administrators group.
If you start Windows in Safe Mode or Recovery Mode, the Administrator account is enabled automatically.
For security reasons, it is advisable to rename the built-in administrator account. This can be done manually, using LAPS or the GPO Accounts: Rename administrator account in the Computer Configuration -> Policies -> Windows Settings -> Security Settings -> Local Policies -> Security Options section.
Renaming the administrator account somewhat reduces the risk of it being used by attackers or password guessing, but the main problem is that its SID does not change, which makes it easier to guess. The built-in administrator account always has a known SID SID S-1-5-domain-500.
Advice . By default, the Administrator password is not specified (empty).
Important . Microsoft does not recommend keeping the Administrator account enabled (active), much less working under it all the time. You only need to enable the “Administrator” account if absolutely necessary to perform a specific task or troubleshoot. Do not under any circumstances use it to auto-login to Windows.
Enabling (disabling) the built-in administrator account in local users and groups
This option is only available on Professional and Enterprise editions of Windows 10.
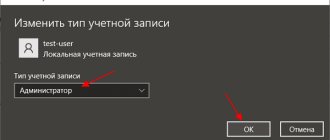
1. Press the Win+R keys and in the window that appears, run the command lusrmgr.msc (you can also write it in the search bar and select from the results found);
2. On the left side, select “Users” => in the middle panel, double-click the left mouse button on “Administrator”;
3. Here you can enable the built-in administrator account by unchecking the “Disable account” box and clicking “OK”.
Also, if you want to set a password for the built-in administrator account, right-click on it and select “Set Password” => enter the new password twice and click “OK”.
If you want to disable the administrator account in the future, follow steps 1 and 2 from the instructions above, and in the window that opens, check the “Disable account” field => click “Ok”.
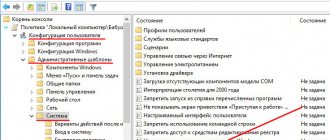
Local Security Policy utility
In the Run window, enter the command secpol.msc .
Healthy! An alternative option for launching the Local Security Policy utility: Start -> Control Panel -> Administrative Tools.
After this, follow these steps:
Open the “Local Policies” branch –> Security Settings –> select “Accounts: State “Administrator”” in the right window
This option is disabled by default. Double-click on it and set the marker to the “on” position.
Enable (disable) the built-in administrator account from the command line
This method is available in all versions of Windows 10.
1. Open the command line: one way is to right-click on the “Start” menu and select “Command Prompt (Admin)”;
2. To simply enable the built-in administrator account, run the command net user administrator /active:yes and press Enter. It will write “The command completed successfully,” which means that you have enabled the administrator and you can close the command line.
If you want to enable and set a password (or change it) for the built-in administrator account, run the command net user administrator password /active:yes, only instead of the word “password” write the password you created and press Enter.
If in the future you want to disable the built-in administrator account, run the command net user administrator /active:no at the command prompt.
After executing the required command, close the command prompt.
What to do if a user with rights is deleted?
If the admin account has been deleted, it will not be possible to restore it using the described methods. These recovery methods are only suitable if you do not have access to your account, for example, if you forgot your password. Then you can give your current account admin rights. In this case, it is recommended to use System Restore.
The first method is to open Control Panel through the Start menu. Then select the “Recovery” section, then “Run system recovery”. After these steps, the “System Restore” window will open, where you will need to click “Next”. All possible recovery points will become available to which you can return/rollback, including the one where the admin account still existed. If this method does not help, then you can try another method.
To do this, you will need a disk or flash drive with the required OS. When the system boots, enter safe mode (pressing “F8”), then select “Troubleshoot computer problems.” The Windows 10 System Recovery Options window will open. You will need to boot from the drive and select “System Restore”. After which the OS will be updated, the administrator account will be created anew. In this case, the files will not be affected and will be saved in their places.
Source