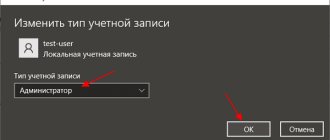
In this post, I will tell you how to add a guest in Windows 10, as well as how to enable it in Windows 7 and remove it if necessary. I’ll explain why such an account is needed in systems and how it can be usefully used. Moreover, I will show a simple way to enable a guest in Windows without any scary command lines, as for some reason other bloggers show.
You've probably at least once encountered a situation where you needed to give your computer for temporary use to another person in order to surf the Internet, play games, or use some programs.
And in order not to give your admin access, “Guest” will do just fine. So that a person does not spoil anything or in case of very curious
Run UWP apps only
To give a person the opportunity to work only with UWP applications and block his access to desktop EXE programs, you can use the option to run only specified applications.
When enabled, this parameter will allow you to specify by name only EXE programs that are allowed to run. You must specify at least one such program, for example, a standard notepad.
How to create a guest in windows 7
Now let’s look at how to create a “Guest” user in Windows 7. Everything is much simpler here, since this type of account in 7 is available initially and you don’t need to dance with a tambourine like in 10.
We proceed sequentially to the section for working with accounts:
- Open the “Start” menu and go to “Control Panel”;
- Go to “User Accounts”;
- Open the subsection with the same name again;
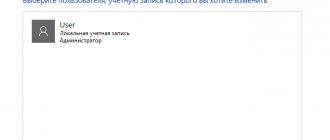
- Open “Manage another account”.
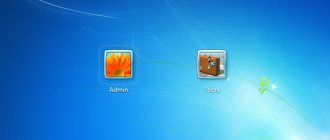
So we find ourselves in a window where all accounts created in Windows 7 are displayed. Here our “Guest” flaunts, which you need to click on and select “Enable” in the next window.
Now when you log out of Windows 7, the guest account will be available for login:
Setting up a local network for other operating systems
If you live in Krasnodar and you need to set up a local network in Windows
Ivan Sukhov, 2022, 2022
.
If you found this article useful or simply liked it, then do not hesitate to financially support the author. This is easy to do by adding money to Yandex Wallet No. 410011416229354
. Or on the phone
+7 918-16-26-331
.
Even a small amount can help write new articles :)
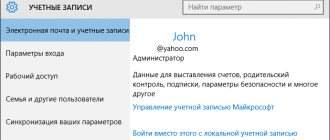
Since there are beginners among Windows 10 users who have just begun to get acquainted with the operating system, instructions appear on our website describing things that have long been familiar, understandable and obvious to experienced users
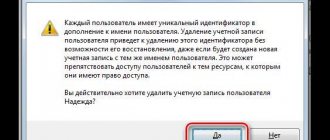
This guide focuses on the following questions: how to delete a Windows 10 user; how to delete the built-in Administrator and Guest accounts if the message “User cannot be deleted” appears; what to do if two identical Windows 10 users are shown when logging in
Please note that to perform all manipulations, the account must have administrator rights. The instructions will help you change them if necessary.
Before eliminating an unnecessary account, make sure that it does not contain important files and data.
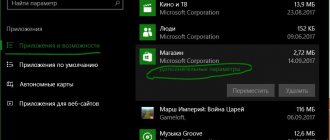
Run only individual programs
Using the option to run only specified applications, you can expand the list of EXE programs allowed to the user.
Or you can do it differently and allow the use of all EXE programs, except for some.
When attempting to launch prohibited programs, the guest will see the following message.
Benefits and Limitations of Guest Posting
How is a guest account convenient in practice? Limited access will help the PC owner in the following ways.
- safety. People logged in through the guest group will not be able to access files in the “Images”, “Videos”, “Documents” folders. Visitors will not have the opportunity to install or uninstall the program, and it will become more difficult to “catch” the virus due to a lack of rights for its operation.
- confidentiality. There is no need to give access to your desktop and personal files to strangers. When you try to open your files, the system will automatically request the login and password for the main account.
- convenience. There is no need to create an account for each user on the computer. A guest account is enough to use the Internet, games, and use the media library in the vast majority of cases.
- control. The system administrator has the rights to configure all groups, which allows you to configure access restrictions in any convenient configuration.
Guest account
Run only one UWP app
Accounts with standard user status can be limited as much as possible, allowing them to launch only one UWP application. This is done in the Settings from the administrator account.
The only available application in this situation can be any UWP application - even a standard one, even one installed in the Microsoft Store, but not the Edge . However, if the user needs to be given a limited web surfing environment, a third-party UWP browser can be installed in the Microsoft Store.
Such a limited account will work like a terminal. You can exit it by pressing Ctrl+Alt+Del.
You can more flexibly set up restrictions for individual users using the functionality of Windows 10 editions, starting with Pro.
Enable Android parental controls using Family Link
First, about the requirements that must be met in order to be able to perform the following steps to set up parental controls:
- The child's phone or tablet must have Android 7.0 or a newer OS version. The official website says that there are some devices running Android 6 and 5 that also support the work, but specific models are not specified.
- The parent's device can have any version of Android, starting from 4.4; it can also be controlled from an iPhone or iPad.
- Both devices must have a Google account set up (if your child does not have an account, create one in advance and log in with it on his device), and you will also need to know the password for it.
- When setting up, both devices must be connected to the Internet (not necessarily to the same network).
If all the specified conditions are met, you can begin setting up. For it, we will need access to two devices at once: from which control will be carried out and which will be monitored.
The setup steps will be as follows (I skipped some minor steps like “click next”, otherwise there would be too many of them):
- Install the “Google Family Link (for parents)” application on the parent’s device; you can download it from the Play Store. If you are installing it on an iPhone/iPad, there is only one Family Link application in the App Store, install it. Launch the app and explore several screens of parental control options.
- When asked “Who will use this phone,” click “Parent.” On the next screen - Next, and then, at the request “Become a family group administrator”, click “Get Started”.
- Answer “Yes” when asked if your child has a Google account (we previously agreed that they already have one).
- The screen will prompt you to “Take your child's device”, click “Next”, the next screen will show the setup code, leave your phone open on this screen.
- Take your child's phone and download Google Family Link for Kids from the Play Store.
- Launch the application, when prompted “Select the device you want to manage,” click “This device.”
- Enter the code displayed on your phone.
- Enter your child's account password, click Next, and then Join.
- At this point, the parent’s device will ask “Do you want to set up parental controls for this account”? We answer in the affirmative and return to the child’s device.
- Review what a parent can do with parental controls and, if you agree, click Allow. Turn on the Family Link Manager profile manager (the button may be at the bottom of the screen and invisible without scrolling, like in my screenshot).
- Set a name for the device (as it will appear to the parent) and specify allowed applications (you can then change it).
- This completes the setup; after clicking “Next” again, a screen will appear on the child’s device with information about what exactly parents can track.
- On the parent's device, on the Filters and Control Settings screen, select Set Up Parental Controls and click Next to configure basic blocking and other settings.
- You will find yourself on a screen with “tiles”, the first of which leads to parental control settings, the rest provide basic information about the child’s device.
- After setting up, the parent and child will receive several emails describing the main functions and features of Google Family Link, I recommend that you read it.
Despite the abundance of steps, the setup itself is not difficult: all steps are described in Russian in the application itself and are completely understandable at this stage. Below we will talk about the main available settings and their meaning.