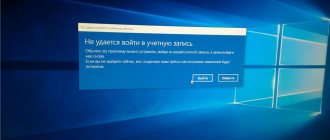
Hello, dear users. Today we will look at an issue that many have already encountered and few have found a way out of. Is it possible to delete an account in Windows 10, and how to do it?
When installing Windows 10, you will be prompted to enter a username
and
Microsoft account password By entering this information, you agree that Windows 10 will use it to start the operating system. Naturally, most users are not happy with this situation.
There can be many reasons, but the most common is the reluctance to enter a complex and difficult to remember password when logging in every time. That is why today I will talk about how to get rid of your account and work on your own “account”.
Click on the Start icon and then on your username. A small block should appear on the screen, on it you should click on the line “Change account settings”. A new window will then open where you can set up your personal account. Click on “Sign in with a local account instead”
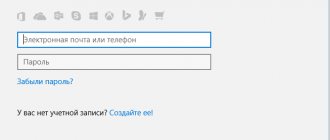
You will see a window called “Switch to local account.” You must write your account password and click “Next”.
Then you will need to write a username, password and a hint if you suddenly forget your password. There are times when a person does not want to put a password on an account. In this case, simply leave the “password” line empty.
That's all. Now click on the “Log out and shut down” block.
After completing this sequence of actions, you will log out of your Microsoft account and log in as a local account. Now the switching between accounts has occurred, and to completely get rid of the Windows 10 account, you need to:
- Open the Start menu
- "Account Settings".
- At the bottom of the page you can delete the entry completely.
Delete multiple entries
This method will help those users who have more than one account.
First, log in as the administrator of the account you plan to keep.
- Launch the Start menu;
- Select Options";
- Then “Accounts”;
- In the new block, click on the “Family and other users” link.
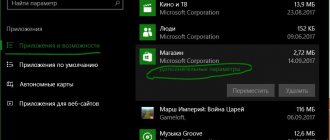
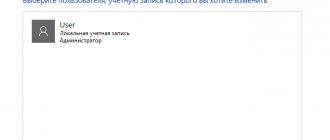
- In the “Other Users” list that appears, find the account you are going to delete. Click first on it, and then on the “Delete” button, as shown in the screenshot.
After this, you will see a warning block that if this account is destroyed, all user files (desktop files, photos, videos, documents, etc.) will be erased from the computer. Therefore, think in advance about the safety of the necessary data. If everything is okay with this, click on the “Delete account and data” block.
Within a short time the recording will be completely deleted from the device.
Switching from a Microsoft account to a local account
Before deciding how to delete an account on Windows 10 (meaning a Microsoft “account”), you should first rebuild your login parameters, that is, set the access condition not using a “Microsoft” registration, but a local account.
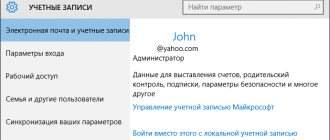
In general, the process of deactivating an “account” and changing its settings boils down to logging out of one account and logging in under another. To do this, we use the standard “Start” menu, where you just need to click on the user name and select change account settings from the drop-down menu. In the settings window we are interested in the email and “accounts” section. In the window on the right there is an additional login line under local registration. Click on it and go to the next menu.
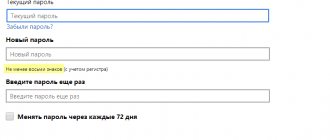
Here you will have to enter your current password, and then enter new login information. In principle, if the password will not be used in the future, the corresponding field can be left empty. Next, we simply confirm logging out and shutting down. At this stage, this can be limited. The next time you boot, the system will use local registration. Let's stop there for now.
Removing a local account using Control Panel
It differs in that when an account is destroyed, all the user’s files can be saved. We will work with the control panel. We log in with administrator rights.
Open the Windows 10 control panel (select the “icons” view). Select the sub-item “User Accounts”. Select the Microsoft account that needs to be deleted. Click on the “Delete Account” button.
You will see a block where you will be asked to choose to delete or save user files. In a save situation, the files will be moved to the desktop in the current user's folder.
Agree with the selected team.
Here are three easy ways to get rid of an account on a Windows 10 computer. Now you know how to do it. All articles about Windows.
There are several ways to delete unnecessary accounts in Windows 10, but this does not mean that there is no difference in which one is used. Thus, an “incorrect” deletion can result in a whole bunch of junk files and incorrect paths in the file system remaining on your disk. Or, on the contrary, wanting to delete only the entry itself, while saving the profile files, the user, out of ignorance, can delete the data associated with it along with the profile.
Problems with user files
How to delete Windows 10 accounts is, in general, already clear. As for storing information, in principle, you can do two things. For example, you can initially move the files to another location on the disk or logical partition, or copy them to removable media. However, the method of deleting an “account” from the “Control Panel” in this sense seems more preferable, since the system itself will remind the user of the need to save important data. However, what to do depends on the user himself.
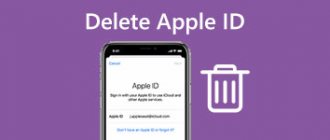
How to delete a Microsoft account on Windows 10
If you are planning to get rid of a profile that has become unnecessary, while saving all its files, we suggest using the following method.
In the Navigation Pane of Explorer, right-click on the “This PC” icon and select the “Manage” option from the context menu that appears.
In the Computer Management snap-in menu, select “Utilities” → “Local Users” → “Users”, in the right part of the window, right-click on the unnecessary profile and click “Delete”.
The deletion of the Windows 10 Microsoft account is completed, but the files belonging to it remain untouched.
Deactivating the profile through the management snap-in - netplwiz - will lead to the same results. Press Win + R and in the Run window that appears, run the command netplwiz.exe. Having selected the profile in the utility window, click the button shown in the screenshot.
The system will issue a warning asking you for confirmation again.
The profile itself is no longer on your computer, and its files will still be located in the directory of the same name in the “Users” folder.
Completely deleting a Windows 10 account along with all files is even easier. To do this, open the universal Settings app.
Go to the "Accounts" section
Switch to the “Family and other people” tab, select the one you don’t need and repeat the steps in the screenshot below.
Reconfirm the request in a pop-up window, where the operating system draws attention to the fact that all data from this computer will be lost forever
Now the profile and all personal files belonging to it will completely disappear from the computer.
Windows allows you to create an operating system for the convenience of different users. Situations arise when a particular user is no longer needed and it is necessary to delete the Windows account created for him.
Local account management
Local profile is a concept familiar to users of older OS releases from Microsoft. The account allows you to manage resources and settings of your personal computer. A Microsoft account simultaneously works as a local and global profile, giving access not only to PC management, but also to a huge range of online developer services.
This can be done both from the settings and in the control panel. In the first case, the list of users is in the “Family and other people” area.
The control panel can be accessed through search.
Click the “User Accounts” section.
Click on the “Manage another account” link to go to the list of all profiles.
You will see everyone who has permission to log in.
Select the one you want and click delete.
Determine the information that this user has managed to create. You can clean everything or leave it.
Confirm again.
If the profile is active, that is, there was a login, then you need to switch to the user and log out.
And then delete. Or you can immediately click “Yes”, then the user will also disappear.
Please note that you cannot delete yourself. First you need to create another local account, log in under it, and only then can you get rid of the first one.
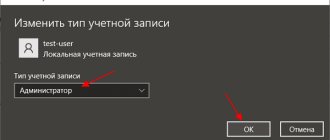
One more nuance - you cannot remove the only administrator from the system. If you are interested in how to delete an administrator account on a computer in Windows 10, then the answer is simple: create a new one, log in under his name and, according to the instructions given, remove the old one.
Attention! This simply disables your Microsoft profile from signing in, but does not completely remove it. In the settings, the user will disappear from the family and other users section, but will remain where Microsoft accounts are displayed. Deleting a Microsoft profile must be done through the settings.
You can delete a local Windows 10 account on a laptop in the same way, since there is no difference in profile management depending on the device.
Owners of a new operating system often wonder how to delete a user in Windows 10 if the account is redundant or defective? The answer to this question lies in the specifics of working with user accounts. Microsoft developers have added a new design of system settings to the OS. Now, using a special section of Settings, you can delete a user in Windows 10 or temporarily disable a second account. This is a useful innovation, since the computer administrator may not delete the profile, but temporarily prohibit it from logging into the system. However, if disabling your profile on your computer is not an option for you, you can delete your user account in Windows 10.
Block: 1/2 | Number of characters: 698
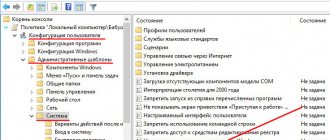
Enabling Administrator Rights
Before you delete an account from the system, make sure that your account has administrator rights. Other accounts usually have limited capabilities, including not being able to delete other accounts.
In Windows 7, administrator rights are disabled by default, so you need to enable them first. To do this, use the Win+R key combination. In the window that opens, enter lusrmgr.msc and press Enter. Next, select “Users”, right-click on the “Administrator” account, open the “Properties” window and uncheck the “Disable account” box, then save the changes and restart the computer.
Two identical Windows 10 users
One of the common bugs in Windows 10, which forces you to look for ways to delete users, is the display of two accounts with the same names when logging in.
This usually happens after any manipulations with profiles, for example, after this: How to rename a user folder, provided that you have previously disabled the password when logging into Windows 10.
Most often, a working solution that allows you to remove a duplicate user looks like this:
- Press Win+R keys and enter control userpasswords2
- Select a user and enable a password request for him, apply the settings.
- To restart a computer.
After this, you can remove the password prompt again, but a second user with the same name should not appear again.
Users who do not want to enter a password when logging into the system need to know how to delete a Microsoft account in Windows 10. Many people find it more convenient to log in using a local administrator account. In addition, users are nervous about sending data to the Microsoft website from an official account.
It’s worth thinking about the benefits of a Microsoft profile. First of all, it is easy and fast access to all applications, including the Windows Store. And the second is the presence of a single platform for information exchange. You can easily send data from Microsoft mail to the cloud, the information is not lost. If you have several work computers and mobile gadgets, this is very convenient - all devices are synchronized and files are accessible.
If all these bonuses are not for you, then we will tell you about different ways to delete accounts from your local computer.
Deleting an account
If you did everything correctly, after the steps described above you will be able to work with user accounts. The instructions on how to delete a user account are simple and usually do not cause problems.
- Open the Start menu and type “accounts” in the search bar. After pressing Enter, you will be able to work with user accounts.
- Go to Manage Another Account to see a list of all users on your computer. All you have to do is select the entry you want to delete and select “Delete account”.
- After this, tell the system whether you want to save the user files of the account you are deleting. If necessary, restart your computer.
Why do you need a Microsoft account?
Progress does not stand still, operating systems are becoming more convenient and functional. The leader in this field is not far behind - Windows, or rather its latest tenth version. Microsoft links users' accounts to their accounts so that data is stored in the cloud at all times and cannot be lost, which often happens when using a standard hard drive or even an SSD drive. By storing your files, passwords, and settings on OneDrive (Microsoft's cloud storage service that's free to every Windows user), you can be sure they'll never get lost.
There is one more point that speaks in favor of an Internet account. This is a banal reinstallation of Windows. This operating system is built differently than others. The registry is used here and this is an outright disadvantage of both “Ten” and other versions of the Microsoft OS. The fact is that over time this registry becomes cluttered and the average user has no choice but to reinstall the operating system. And here the most interesting thing awaits you - installing Windows itself is not difficult and does not take long, but installing and configuring the software takes a lot of time. For example, the application we use, Key Collector, requires re-configuration, which takes more than half an hour. If you install it on the cloud, you will not need to configure the configuration and the program will be ready in 2 minutes. Draw conclusions.
Removing an administrator account
Users often ask about how to delete an administrator account.
In Windows 7, this option is disabled, meaning it is impossible to delete this account. However, it can be disabled to prevent other users from accessing it. To do this, use the instructions described above to enable the administrator account. The only difference: you will need to check the box next to “Deactivate account”.
In WindowsXP, you can delete an administrator account only if there are at least two entries with administrator rights. So, having logged in under one of them, you can remove a friend’s administrator account by going to the “Control Panel” and then follow the chain: “Computer Management - Local Users”.
We're sorry to say goodbye to you and want to make sure you have everything you need before you close your Microsoft account.
- Once your account is closed, you will have 60 days to change your mind. After 60 days, your account will be permanently deleted and you will lose access to all services that require your Microsoft Account email and password to sign in. This includes any content, games, apps, and OneDrive content that requires an Xbox Live sign-in to access.
- Closing your Microsoft account does not cancel all subscriptions associated with it.
- If you close your Microsoft account, you won't be able to sign in to your Xbox console, even if you save your email address and password for that console.
- Once you close your Microsoft account, you will no longer be able to manage your children's accounts. Only one of these methods can be used at a time. Revoke permissions for your children immediately.
- Allow your children to continue using Xbox Live. The child's account must be linked to the other parent's account and parental consent must be obtained through that account to use Xbox Live. For more information, see Add a new family member to your Xbox One.
Removal
- Or simply highlight the desired account and click on the icon in the shape of the letter “X” in the top menu of the window;
- After this, a warning window will appear in which you need to confirm the steadfastness of your intentions by clicking on “Yes”;
- Ready. The account and its directory have been liquidated.
Method 4. Using command line capabilities (CL)
You will need to do the following:
- Click “Start”;
- Hover the cursor and click on the line “All programs”;
- Next, enter the “Standard” section;
- Call the context menu from the “Command Line” position;
- Then run it with extended permissions;
- In the displayed CS, type “net user “Nadezhda” /delete”;
Note: In the command, instead of “Hope”, you should write the specific username that is to be deleted.
7. Click “Enter”;
8. Done.
Method 5: Adjusting entries in the Registry Editor
You need to do the following:
- While holding down “Win”, press the key with the letter “R”;
- In the menu that appears, type “Regedit”;
- Click “Ok”;
- It is recommended to exercise caution and remember to create a copy of the registry before making changes. To do this, go to the “File” menu, where click the “Export” line;
- Come up with a name for the copy and type it in the “File name” column;
- Specify the location in the computer memory of the copy to be created, put o and click “Save”;
- Next, click “Computer”;
- Enter the directory “HKEY_LOCAL_MACHINE”;
- Go to the “SOFTWARE” directory;
- Open the “Microsoft” folder;
- Go to the “Windows NT” subdirectory;
- Expand the contents of the “CurrentVersion” section;
- Click “ProfileList”;
- Then, by clicking on the subsections that appear inside the section, observe the values of “ProfileImagePass”, thus finding the account to be liquidated;
- Delete the found subsection;
- In the menu that appears, click “Yes”;
- Restart PC;
- Open the contents of the system volume through Explorer;
- Enter the “Users” directory;
- In this directory, find the directory of the user who has fallen out of favor with the administrator;
- Call the context menu from the user folder and click “Delete”;
- Click “Continue”;
- Restart your computer;
- Ready.
Please cancel all subscriptions and use up any remaining funds before closing your account.
If this is not done, the corresponding invoices will continue. How to cancel.
- Select Services & Subscriptions
. - Under Subscriptions,
select
Cancel
next to the subscriptions you want to cancel and follow the instructions. - Select Cancel
.
Note.
All purchases are final and non-refundable, as stated in the Xbox Live terms of service. If you cancel automatic payments, any subscription time will continue to count until the 60th day. On the 61st day the subscription will be terminated.
Use up your account balances. All balances (from Microsoft and Xbox gift cards) may be lost when your account is closed. Check your balance.
How to close your account
Once you've sorted out your subscriptions and account balances, follow these steps:
- Log in to the site. When prompted, enter your password.
- Go to the Security
and select . You may receive a security code via text message or email to verify that you are the account owner. If yes, enter this code on the account web page. - Click Advanced Security Settings
. - Scroll to the bottom of the page and select Close account
. - Review the steps we recommend you take before closing your account, and then select Next
. - Please check all the boxes to confirm that you have read and understood each item.
- At the bottom of the page, select Mark for Close
. This confirms that you understand that access to all sites, services and data associated with this Microsoft account will end after 60 days.
How to remove login password using Windows 10 Registry Editor
There is another way to do the above - use the registry editor for this, but keep in mind that in this case your password will be stored in clear text as one of the Windows registry values, so anyone can view it. Note: below we will also consider a similar method, but with password encryption (using Sysinternals Autologon).
To get started, launch the Windows 10 Registry Editor by pressing the Windows + R keys, typing regedit and pressing Enter.
Go to the registry key
HKEY_LOCAL_MACHINE\Software\Microsoft\Windows NT\CurrentVersion\Winlogon
To enable automatic sign-in for a domain, Microsoft account, or local Windows 10 account, follow these steps:
- Change the AutoAdminLogon value (double click on this value on the right) to 1.
- Change the DefaultDomainName value to the domain name or local computer name (can be found in the “This Computer” properties). If this value does not exist, you can create it (Right mouse button - Create - String parameter).
- If necessary, change DefaultUserName to a different login, or leave the current user.
- Create a string parameter DefaultPassword and specify the account password as the value.
After this, you can close the registry editor and restart the computer - logging in under the selected user should occur without prompting for a login and password.
Have you changed your mind about closing your Microsoft account?
If you change your mind within 60 days, simply return to account.microsoft.com and sign in with your account and password. You will need to enter the security code that was sent to you by phone or email. This is necessary to confirm that it is you who want to open an account.
Please note the following points:
- You will be able to use your account until the end of the subscription period; the time during which it was closed will not be reimbursed.
- If auto-renewal for your Xbox Live or Groove Music subscription is turned off, you'll need to turn it back on.
- If any subscriptions are canceled entirely or the subscription has expired, you must repurchase the subscription.
- Your Xbox profile, as well as all the games, music, and videos associated with your profile, will be available to you the next time you sign in to your console.
Note.
After 60 days, your Microsoft account will be permanently deleted and you will not be able to reopen it.
The most intuitive and simple solution to this problem is to change
status of the current entry through settings.
In addition, this method involves saving
all user data, for example, personalization.
To do this, click the “ Start”
" and select the "
Settings
" icon located above the "
Shutdown
" icon.
Win + I
may be somewhat more convenient .
Before making changes to the system, it is recommended to save
all working files, because after restarting the computer, unsaved changes will be lost. After this you need:
New address and Microsoft Points
Because a Microsoft account is also associated with various email services, you need to make sure that people have a different way to contact the account holder. In this case, it is necessary to pay attention to three points:
- Within sixty days after deletion, the owner will no longer be able to access his mailbox, but he will still receive letters.
- After this period, all data and materials stored inside the mail will be deleted.
- The address itself (in particular, from Outlook) can be transferred to someone else.
It's best to set up an automatic response for anyone who sends an email to that address before closing your account. In it you can inform about the deletion of your account, and also indicate another email to which you need to write. Automatic reply is set up in Account Management. You can access it through the Settings item.
Next, you need to make sure that there are no Microsoft Points on your account. If you have them, you need to spend them first. You can find out about the quantity using “Invoicing”, where you need to select the “Payment Methods” section.
Finally, we also need to address the issue of linked child accounts linked to the main one. Once all possible losses from account closure have been minimized, you can proceed directly to the main process.
How to delete a user
This manipulation seems possible only if there are at least two of them. This is done through the administrator
. If you need to get rid of it, you must first grant administrator rights to another account and perform the operation through the latter.
As in the previous case, you need to go to the “ Accounts”
" in "
Options
".
Here you need to select “ Family and other users
”.
After clicking the “ Delete”
"The system will warn you that all files and data located at C:\Users\Deleted_User_Name
will be lost
.
After a short period of time, the data will be erased.
In the Windows Settings app
This is a simple way to remove a user profile from a device and is suitable for beginners.
To start the process you need
- Open "ten" Start.
- Click on the gear icon.
- Click on the appropriate option.
- Select the "Family and others" section.
- Find the account you need in the list of users.
- Tap the name, a window will open and select “Delete”.
- Click on the corresponding element.
After completing this step, the user will be permanently removed from your computer. All data and files will also be deleted along with it. The program will notify you about this with a system message. Therefore, it is necessary to transfer important information to another storage location in advance. This operation is not intended for built-in accounts and can only be disabled.
Uninstall via Control Panel
This solution provides slightly broader capabilities. First of all, you need to log in to the system with administrator rights
.
Right-clicking on “ Start
” will open a context menu, at the bottom of which there is a link to “
Control Panel
”.
Regardless of its design (“Category”, “Small Icons” or “Large Icons”), which can be changed in the upper right corner of the interface, you need to select the “ User Accounts
” section. After this, you need to follow the following algorithm of actions:
The last step is confirmation
removal, after which you should
restart
the computer.
out
using the Run utility, launched by the keyboard shortcut Win +
R. Here you need to enter the netplwiz
, after which the settings window will open.
Here you need to select the “ Delete”
", having previously
selected
the required user.
Via command line
You can achieve the same results through the command line. Use this method if none of the above worked. Moreover, this method is faster.
Attention! Beginner users should not use account deletion via the command line. The system will not ask you again about your intentions and will delete all data, including your account, immediately and irrevocably. Keep this in mind before you begin.
Let's move on to working with the command line:
- We will launch the command line through the Windows search menu. This will allow you to work with administrator rights. Click on the magnifying glass icon and enter the words “cmd” into the search bar. We look for the result we need in the results and right-click on it. We need the "Run as administrator" option.
- Let's ask Windows for a list of users and figure out who we're going to delete. To do this, enter “net user” into the command line without quotes and press Enter.
- The system will display the result: in our case, these are only two users. We remember the name of the account that we will delete, and enter the following command: “net user “username” /delete” (without quotes).
- Windows accepted the command and responded that it was executed correctly. Let's check if the user has left. Enter “net user” again.
As you can see, the account with the name “Seryozha” is no longer there. Everything works perfectly.