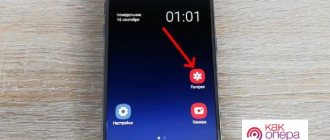
How to empty the trash on a Honor phone
Once you know where the deleted items are stored, you have a choice: restore them, permanently erase them, or do nothing. In the third case, they will be present on the device until their storage period expires. Usually this is 30 days. After this, they will be permanently deleted, and this will happen automatically.
If you want to restore them or delete them, then the following instructions are for you. This is a way to empty the trash on Android in the Honor 10, 9 and other models. It is suitable for all storage methods mentioned above.
- Go to Cart.
- Select the desired objects with a long press.
- Icons for recovery or permanent deletion will appear on the screen. Click on the one you need.
This is a way to empty the trash in Honor 7a, 8a, 7c and any other models. It is very simple and fast. But remember that files that you delete in this way cannot be returned - unless their copies are stored in cloud storage or Google Photos.
What is cache and when should it be cleared?
To make it more clear, let's give a small example. Probably everyone has noticed that after downloading any navigator program, the application first downloads a map of the desired region. However, after restarting, the download does not occur, and the software instantly launches the area we need. The fact is that the map of interest to the user is saved in the cache of the navigator program, so there is no need to download it again.
Also, many instant messengers, such as Whatsapp, save sent photos and videos.
However, despite all the apparent usefulness of the cache at first glance, many applications or users simply do not use the saved files, so they simply accumulate on the mobile device, taking up unnecessary space.
Why do you need to empty the trash can?
Sometimes emptying the trash on Android Honor is simply necessary. Without this, you may lose other important materials, and your smartphone will begin to freeze and malfunction. Here are general recommendations when such cleaning is necessary:
- If your device runs out of free space. The phone will usually notify you of this in a pop-up message. It can also hang and get confused for no apparent reason. The most common solution is to “clean up” photos or large videos. But this action will not lead to results, because the object is still on the device. Therefore, you need to clean them. Now the space on your smartphone will really be freed up.
- When you want to install an application, but it does not fit into the phone's memory.
- If your cloud storage runs out of memory and you need to write important materials there. In this case, empty the corresponding folder there.
- In case you want to immediately and irrevocably get rid of an object, for example, an unsuccessful photograph.
In normal cases, you do not need to open the recycle bin on Huawei Honor and empty it. The content is automatically deleted after 30 days. You will only have to perform this operation if you have the problems described above with the device's memory.
Now you know where the recycle bin is located on the Honor android and how to empty it. I’m sure this will help you get back an erroneously deleted photo or find additional space in your smartphone’s memory.
Why are files not deleted from my phone?
Features of the Android operating system include granting different rights to access files and folders. Some can simply be viewed, while others can be deleted or corrected; some files cannot be accessed by an ordinary user at all. This is necessary to ensure that the owner of the gadget does not remove the necessary elements in the OS for the smartphone to operate.
Software for modern devices is divided into 4 categories:
- System files and programs that are needed for operation; the performance of all equipment depends on them.
- Programs installed by developers.
- Applications installed by the owner of the gadget.
- Malicious software.
In fact, there are few reasons why it becomes impossible to delete a particular file:
- The user does not have the rights to carry out such an action.
- The program is included in the list of gadget administrators.
- The file has a built-in lock for system operation.
- Immediately after successful deletion, the file is downloaded again by another application.
The described factors can be combined, which increases the degree of protection of applications and other files. However, in almost any situation you can cope with them yourself, without the use of specialist services.
How to recover deleted data from Android device?
"Android Data Recovery" is used all over the world and is the best software that can recover lost data after factory reset Android phones.
The program scans both the internal and external memory of the phone.
Any data that has been lost can be easily recovered using this software such as photos, videos, audio files, documents, WhatsApp messages, contacts, text messages, call recordings and more.
The software not only retrieves files after a factory reset, but also works with other data loss situations such as malware attacks, accidental deletion, water damage, broken or dead screen, and several others.
It supports all Android phones including Samsung, LG, Sony, Xiaomi, Oppo, Vivo and many more.
So you just need to download "Android Data Recovery" software and recover deleted data after factory reset your Android phone.
Follow the user manual to learn how to use the Android data recovery software.
Step 1: Connect your Android device
First, launch the "Android Data Recovery" software on your computer and select "Data Recovery".
Now connect your Android device to your computer via USB cable.
Note. Make sure USB debugging is enabled on your Android device.
Step 2: Select file types to scan
When your device is successfully connected, "Android Data Recovery" will show the data types it supports.
By default, it checks all file types.
You just need to select the type of data you want to recover.
If your device is rooted, "Android Data Recovery" will offer two options:
- Scan for deleted files;
- Scan all files.
Selecting "Scan for all files" will take longer, but the file will be thoroughly scanned.
Now click “Next” to continue the recovery process.
The recovery program will first check your phone:
And now your device will be scanned to recover your lost data.
This whole process will take some time, so just wait and relax.
Step 3. Preview and Recover Lost Data from Android Phone
Once the scan is completed, you can now view the recovered data one by one.
Here you should mark the items you need and then click “Recover” to save them to your computer.
Sources
- https://programmy-dlya-android.ru/instrukcii/939-kak-naiti-korziny-v-telefone-android.html
- https://mirinfo.ru/android/gde-nakhoditsya-korzina.html
- https://3ib.ru/kak-pochistit-korzinu-na-telefone-android/
- https://KakOperator.ru/os/kak-ochistit-korzinu-v-telefone
- https://Gaidi.ru/lajfxaki/kak-najti-korzinu-v-telefone/
- https://devicefaq.ru/gde-nahoditsya-korzina-na-androide.html
- https://it-tehnik.ru/gadgets/korzina.html
- https://WiFiGid.ru/android/gde-korzina
- https://ucompa.ru/android/kak-poluchit-dostup-k-korzine-na-android
We work with third-party applications
There are many free applications available in the Play Store that allow you to clean your phone in a few clicks. Below we will explore the most practical and popular of them.
p, blockquote 27,0,0,0,0—>
Clean Master
This is one of the most famous applications in its category. In Clean Master, you can completely clean your gadget from cache, temporary files, empty and damaged folders, browser history and other garbage.
p, blockquote 28,0,0,0,0—>
p, blockquote 29,0,0,0,0—>
The utility's options also include a built-in antivirus and automatic closing of unnecessary programs. The application has a convenient and pleasant interface that allows you to clean the gadget by two clicks of the “Analysis” and “Clean” buttons.
p, blockquote 30,0,0,0,0—>
System monitoring in Android Assistant
p, blockquote 31,0,0,0,0—>
This program is included in the top Play Market and has a fairly wide list of functions:
p, blockquote 32,0,0,0,0—>
Total Commander
p, blockquote 33,0,0,0,0—>
This utility allows you to organize all the files that are on the gadget. Total Commander unpacks and packs folders with files in zip and rar formats. Its capabilities also include transferring and editing the contents of the device from place to place or to another gadget.
p, blockquote 34,0,0,0,0—>
How to transfer an application to a memory card (flash drive) on Android
p, blockquote 35,0,0,0,0—>
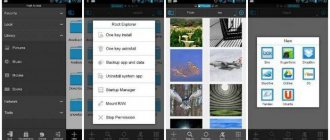
ES-Explorer
A multifunctional file manager, the most popular among users. It interacts with internal memory and SD card, supports network access, FTP, and can connect to popular cloud services. But, and most importantly, ES Explorer can integrate a shopping cart into the system. Once files are in this partition, you can restore them or delete them permanently:
- Open the main menu and select "Cart". Activate the slider to enable.
- Delete a file or folder somewhere on your smartphone. After this operation, they will disappear from there and will be moved to the activated section of the above option.
- You can manage actions in this section using the control panel located at the top. The main functions are hidden under a button with three dots.
Manual cleaning cache
Mostly the cache is clogged by messengers and social networking applications, for example, Viber or VKontakte. While watching videos, images and listening to music, it is saved in the phone memory. It is recommended to periodically clear the cache by deleting unnecessary files from present applications.
There are many useful utilities on Google Play that optimize the Android system by cleaning up memory. But, not in all cases the installation of these programs is required. The user can use standard methods by accessing the settings. Manual cleaning instructions:
- Go to settings.
- Find the Application Manager tab.
- Select a specific application.
- On the next page you can see the basic information, which shows how much internal memory the program takes up, etc.
- Next, go to the “Memory” tab and select “Clear cache”.
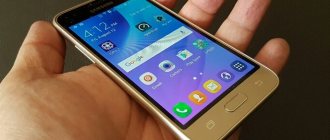
Two-window mode of use
Surely, if you have previously used this application, then the most convenient mode for displaying information was two-window. This mode allows you to display the contents of the internal, system memory, as well as the memory card in two independent windows, exactly as in the full-fledged PC version.
When using a smartphone, the program, by default, is displayed in a vertical format. That is, to go to the second panel it will be enough to make a simple swipe from the right edge of the display to the center.
If you use a tablet, the program will automatically switch to horizontal mode and both panels will be available to the user at the same time. You can see what it looks like in the screenshot below.
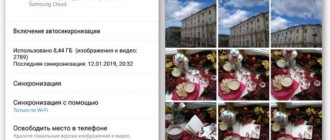
Where are deleted files stored on Samsung?
To find the folder, you need to go to the gallery and click on the three dots button at the top of the screen. In the context menu that appears, select the required section. You will be taken to the folder where all deleted photos, audio, videos, etc. are stored.
Interesting materials:
How to connect to a TV from a Samsung phone? How to connect a tp link router yourself? How to connect a Wi-Fi router yourself? How to make pppoe connection automatic in Windows 10? How to make a wireless connection on a laptop? How can I make the Internet connect automatically? How to make your iPhone automatically connect to Wi Fi? How can I make the Internet connect automatically? How to make Wi-Fi connect automatically? How can I make the high-speed connection connect automatically?
Part 1. Recover deleted files with dr.fone toolkit – Android Data Recovery
God knows all of us have gotten our hearts broken and deleted a contact we shouldn't have. We've even mass-deleted our texts and found that important Account Information went missing along with those texts. And who knows why Photos we want the most magically disappear as if some ancient curse were at play. dr.fone toolkit - Android Data Recovery is the real-life knight that we lost-souls have all desired to embark on the quest to reclaim our prized possessions (material or not). dr.fone toolkit - Android Data Recovery is a unique PC Application, that offers a reliable and efficient way to recover lost or deleted contacts, text messages, photos, WhatsApp messages, audio files, videos, documents and more. It also offers the Android App version to recover deleted files on Android devices.
dr.fone toolkit — Android Data Recovery has the highest recovery rate in the Android date-retrieval business. It can recover data from a lot of other scenarios as well:
- Data that has been lost from a factory restore.
- Data lost from OS update.
- Rooting Error.
- Error in Backup synchronizing and a few others.
dr.fone toolkit – Android Data Recovery
World's 1st Android smartphone and tablet recovery software.
- Recover deleted data by scanning your Android phone & tablet directly.
- Preview and selectively recover what you want from your Android phone & tablet.
- Supports various file types, including WhatsApp,Messages & Contacts & Photos & Videos & Audio & Document.
- Supports 6000+ Android Device Models & Various Android OS.
7 Day Money Back Guarantee
How to recover Android deleted files with dr.fone toolkit?
Follow the below steps to recover data from your Android Device:
- Start dr. fone toolkit and select data recovery. The below screen should pop-up. Now, connect your Android device to the computer with a USB cable.
The USB debugging is then to be activated, just allow USB debugging on your phone according to the instructions in the below window. In case you have Android OS version 4.2.2 or above, you will get a pop-up message. Tap OK. This will allow USB debugging.
Select the types of file you want to scan for and click 'Next' for the subsequent step in the data-recovery process.
Select scan mode. dr.fone toolkit offers two modes: Standard and Advanced. Standard Mode is faster and we recommend you to select it. However, if Standard doesn't locate your deleted file go for Advanced.
Preview and recover deleted files. Just before the below result, you may get a Superuser authorization window appearing on your device. If you do, click 'Allow'.
Final step is to just select the files you wish to undelete and click 'Recover'.
Apart from retrieving files from memory card and internal memory, you can also preview files before recovery. Also, recovery is guaranteed without overwriting any existing data. You can always make us of its free 30-day trial to explore all of its android data-recovery features.
What is a computer desktop
The desktop in the Windows operating system is a folder. Don't be surprised, but this is exactly the case. Besides, this is the most interesting folder. As soon as you turn on your computer and your operating system boots, you will immediately see an open folder called Desktop or Desktop.
Only this folder can have a beautiful background image on its spread, called desktop wallpaper, and be customized to your liking. Other folders do not have such settings. In Windows 10, this folder is located on the C: drive in the Users folder. But you better not climb there yet.
These are the files, icons and folders located in my Desktop folder.
And this is what my opened Desktop folder looks like on the monitor screen.
Everyone can customize their desktop the way they like. In the next lesson, I will teach you how to properly configure this folder so that your desktop is beautiful and convenient. In the Windows 10 operating system there can be several such virtual desktops
They were also present in previous operating systems. Back then, this tool was called PowerToys, and it could only be turned on through a series of cunning manipulations.
In the Desktop folder, you can create your own folders and put your own folders and files in them. At the bottom of the desktop there is a taskbar (we will talk about it in more detail in the following lessons).
Desktop icons
The desktop can contain not only your folders and files, but also icons for launching games, programs, and system folder icons. System folders include the following packs:
- Basket;
- Computer;
- Control Panel;
And some others. The Trash folder icon is located in the Desktop folder by default. Other folders must be displayed to users themselves.
You can also display icons for games and programs yourself, or they are automatically displayed on the desktop when you install them.
How to move an icon, folder or file
Folders, files, and program icons can be moved around the desktop. To do this, you need to move the cursor over the object, press the left mouse button, and without releasing the button, drag the icon (folder, file or icon) to a new location. After this, you can release the mouse button.
How to remove an icon from your desktop
Program icons can be removed from the desktop. To do this, you need to hover the cursor over the icon, click the right mouse button, and select “delete” from the drop-down list and left-click on it.
In the same way, you can delete both files and folders.
Good luck to you!