With the release of the new Windows 10 operating system, the developers added new account management functions and divided them into two types. The first type of accounts is online , that is, Outlook accounts are used to log into the system. The second type of account is local . This type of account is well known to everyone since the days of Windows XP. It was this confusion with the type of accounts that caused many problems when changing administrators. In this material we will describe in detail the process of changing administrator , both for online accounts and for local ones.
Changing the local administrator account
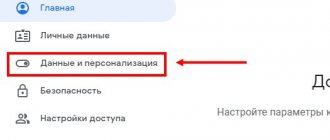
To change the local administrator in Windows 10, you first need to create a new one and then delete the old one. So let's go to Control Panel . Start menu icon and selecting the item we need in the context menu that appears.
In the launched Panel, go to the accounts section and select the “ Change account type ” link there.
In the window that appears, you will see the old administrator account, in our case the name “User”. At the bottom of this window there is a button to add a new user , clicking on which will take us to the OS settings section.
In this section you can add a new admin and remove the old one. To add it, click the “ Add a user for this computer ” button. This action will take us to the New User Creation Wizard.
Since we are creating a local admin, we will therefore skip the email entry point by clicking on the “ I don’t have this person’s login information ” link. This action will take us to the window for creating an online account for Microsoft.
To skip the account creation process, click on the lowest link in the wizard window, which will take us to the local user creation window.
As an example, write down the name “New Admin” and continue the wizard. After these steps, a new local account will be created.
Now let's go to our users and select the name "New Admin".
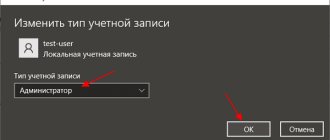
In the next window we need to select “ Change account type ”. This is necessary in order to change our account type from regular to administrator.
Therefore, feel free to go to this point and change the user type.
Having made our user an admin, we can now proceed to directly deleting the old user . Now you need to change users . Therefore, let’s log into the system under the admin, whose name is “New Admin”, and go to the list of our admins, selecting “User”. Now, to remove the old user, select the “ Delete account ” item.
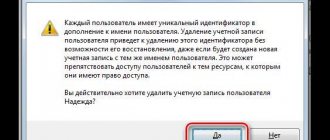
After selecting this item, the system will offer us to delete all user data or save it. Therefore, be careful, if there is important information there, then save it.
We select one of the options in which we can delete or save files. After confirmation, the old admin will be permanently erased from the system.
From the example it is clear that creating a new and deleting an old admin is not at all difficult, although you will have to tinker a little.
Is it possible to remove the built-in Microsoft account?
In the latest available versions of Windows, it is possible to change your Microsoft account to a local account. The process of deleting a built-in profile is complex and therefore beyond the capabilities of an ordinary person.
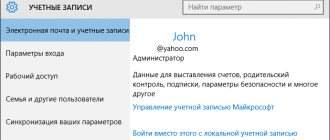
This procedure is performed by selecting 'Accounts' in the 'Settings' menu. Under Email & Accounts, select your linked Microsoft account. Basically, the owner of this profile is the administrator, who knows the password.
You will need to “Sign in with a local account” to enter your password. You will then be asked to enter your personal information. You will then need to log out and then log into your local account and enter your personal details.
In this review, we will show you the basic method to remove the local profile "Ten". If this operation is necessary, the user only needs to select one of the proposed options. The main caveat is that all data, files and documents will be permanently deleted along with the profile; The PC administrator cannot delete the account, but can disable it.
Changing the online administrator account
To change the Microsoft account, which in our case acts as an administrator, let's go to the same wizard discussed in the previous example.
In the wizard, enter your Outlook account email and click Next. These steps will complete the wizard, and the online account will be added as a new account. Now let's go to our online account and change its type, as in the previous example, to administrator.
How to disable an administrator
One of the features of the newest version of the operating system from Microsoft is two types of accounts: local, which has been used since Windows 95, and an online account, which is one of the “ten” innovations. Both options have separate admin rights, so you need to disable them for each separately. Let's start with the more common local option.
Option 1: Local account
Removing an administrator on a local account means deleting the account itself, so before starting the procedures, make sure that the second account is present in the system and you are logged in under it. If one is not found, it will need to be created and given administrator rights, since manipulation of accounts is only available in this case.
After this, you can proceed directly to deletion.
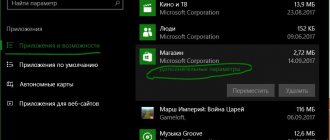
- Open the “Control Panel” (for example, find it through “Search”), switch to large icons and click on “User Accounts”.
Use the “Manage another account” item.
Click on the “Delete account” link.
You will be asked to save or delete the old account files. If the documents of the user being deleted contain important data, we recommend using the “Save files” option. If the data is no longer required, click on the “Delete files” button.
- Confirm the final deletion of your account by clicking on the “Delete Account” button.
Done – the administrator will be removed from the system.
Option 2: Microsoft Account
Deleting a Microsoft administrator account is practically no different from deleting a local account, but has a number of features. Firstly, there is no need to create a second account, already online - a local one is enough to solve the problem. Secondly, the Microsoft account being deleted may be linked to the company's services and applications (Skype, OneNote, Office 365), and deleting it from the system will most likely disrupt access to these products. Otherwise, the procedure is identical to the first option, except that in step 3 you should select a Microsoft account.
As you can see, deleting an administrator in Windows 10 is not difficult, but it may lead to the loss of important data.
In addition to this article, there are 11911 more instructions on the site. Add the Lumpics.ru website to your bookmarks (CTRL+D) and we will definitely be useful to you.
Thank the author and share the article on social networks.
Create a local user in Windows 10 using the console
First of all, let's launch the console as an administrator. You can do this by searching for Windows 10 and typing “ CMD .” Now right-click on the result found and select “ Run as administrator ” from the list.
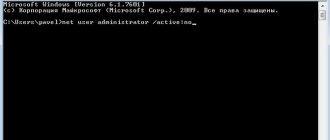
Now run the command to create a new user whose name is “New_Admin_2” shown in the image below.
To change a regular user to an administrator for the newly created account “New_Admin_2”, run this command.
The last action left is to delete the old admin . In our case, the name of this admin is “Old_Admin”. To do this, log in to the system under “New_Admin_2” and open the console as administrator. In the console, run the command shown in the image below.
After this, the account will be disabled.
The example shows that in Windows 10, using the command line, you can quite quickly both create and delete a local admin.
Method 2: Disable or change User Account Control using a .REG file
- Follow the steps below depending on which mode you want to change to User Account Control.
- “Always notify” mode. Click "Download" below to download the REG file and proceed to step 6 below.
"Notify me only when applications try to make changes to my computer (default)" mode.
- Click "Download" to download the REG file and proceed to step 6 below.
Mode “Notify only when applications try to make changes to the computer (do not dim the desktop)”
- Click "Download" to download the REG file and proceed to step 6 below.
"Do not notify me" mode. This mode disables UAC.
- Click "Download" to download the REG file and proceed to step 6 below.
Save the .reg file to your desktop. Double click on the downloaded .reg file to merge it. When prompted, click Run, Yes (UAC), Yes, and OK to confirm the merge. Once complete, you can delete the downloaded .reg file.
That's all,
This table describes all UAC settings and how they affect the security of your PC.
| Settings | Description | Safety Impact |
| Always notify (recommended) |
|
|
| Notify me only when apps try to make changes to my computer (default) |
|
|
| Notify only when apps try to make changes to your computer (do not dim the desktop) |
|
|
| Don't notify me (turn off UAC) |
|
|
Let's sum it up
In most cases, changing the user is required for the correct functioning of some programs. For example, you need to run a program that is bound to a specific user , and when running this program under a different name, an error occurs.
This error occurs because the program tries to access the user's files from his folder , but the path to the directory does not match the one included in the utility, since the name is different. This is one of many cases when you need to change the admin.
In our material, we looked at all the ways to change the administrator in Windows 10. Therefore, we hope that our article will help our readers complete this task.
How to switch to another clean account
In Windows operating systems, it is possible to create several accounts: two, three, etc. You can switch from one to another as follows:
- Simultaneously hold down the “Ctrl + Alt + Delete” buttons on your PC keyboard.
- A window with system parameters will appear. Here the user can enter the task manager of the operating system, block the operation of his PC or change the user. The last option is interesting here.
- After clicking on the “Change user” option, a menu will appear with all previously created accounts.
- To switch, you need to select the account you are interested in and tap on its name.
Note! Each Windows account has its own settings and programs. The location of folders and files on the desktop will also differ
Video - how to remove the administrator account in Windows 10
Like previous versions of the OS, Windows 10 has a hidden built-in Administrator account, hidden and inactive by default. However, in some situations it may be useful, for example, if it is impossible to do anything with the computer and create a new user, to reset a password, and more. Sometimes, on the contrary, you need to disable this account.
This instruction details how to activate the hidden Windows 10 Administrator account in various situations. We will also look at how to disable the built-in administrator account.
I note that if you just need a user with administrator rights, then the correct ways to create such a user are described in the materials How to create a Windows 10 user, How to make a user an administrator in Windows 10.
Why do you need a Microsoft account?
Progress does not stand still, operating systems are becoming more convenient and functional. The leader in this field is not far behind - Windows, or rather its latest tenth version. Microsoft links users' accounts to their accounts so that data is stored in the cloud at all times and cannot be lost, which often happens when using a standard hard drive or even an SSD drive. By storing your files, passwords, and settings on OneDrive (Microsoft's cloud storage service that's free to every Windows user), you can be sure they'll never get lost.
There is one more point that speaks in favor of an Internet account. This is a banal reinstallation of Windows. This operating system is built differently than others. The registry is used here and this is an outright disadvantage of both “Ten” and other versions of the Microsoft OS. The fact is that over time this registry becomes cluttered and the average user has no choice but to reinstall the operating system. And here the most interesting thing awaits you - installing Windows itself is not difficult and does not take long, but installing and configuring the software takes a lot of time. For example, the application we use, Key Collector, requires re-configuration, which takes more than half an hour. If you install it on the cloud, you will not need to configure the configuration and the program will be ready in 2 minutes. Draw conclusions.
This is interesting: Deleting correspondence on Skype - let’s get to the bottom of it
Enabling the hidden Administrator account under normal conditions
By normal conditions we further mean that you can log into Windows 10 and your current account also has administrator rights on the computer. Under these conditions, activating the built-in account does not present any problems.
- Run Command Prompt as Administrator (via the right-click menu on the Start button), there are other ways to open the Windows 10 Command Prompt.
- At the command line, enter net user Administrator /active:yes (if you have an English-language system, and also on some “assemblies” use the spelling Administrator) and press Enter.
How to uninstall your current Microsoft account and replace it with a local account
To complete this task, you can use the following instructions:
- Open the operating system settings using the method discussed above.
- In the window that appears, find the line “Login to the second instead with a local entry” and click on it.
- If necessary, enter your account password. If a password is set on the account, the system will ask the user to enter it to perform further operations.
- Next, another menu will appear in which the user will need to fill in the fields for a local account. To create a new account, you will need to enter characters in the “Username” and “Password” fields. However, you can refuse to enter a code to protect your account from unauthorized access and do this later, if necessary, through the control panel.
- Finish the account creation procedure by clicking on the “Finish” button.
- For your own peace of mind, restart the computer and log into the local account.
Creating a local entry on Windows ten