One of the oldest and most popular programs for data backup and recovery. It has very broad functionality, which is both its advantage and disadvantage. The latter is that if you accidentally activate the wrong process, you may not get the desired result or cause even more harm. Therefore, before you restore the firmware on Android using it, you need to find suitable instructions and strictly follow them.
- How to restore Android after unsuccessful firmware
- How to restore factory firmware on Android
- How to roll back firmware on Android
- Popular utilities for creating backups and restoring Android systems
- Titanium Backup
- Easy Backup & Restore
- How to flash Android through recovery
- Download ClockworkMod Recovery for Android
p, blockquote 10,0,0,0,0 —>
- Install and launch LG Mobile Support Tool.
- Install the phone drivers in the “Install USB Driver” section.
- Connect your smartphone via USB. Press the power button or the combination “Power + Vol-”. The device should appear in the program window.
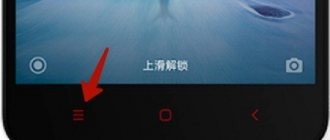
Increase
Why might gadget owners be unhappy with the update?
In most cases, after the update procedure, the device should work faster, and all shortcomings should become a thing of the past. All that users can complain about are some changes in the interface or, for example, the disappearance of shortcuts from the desktop (accordingly, the applications themselves disappear). This happens because the installed programs are already outdated and simply do not correspond to the new firmware.
New versions of applications or their analogues can still be found on the Play Market, and trying to return the previous version of the OS due to the loss of old applications is a rather stupid idea. What else may irritate owners in the new firmware version is the appearance of some programs that cannot be removed. For example, these could be new services from Google. And then all users begin to think about whether it is possible to return the old version of Android. But most of all those who want to return to the old firmware are among those who tried to reflash their device on their own. Here, a huge variety of problems may appear, to the point that your gadget may turn into a “brick,” that is, stop showing signs of life altogether.
So before performing such manipulations, make sure that you have enough knowledge and experience, and best of all, contact a professional. Reflash the device only in extreme cases, when you cannot do without it, because such a procedure completely voids your warranty. But you can still return the previous version.
The concept of firmware backup
Backup translated from English means duplication. This process in relation to Android devices involves creating a backup copy of information stored in the gadget on a separate medium.
The main purpose of creating an Android backup before flashing the firmware is to be able to restore data if it is damaged or lost. Using a correctly created copy, you can completely restore a working system, even if you managed to flash the device and remove the user’s personal settings.
Today, there are many programs that allow you to backup individual files, for example, SMS, contacts, photos or applications.
How to return to the old version of Android after updating?
First, come to terms with the fact that standard system resources do not provide a system rollback option, such as in the Windows OS. Accordingly, when you return to the old version, all installed programs and personal files will be deleted. Therefore, immediately before the procedure for returning the old version, make backup copies of all important documents, files, phone numbers, and so on. Be prepared to say goodbye to user settings, saved accounts or applications, they will be erased, everything except the built-in ones.
Next, you will have to perform a factory reset yourself. How to do this depends only on your version of the operating system, but most often this item is found if you go to “Settings” and “Backup and reset”. This parameter can also be found in “Confidentiality”. In any case, finding a factory reset will be easy. Next, you will need to perform a series of actions that are a little more complicated, that is, enter recovery. And how to return the old version of Android using it - read on.
Bootloader check
The first thing you need to do before flashing Android is to make sure that the problem is of a software nature. Press the Power button: if the phone shows at least some signs of life (clicks, the logo is on, the robot is frozen, an exclamation mark), then the bootloader is working. This means you can flash your smartphone, and it will continue to work.
p, blockquote 5,0,0,0,0 —>
p, blockquote 6,0,0,0,0 —>
Even if nothing happens when you press the power button, it’s too early to panic. Connect the device to your computer via USB and press the power button or the combination of “Power” and volume down keys.
p, blockquote 7,1,0,0,0 —>
If the computer sees the connected phone, it means it can be flashed - the main thing is to know how to do it yourself. If your smartphone does not show any signs of life, take it to a service center. The device probably does not turn on due to hardware problems, the elimination of which requires the intervention of a competent specialist.
p, blockquote 8,0,0,0,0 —>
If there is new firmware for the device, you will be prompted to download it.
If there is new firmware for the device, you will be prompted to download it.
If there is no new firmware yet, a message will appear on the screen: “The latest updates have already been installed.”
If the device has been rooted or the firmware has been changed, the message “Device has been changed” will appear. To update the firmware on such a device, contact a Samsung service center.
When all actions are completed, the gadget reboots and reflashes. This usually takes 10 minutes, but may take longer or less depending on the brand of device.
Detailed guide to installing custom firmware on a Samsung Galaxy smartphone or tablet:
After that you should be in recovery, which looks something like this:
When you are on the main screen of TWRP, go to the “ Wipe”
” to remove the current firmware before installing the new one.
Next, click on “ Advanced Wipe
” and check the box next to “
Dalvik Cache
”, “
System
”, “
Data
”, “
Cache”
. If you also select “Internal Storage”, you will format the gadget’s internal memory (and if “Micro SD Card”, then the flash drive), but this is not necessary.
- Drag the slider at the bottom of the screen from left to right to erase the selected sections. We are waiting for the end of the process.
- Go to the main screen and select “ Install
”. - Then we look for the firmware file at the address where it is located and tap on it to select it.
You can return the stock firmware at any time from the backup that you should have made earlier, as stated at the beginning of the article.
We tried to describe the entire installation process in as much detail as possible so that you do not have any questions or ambiguities. But if you still have them, write them in the comments.
Launch ROM Manager and select – Load Recovery Mode
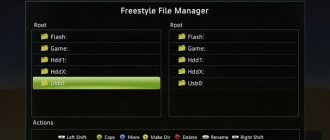
Instructions on how to remove an image from Android
- Connect your Android device to PC
- Launch the ADB RUN
and go to menu (a) Adb
Find out /dev/block partitions
What is /dev/block/? /dev/block/ are the “disks” on which the system, data, cache partitions are located.
Option 1
This method is the simplest, but unfortunately it is not possible to find out where the core is located.
To find out /dev/block/ enter the command:
adb shell mount
We get a list where we see a list with our partitions and to which /dev/block/ they are mounted
Option 2
We connect Android to the computer in adb and enter:
Adb sheell su ls -l /dev/block/platform/*/by-name
We get the entire list of blocks.
Removing an Android image from a selected partition
And so, when we already know where which partitions are located, we can begin to remove the Android image (dump) from the selected partition. Before you start, make sure you have enough free memory on your memory card!
- In order to remove the image, you need ADB RUN
menu (7) Manual Command > (1) Adb - Log in to the terminal under Root:
adb shell su
3. Type the linux command to take a dump:
dd if=/dev/block/ XXXXX
of=/sdcard/
NAME_razdel.img
- where XXXXXXXXX
is the partition from which you are removing - where NAME_razdel.img
is the name that you will assign when removing the image from the selected partition (it is better to give names the same as they are indicated, if data then data)
The removal procedure may take some time, from 1 minute to 15, during which time it is better not to tug on your Android!
[Update]
In new versions of ADB RUN, it became possible to quickly remove an image each time without typing such long commands. All you need is to know the block name.
When you already know the required block, go to ADB RUN:
Restoring a partition from a created Android image (partition dump)
When you need to restore from a previously created image, you need to do the following:
Make sure that the image is still in the /sdcard partition - since the backup was created in this partition, or move it back.
Enter the following command:
dd if=/sdcard/ NAME_razdel.img
of=/dev/block/
XXXX
- where XXXXXXXXX
is the partition on which you are uploading the image - where NAME_razdel.img
is the name of the image of the selected partition (it is better to give names the same as they are indicated, if data then data)
The recovery procedure may take some time, from 1 minute to 30, during which time it is better not to tug on your Android!
[Update]
This is especially true for those who have not successfully completed S-OFF (or are planning to do so) or have unsuccessfully flashed custom firmware, or after unsuccessful experiments!
For Sony, HTC, Xiaomi devices and other devices that have Fastboot mode, they can perform recovery as follows after the previously required removal of boot.img (zImage) and system.img (factoryfs.img)
copy these images to your PC:
- Put Android into fastboot (bootloader) mode and connect to PC;
- Move the boot.img and system.img files to the folder C:/adb_run/
b in; - Run ADB RUN and go to point (a) ADB
; - Type the following commands (details about Fastboot):
fastboot flash boot boot.img
fastboot flash system system.img
The system will be restored to its original state! You can continue your experiments!
That's all! Subscribe and Stay with the site! Good luck!
Surely you have heard about the Android operating system, unless you yourself are the owner of a device running this shell. This platform has appealed to a good portion of gadget owners and is the most common OS among mobile devices. Since 2009, when the first version of the “robot” was released, the developers have not stopped improving and modifying their brainchild. New versions and updates are released regularly. But do you always need to update your device and how to return the old version of Android after updating? We will talk about this in this publication.
Charge your smartphone
What is worth noting first of all is that before starting this procedure you need to charge the device well. It doesn’t matter how long it takes to roll back the system and how long the gadget will reboot after that.
If during such manipulations in the “recovery” mode the device does not have enough charge and it cannot fully complete its task, then, most likely, problems with its further use cannot be avoided.
The same applies to flashing your phone yourself. For some users, certain system functions disappeared or did not work, even the touchpad became inoperable. In some cases, the firmware did not install at all and it was simply impossible to enter the OS. But even then recovery helped again. If you cannot enter this mode or it simply does not exist, there are a number of simple utilities for flashing this mode directly through the operating system. Sometimes you may need a PC for this task.
We told you about how to return the old version of Android after updating. Treat your gadget with care and it will serve you for a long time.
You often hear from smartphone owners about the desire to change or remove the firmware. What is it and why do anything with it? Firmware is the most important program of the phone, on which all its work rests, that is, the brain of the mobile phone. Changing or deleting it is not recommended, but sometimes it is necessary. In this article we will look at changing the firmware using the Sony Xperia as an example.
A few words about the need for change.
If the phone was purchased not in official stores, but on the Chinese “black” market, then the built-in language of the smart phone will be Chinese. Naturally, no one needs such a gadget. In this case, download the official firmware for your model in Russian and try to reflash it. Usually this procedure is painless for phones, but there are times when the program crashes and the mobile turns into a “brick.” In other words, it freezes at loading and does not continue working. Let's start work. Download and install the “ Flashtool
” program.
Install the phone drivers on your computer. Download the firmware from the official source exclusively for your phone model and processor. The file has a .FTF
.
Paste it into the C:\flashtool\firmwares
.
Now run the program. In the window that appears, click the lightning icon and select Flashmode
.
Highlight the firmware and click OK
. At the same stage, you are given a choice of options for cleaning your phone. I strongly recommend doing a complete data wipe so that the firmware works well. If you want to save the information, uncheck the following items:
- Wipe User Data – clear user data (contacts, games, programs, SMS and more);
- Wipe Cash – clear cache;
- Exclude system – exclude system firmware;
- Exclude kernel – exclude kernel firmware;
- Exclude baseband – exclude modem firmware.
The program will ask you to connect your mobile phone via a USB cable. To do this, insert the cable into the USB port. Then turn off your mobile phone. Press and hold the Volume DOWN button and at the same time insert the cable into the smartphone. When the manipulation is performed correctly, the green diode lights up. The phone's firmware has begun. You just have to wait for the process to complete. When the firmware is uploaded, the message Flashing finished will appear in green .
Disconnect the smartphone from the computer and turn it on.
If the firmware fits your smart phone perfectly, then there should be no glitches or freezes. When something went wrong and you end up with a phone that absolutely does not respond to being turned on, colloquially a “brick,” don’t panic. It is very easy to return your smartphone to its previous state. If you doubt your skills, it is better not to take on such a task, but take your mobile phone to a service center. And yet, let’s try to breathe life into a piece of iron. Download the official firmware. Search the forums to make sure this version is 100% working. Launch the same “ Flashtoo
”
.
Connect the cable to the PC. Remove the battery from the mobile phone. Press three buttons at the same time: volume UP, DOWN and the smart power button. At the same time, plug the cord into the phone. Start flashing. Upon completion, the smart should work. Remember, each “brick” case has its own recovery method. If the phone still does not come out of the coma, take it to the service center and describe the problem in detail.
Before starting the firmware, think: “Is it necessary to do this?” If yes, read these instructions again; if not, close the article and leave your smartphone unharmed. Good luck and don't catch the brick!
Ruth is right - an extremely useful thing on Android. Root gives you full access to your device, allows you to remove unnecessary applications and customize your smartphone. However, sometimes you may need to remove root rights - due to the sale of the device, or maybe because some applications do not work on devices with root rights, for example the popular game Pokemon GO. Today I will tell you how to completely remove root from Android and give you several effective methods.
The SuperSU application is required to be installed on your smartphone if it is rooted. Most likely, it is already present on your rooted device, but you can always download it for free on GooglePlay.
After launching SuperSU and giving it root access, you will see several tabs, each of which serves to fine-tune the application. If you go to the “Settings” tab and scroll to the bottom of the page, you will see the “Full unroot” option. Click on this item, confirm the action - and wait for the program to finish (it will close). After that, reboot the device and the root should disappear.
After you finish removing the root, also remove all applications similar to SuperSU (and, preferably, all applications that require root rights to operate). After that, install the Root Checker program and make sure that the root was removed successfully.
Another application that allows you to remove root rights on Android (including versions 4.4 and 4.4.2) is called Universal Unroot. The application is paid, costs about $1 on GooglePlay. You launch the application - then it does everything itself. In some situations where SuperSU cannot remove root, Universal Unroot can help.
It is worth noting that it is difficult to remove root from devices from some manufacturers due to built-in functions (for example, KNOX for Samsung and LG eFuse for LG). If you have such devices, seek advice from the XDA Developers and 4pda forums to remove root from your smartphone.
After the Universal Unroot program is running, check the removal of the root using Root Checker.
Recovery menu modes
Recovery Mode has several main modes, which we will list.
Once again, please note that depending on the type of recovery menu, the list of modes may differ significantly.
Friends! If our site helped you or just liked it, you can help us develop and move on. To do this you can:
- Leave a comment on the article.
- Subscribe to our YouTube channel .
- Subscribe to our VKontakte group .
Select Reset data or Reset device.
How to remove root rights from a phone
Despite the ability to flash firmware on a smartphone or tablet, most users prefer to manipulate root rights in the device itself. The easiest way has already been described above - manual removal. It does not require installation of any programs. For those who do not want, or for some reason cannot remove root rights manually, there are special applications that will help in this difficult task. For novice users, there are several applications where in a couple of clicks you can remove root rights from your phone or tablet.
For most models, two applications are suitable - this and Universal Unroot. Both are downloaded from the Play Market. The first is suitable for those who do not have custom (third-party) firmware installed, and the second is paid ($1). These programs have their pros and cons, which will be described in the next paragraph.
Many users, in addition to root rights, also install custom Recovery. Recovery is a boot mode that is present as standard in all Android models. Standard boot mode is responsible for updating the system. Custom gives significantly more rights. First of all, they are suitable for those who like to constantly do something with their device, namely: install any patches and fixes, selectively delete unnecessary files without the risk of deleting unnecessary ones, etc. For those who want to completely remove root rights, it is necessary to delete Recovery, because even after removing the “super rights”, a third-party bootloader can easily return them. Removing Recovery occurs only by flashing the device, because Utilities for removing root rights, for the most part, do not remove custom boot mode.
Applications and programs for removing ROOT rights
Let's look at applications for removing root rights in more detail. As already mentioned, the application will help if the device does not have third-party firmware. After launching SuperSU, open the “settings” tab and, after reading the detailed window that appears, click “continue”. After the root removal process, reboot your device. The second application, Universal Unroot, works on the same principle, but is more effective.
Samsung Galaxy devices stand apart in the case of removing root rights. It's a little more complicated here. To remove “special” rights you will have to download:
- official firmware and find the .tar.md5 file there;
- Odin3 program, which is used for firmware;
- Samsung and Samsung USB drivers.
To begin removing root rights on a Samsung Galaxy, you need to turn off the device to start in a special mode. After that, press and hold 3 buttons: “home”, “volume -”, and “power”. We turn on download mode and connect the gadget to the PC via USB. We launch Odin3 and see a green square (if we don’t see it, it means the driver installation was unsuccessful). In the program, click on PDA and find the same .tar.md5. Leave the checkboxes only for “PDA” and “Auto Reboot” and click “run”. After completing the procedure, the Odin3 program will write “Done”.
We remind you that in order to find out about removing root rights, you need to use the Root Checker application. Which need to be opened after the removal process. The program should not detect any traces of root rights. To do this, click “Verify Root Status”. If “special” rights are detected, the icon will turn green and vice versa.
Let us remind you once again about the “full reset” function, which must be used in case of problems after removing root rights. By the way, on a Samsung Galaxy, the reset can be done manually (for example, in the case of a constant reboot of the gadget). To do this, you need to hold down the “home”, “volume +” and power buttons when the device is turned off. After that, use the volume buttons to look for the “reset settings” item and press the power button on it.
Finally, let’s remember another problem for Android users related to root rights – the . With which you can gain access to super rights. The utility has great functionality and its official version does not pose a threat to the system. However, recently the program has begun to be hacked, turning it into malware that can access personal data, slow down the device and quickly drain the battery.
How to get ROOT rights on Android
Today, a lot of mobile devices based on the Android operating system are supplied to the market from such well-known...
Today, obtaining Root rights on Android opens up a lot of new opportunities for users, so developers...
Many novice Android Romodelers or geeks do not know how to remove an image from Android. This article describes in detail how to find out the /dev/blocks you need, how to take dumps from them, disassemble them, or subsequently restore them.
For those who do not understand anything about what we are talking about. This article will describe in detail how to remove the current state from Android partitions - system, data, efs, preload, cache or rip out the kernel (zImage / boot.img). For what purpose I will not write here, since that is another story.
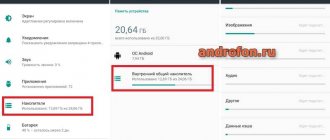
What to do before resetting your data
2.1. Copy important information from your device.
During the reset, the device memory will be cleared and all data will be deleted. If there is any important data, make a copy of it.
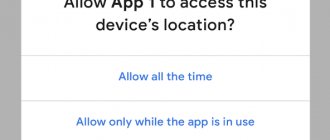
2.2. Remove your Google account from your device.
If you do not do this, then when you turn on the device after a reset, you will be asked for the account that was on the device before the reset. Without entering this account, you will not be able to turn on the device.
Now that you have TWRP recovery on your device, we can start flashing the firmware, but first make sure that all the important data in the device memory is transferred to a safer place. After the process is completed, contacts, messages and call logs will disappear from the phone.