Has a notification popped up on your phone that you need to clear your phone memory to continue working? This situation is familiar to many. But it’s most unpleasant to see this notification when the list of applications has already been reduced to a minimum, and there are almost no personal photos and videos left. Where is all the memory hidden?
In fact, the lion's share of memory is occupied by application backups and cached files for quickly loading user data. According to the developers' plans, the phone itself should be automatically cleared of unused files. However, in reality, even running a utility like “Memory Cleaner” does not give the desired results.
Read below to learn how to completely clear your phone’s memory of cache and unused files.
Please note that we have already compiled detailed instructions for iPhone owners: “ Optimizing iPhone: how to clear memory of cached files ”
Clearing the application cache
To make the interface of frequently used pages load faster, applications store their image. But if you need to free up memory from such cached files, then go to “ Settings ” (swipe down from the top edge of the screen and click on the gear icon). Then open the Applications . Now open frequently used applications one by one to delete the cache.
Depending on the Android version, the interface of the application information window will change.
In earlier models, for example, running Android 5 , in the “Applications” section you will need to open the “ Application Manager ” subsection and from the list that appears on the “Downloaded” tab, select the applications that need to be cleaned one by one. In the window that opens with information about the program, there will also be an information block with data on memory usage, and there will also be two cleaning options: “ Clear data ” and “ Clear cache ”. The first option is responsible for user data and your personal application settings. If you delete them, you will have to register again. In the application. The second option will clear the current cache and will not change the settings.
If you do not need to delete data, but want to clear the entire cache at once, then go to the “ Settings ” section in the “ Memory ” section. The Cached Data item will appear on the screen . By clicking on it, the system will prompt you to delete unnecessary files from the device.
In Android 11, you will need to scroll down to the Usage block and click on the Memory . In the window that opens, you will also have 2 options for cleaning the application: “ Clear data ” and “ Clear cache ”.
If you want to delete only the cache and not touch the settings, then doing this for all applications at once, as this happened in previous versions of Android, will not work. The developers decided to give this part of memory management to full automation.
What is cache?
Cached data is an intermediate quick-access buffer that contains periodically requested information. That is, some files are specially stored on the phone so that a person gets quick access to the site.
For example, you opened your favorite social network. The first news was a post with cats, but the image took a long time to load. After it opened, you spent another 30 minutes there and left. An hour later we decided to open the feed and saw this photo, but now it loaded instantly.
This process was accelerated due to caching. The first time the image was downloaded from the Internet, which took a lot of time. In the second, the download was faster, since some information about it was saved in the smartphone.
On Android, the described buffer comes in 3 types:
- Dalvik-Cache. This information is generated by the virtual machine. There is no point in deleting it, since everything will be restored soon.
- Application cache. Such information appears after using certain programs.
- System data. Files from various applications found on Android are stored here.
Clearing hidden files
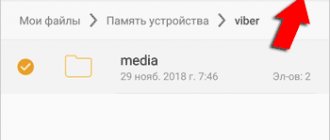
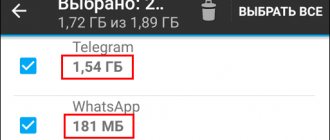
Some applications, for example, VKontakte or Telegram, can create their own folders on the phone to store downloaded files. Other apps download their pictures to your phone to speed up the reloading of their interface (for example, Viber stores photos of users you've chatted with). Even native photo storage applications can create thumbnails of them and take up disk space. However, this multimedia data will not be visible in the Gallery.
Therefore, to delete them we go to the My Files . There you will additionally need to open the “ Device Memory ” section. Now check all application folders for hidden files. This way you can manually get rid of unnecessary files and clean up your phone’s memory.
Where are they located and why are they needed?
Temporary files not only increase download speed, save traffic, but also help the user save progress in applications. Cached data from third-party programs and system information are located in a separate folder on the internal storage and sometimes take up a significant amount of phone memory. The exception is for applications that can be installed or moved to a removable storage device. The information is copied to an external drive.
Offload memory using cloud storage
Google Photos and Yandex Drive are ready to come to your aid and save all your photos from being deleted. These two apps will copy all your photos and back them up to their cloud storage. Moreover, they provide complete unlimited! That is, you can connect regular backups for any volume of your photos, while these files will not take up disk space and you will not have to pay for them. You can also choose when to download: only when connected to the Internet via Wi-Fi or any type of connection.
Now you can unload your phone from gigabytes of photos by transferring them to the cloud. In addition, they will always be available to you when connected to the Internet. But there is one drawback - if you also enable saving video files, then the virtual disk space will already be consumed, which means that very soon you will have to pay to expand it.
To enable backup for Google Photos:
- Download the application and log in using your Google account.
- On the main screen of the application, click on your avatar in the upper right corner and select “Settings”.
- Here you need to activate the “Startup and Sync” option.
To auto-upload photos to Yandex Disk :
- Download the application and register using your data in Yandex Passport.
- The system itself will prompt you to automatically upload your photos. If this does not happen, then click on your avatar in the upper left corner, and then open “Settings”.
- Choose the optimal backup conditions for you.
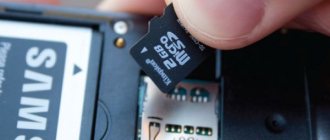
Transferring applications to a removable memory card
For most phones, you can expand the memory by installing microSD. But we recommend using the extra memory to house your apps, not your photos. The fact is that sometimes users encounter problems such as compression of images on a memory card or the inability to backup to a cloud drive.
But, unfortunately, not all applications can be transferred to a memory card. Thus, some system applications, as well as high-resource games, only run on the phone’s internal memory. Therefore, you will have to transfer each application manually.
To do this, open “ Settings ” and then “ Applications ”. Depending on the version of Android, you will either already have a list of applications available to you, or you will need to open the Application Manager section. Now open each application one by one and look for a button labeled “To SD memory card,” or something similar to it. If there is no such button, then the application can only work normally on the device’s memory.
How to clear everything
Let's go to the phone settings.
We need the "Memory" section.
We find the “Data” item, where the amount of memory is displayed.
By clicking on it, a window will appear where the system asks if cleaning needs to be done. Click "OK".
Uninstalling apps
Yes, yes, there’s no escape from this if you’ve run out of disk space and don’t even have the resources to update current applications.
Sometimes this is a temporary measure, because for application updates the same Google Play takes up space for both the new and the old version. After all updates have been downloaded and installed, and the cache has been deleted, you can download the deleted applications again. But more often than not, some applications will still have to be sacrificed.
To remove applications, you can use either Google Play, or go through “Settings” to manage downloaded applications. In both cases, you can remove programs along with all files on the device.
For example:
- Go to Google Play and open all applications downloaded and installed through this store.
- Find the ones you use the least or the ones that take up the most resources.
- Now open them and click the "Delete" button.
Conclusion
The methods described above show in detail how to clear the cache on Android. It is recommended to perform cleaning 1-2 times a month when you need to free up an additional 1-2 GB of internal space, or if the performance of your smartphone/tablet has decreased.
For novice users, methods with built-in cleaning or a built-in application are suitable. It's also worth considering third-party cache clearing apps. Manual search is recommended only for advanced or experienced users to prevent accidental deletion of important information. Resetting settings is indicated in extremely advanced cases when the smartphone/tablet is slow.
Was the article useful to you?
Rate it and support the project!
( 9 ratings, average: 4.00 out of 5)
All applications native to Andro >
Yes, from time to time you have to clear the cache, but it is not necessary to do this constantly, and especially every day. Let's figure out what it is, why it is needed and in what cases it needs cleaning. We will also find out how to clear the cache on different versions of Android and on smartphones of different brands using the system and third-party utilities.
Using special applications
To get rid of excess junk on your phone, you can use a special application, if, of course, the disk space allows you to download it. So, Google Play believes that the best solution for this is CCleaner. It not only removes the cache, but also optimizes the operation of the entire system as a whole.
But this miracle utility also has worthy analogues. Enter “Cache Cleaner” or “Phone Cleaner” in the search bar, and the store will present you with several similar applications to solve problems with the internal memory of the phone.
Cleaning the browser
To clear your browsing history, just go to your browser and open its settings . Here you should go to the “history” item and click “clear”.
Important! You can clear the history on your tablet for a certain period or completely; in addition, in the additional submenus for clearing the history, you can choose what else to delete: saved passwords, images, recently watched videos.
To make your device work faster, you should get rid of all data, and not just delete information about recently opened files. After completing these steps, the browser will be completely clean, that is, to enter any site you will have to re-enter your login and password, and this will also clear your search history. As you use the device, the owner's requests are saved in memory, and the next time you type text in the search bar, the device itself suggests similar words. After clearing, there will be no prompts for some time until the cache is full again.