How to delete a phone number on Android
Removing a contact from your phone book is easy. To do this, follow these steps:
Step 1 . Launch the Contacts (may also be called People depending on the OS version)
Step 2 . Touch and hold on the contact you want to delete until the context menu appears.
Step 3 . Click the "Delete" button and then confirm your selection.
Removal from other sources
If there are no problems with clearing the SIM card of unnecessary entries, then the question of how to delete individual contacts on Android synchronized from other applications often leads to a dead end. A deleted contact constantly returns back to the phone book, so many users simply stop contacting it. The problem is solved by disabling synchronization.
After turning off synchronization, you can safely delete entries from your book and applications without worrying that they will come back.
How to clear SIM card numbers:
How to clear a SIM card on Android from SMS
After you have entered “Messages” you will have your SMS messages in front of your eyes. You don’t need to enter them, you just need to press a button to call up the menu; not everyone will think of clicking there. We need to click on the button with three lines in a square; previously it had the name “Menu” or “Functions”, but now it’s just a square with lines.
In the menu that opens, select “Messages on SIM”. After this, if you have a phone with two SIM cards, you will need to choose which SIM card to use. We are already one step away from where messages are stored and you will soon learn how to delete SMS from a SIM card.
Here we are, in principle, at the very top you will see in the heading “Messages on the SIM card”. After which you can click on the striped square again and delete everything in a few touches on your phone, or by clicking on each message and selecting “Delete” in the menu that opens. That's all, now the SMS messages on the SIM card are over. Your phone's reminders that your SIM memory is full should now disappear.
How to delete contacts from a SIM card
To delete contacts from a SIM card, you must first configure their display. The sequence of actions is as follows:
Step 1 . Launch the Contacts .
Step 2 . Press the Menu button on your smartphone.
Step 3 . The application settings will open, click the “Display” button.
Step 4 . Set the “SIM Card Contacts” checkbox to the “Enabled” position.
Step 5 . Return to the Contacts , find the SIM card contacts that have appeared in the list of numbers (they will be displayed with the appropriate mark), select and delete them at your discretion.
How to do it?
In the latest versions of the operating system, you cannot delete mobile numbers from a SIM card. This was done with the advent of the synchronization function in smartphones. The saved numbers are transferred to your Google account, cloud services from Samsung or other storage facilities. Using technology makes it possible to transfer important information when changing phones by simply logging into your profile.
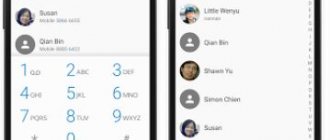
Chinese manufacturers have added the function of displaying and deleting contacts from an Android phone. The instructions will show screenshots taken on a model from the manufacturer Xiaomi; in other shells the action algorithm may differ.
Go to the Contacts application. To get to the settings menu, hold down the context menu key. The button is located in the lower left corner, regardless of whether the smartphone has additional keys at the bottom or they are on the screen.
Click on the “Display” item. The section is responsible for the appearance of the list and the elements that are in it.
We switch the “SIM Contacts” item to the active state and return to the list. All entries saved on the SIM card will be shown. Press and hold the desired element and select the “Delete” line from the context menu to clear the SIM card of contact numbers .
For information: in “Display” there is a “SIM manager” function, in which the user can find out what elements are saved on the SIM card. Need to call someone quickly? Read about this in the article: “How to set up speed dialing”
Batch deleting contacts
Selecting and deleting each contact from the Android phone book individually is a rather labor-intensive and boring task if there are several hundred numbers on the phone. Therefore, you can use the batch uninstall function:
Step 1 . Launch the Contacts app and tap the Show More icon (represented by three dots). In the context menu that appears, select “Settings”.
Step 2 . Here, find the “Group deletion” item. Click Select All and then click the trash can icon. If necessary, you can delete only contacts from a specific group. To do this, go to the appropriate section.
On older devices the procedure will be slightly different:
Step 1 . Launch the Contacts .
Step 2 . Press the Menu button on your smartphone.
Step 3 . Click the "Advanced" button.
Step 4 . Click the "Batch Uninstall" button.
Step 5 . You will be returned to the Contacts , where you can check the boxes next to the numbers you need and delete them with one click of a button.
Possible problems and their solutions
If the contacts are not deleted, then the problem may lie in the activated synchronization of the phone book with various instant messengers, which is why the numbers may return to the list.
To disable synchronization, proceed as follows:
- Go to your smartphone settings and find the "Applications" .
- Find the messenger that causes contacts to return to your phone book, then select it.
- Go to section "Permissions" and open in a new window "Contacts".
- Check the box "Deny" .
Deleting contacts from your phone is done in a few clicks. But the catch is that in modern smartphones, data is synchronized with cloud services and instant messengers, so clearing the address book can be difficult. To work with numbers, system capabilities are provided, as well as programs from third-party developers.
Why do double contacts appear?
Installing different firmware on a smartphone and then synchronizing the data can lead to the appearance of double contacts on Android. As a result, the book of numbers can grow to indecent sizes, and the user will have to constantly wade through the jungle of identical contacts. This problem can be partially solved using the function of merging duplicates:
Step 1 . Launch the Contacts .
Step 2 . Press the Menu button on your smartphone.
Step 3 . Click the "Advanced" button.
Step 4 . Click the Merge Duplicates button.
Step 5 . The OS will offer to find duplicate contacts and merge them. Click the Merge button to start this operation.
Removing duplicate numbers
To eliminate the repetition of the same contact details, you can use the option provided by Android OS by default. It works on almost all devices on the platform and is free.
To do this, use the “Merge duplicates” option, located in the “Android” menu. Merge identical contacts into the same account if you have two phone numbers saved for the same person with the same name. This is done as follows:
- Open the Contacts apps.
- Click on the three vertical dots to access settings settings.
- Select the Suggested Duplicates option.
- Android will show you all duplicate contacts. Below each duplicate item, you will be able to see a “LINK” option and you just need to click on it.
You can then use the Suggested Merges option. This option will add two phone numbers to one contact if they are signed by the same name. If you have contacts saved in multiple Google Accounts, this option will link both accounts and phone numbers. And the next time your phone syncs contacts, the problem of duplicate contacts will not arise.
To use the Android Phone merge feature, follow these steps:
- Open the Contacts app.
- Click on the three vertical dots to access settings settings.
- In Settings, click on the “Suggested Merges” option. Now Android will show you all the contacts that you can merge. If you want to merge specific items, simply click on the merge option under one of them.
- And to merge multiple contacts at once, tap the up arrow icon that appears in the top right corner of the screen.
If you are using an older version of Android, these options may not be available. In this case, you will have to delete duplicate contacts manually.
How to Delete Duplicate Contacts on Android
Google tools or third-party applications such as Duplicate Contacts . Let's consider both options.
Google Contacts
Step 1 . Launch your browser and go to contacts.google.com.
Step 2 . Google account information .
Step 3 . Click the "Find Similar Contacts" button.
Step 4 . Select duplicate contacts and delete them.
Duplicate Contacts
Step 1 . Install and launch the Duplicate Contacts .
Step 2 . The program will scan your contact list and show whether there are duplicate numbers on your smartphone.
Step 3 . Select and remove duplicate contacts.
There is nothing to demagnetize there!
In fact, a SIM card is one of the types of processor-based “smart cards” that differ depending on the supported mobile communication system. Next we will talk specifically about SIM cards working in our GSM networks.
Today, there are four standard sizes of SIM cards:
When you buy a card now, you get a chip on a universal piece of plastic that meets all these standards. And whatever the form of SIM cards, they have one thing in common: this is a real computer in miniature . A small chip with six contacts (previously there were eight) contains almost the same components as in a regular system unit. The SIM card contains:
Of course, there is no battery or any kind of human interface, they are simply not needed. But the small SIM card has its own operating system, which allows you to store vital data for the phone, user files (contacts, SMS) and even Java applications.
Due to the desire to reduce the cost of components, operators issue cards with a minimum of memory, but technically, gigabytes of information can be stored on SIM cards. Of course, no one needs this, there are no terminals operating in this mode, and it’s easier to operate a large amount of data via USB.
Do you understand now? This is a board with contacts. There are no magnetized elements here. The principle of data recording has nothing to do with magnetism. Accordingly, there is nothing to be demagnetized.
How to clear a SIM card of contacts
In addition to deleting SMS messages, many people do not know how to delete contacts from a SIM card, and the following questions have also been received. The tips are too short for a separate article, so I’ll paste them into this one.
How to clear SIM card numbers:
Despite the shortcomings, this option for storing contacts is convenient for many users. However, sometimes it may be necessary to delete some entries.
How to quickly clear your smartphone of unnecessary contacts
It’s hard to imagine today, but earlier (and to be precise, in the early 2000s), the address book memory of most phones was limited to 150-200 contacts. Over time, the number of memory cells grew until this limitation was completely removed. And today our smartphones can have several hundred different phone numbers. Open your phone book and, with a high degree of probability, you will immediately come across subscribers whose data you do not need (or maybe you have already completely forgotten who they belong to). If so, then it’s time to clean up your contact list!
How to get rid of duplicates in a notebook
Unfortunately, you can't do this from the contacts app itself. To do this, you need to log into the web version of the Google Contacts service and right on the service page you will see the “Similar Contacts” tab. Press it and the service will give you all contacts that have duplicates. Next, you can either delete duplicate contacts or combine 2 duplicates into 1 full contact.
You can discuss this and other articles in our official Telegram chat.
News, articles and publication announcements
Free communication and discussion of materials
iPhone is not my smartphone. I realized this almost immediately after I transferred all my data to it from the old Honor View 20, but I decided not to cut corners and use it for a while. After all, a habit is not a constant value; it can change. But, as it turned out, the essence of my complaints about the iPhone does not come down to my own habits, but to the objective shortcomings of both iOS and the hardware of Apple branded smartphones, which are inferior to Android devices.
Data recovery
If the user accidentally (or quite deliberately) deleted important information from his phone book, then you can try to restore deleted contacts on your Samsung phone. To do this, you will need to use your Google account information. The recovery option will only work if the user has set up synchronization with a Google account. If the data was not moved to the user profile, then, unfortunately, it will not be possible to restore deleted contacts on Samsung. You will have to ask your interlocutor for information again.
In order to restore deleted contacts on Android-Samsung, you will need to follow the instructions:
- Go to the site that contains information from the synchronized address book, i.e. at contacts.google.com.
- Carry out the authorization procedure: enter the name of your Google account, as well as the password, and then click on the interactive blue “Next” button.
- On the left side of the monitor you can find a special menu that contains available user options. To view the list of deleted contacts on Samsung, you need to click on “More” and select the “Cancel changes” section.
- A notification window will appear on the display: “Cancel changes. You can restore any version of the deleted data list within 30 days.” Thus, if a friend’s or acquaintance’s phone number was deleted more than a month ago, then it will not be possible to return the information using hardware. You can also choose to recover data deleted a day or an hour ago. After the required period of time for restoring information has been set, you need to tap on the “Confirm” option.
- A window with information will appear at the bottom of the screen. Done: deleted contacts from your Samsung phone will be restored.
Obviously, even after cleaning the device, the phone book information continues to be stored on the manufacturer’s servers for a month. Therefore, you need to delete information about your interlocutor not only on Samsung (i.e. physically), but from your virtual Google profile.
Note! If the user did not manage to set up the Google account synchronization option, then to restore data you will need to use one of the special utilities that allows you to quickly return a deleted Samsung contact. The disadvantage of this method of returning phone book information is the need to use Root rights.
So, to recover contact list data, the GT Recovery application, which is available for download on the Play Market, is suitable. You just need to download the program, click on the “Recover deleted…” option and follow the instructions on the screen. The GT Recovery utility has a simple and intuitive interface, but requires “Superuser” rights.
In addition, there are applications that will allow you to find deleted contacts on your Samsung phone via a computer. One such utility is Coolmaster: an application designed specifically for recovering SMS and numbers on Android phones. The application is also only suitable for rooted devices, but it can work without root (but it is not a guarantee that data recovery on the smartphone will be successful).
To use the Coolmuster application, you must perform the following manipulations:
- Go to the official website of the application.
- Select your operating system type from the list of available options on the top vertical toolbar. Tap on the interactive “Download” button, install it on your PC and connect to your laptop via a USB cable.
- The application will automatically launch after installation on the PC is complete, i.e. after the user clicks on the interactive “Done” button.
- Before connecting your smartphone to your computer, you must enable the USB debugging function. To do this, go to the device settings, find the “For Developers” section, scroll down to the “USB Debugging” subsection and click on the specified debugging option.
- Confirm the action in the window that appears: click on “OK”.
- After connecting the device to a laptop or computer using a USB cable, the Coolmaster program will display the smartphone icon, as well as key information about the gadget. Using the “Select all” tool, you will need to select the type of data to be restored: “Contacts” or “Messages” (check the appropriate box). To move to the next stage of recovery, you need to click on the interactive “Next” button located in the lower right corner of the application.
- Wait for the information generation procedure to complete, then change the position of the “Only display the deleted items” switch to “ON” and click on the interactive “Recovery” button, which can be found in the lower right corner of the display.
- Save the received information on your PC and transfer it to the device’s memory.