Some users are looking for information on how to remove the Windows activation message that appears on the computer desktop. After turning on the PC, the message “Windows Activation” appears on the screen in the form of a watermark in the lower right corner of the Desktop.
The activation reminder annoys many users, so they want to remove the Windows watermark from their computer screen to hide this message.
If this operating system was at one time updated from a previous version of Windows, then after reinstalling the OS, automatic activation will occur, so this message will not appear on the PC monitor. In another situation, the user independently installs a new operating system on his computer.
After installing Windows, if the user does not activate the operating system in time, Microsoft reminds you that it is necessary to activate the OS. For example, in the Windows 10 operating system the following message is displayed: “Windows Activation. To activate Windows, go to Settings.
A non-activated Windows operating system will continue to run on the computer. Personalization settings will not be available to the user.
Users have a question about how to remove the inscription from the “Windows Activation” screen in order to hide this notification from the Desktop. There are several ways to remove the Windows 10 activation message. This can be done using the operating system or using third-party software.
Please note that by using one of the instructions from this guide, you will only remove the message about the need to activate Windows from the computer screen, and the operating system itself will not become activated. To activate the OS, you must enter a valid product key.
In this article, we will look at several ways to remove the “Windows Activation” watermark. Is it possible to remove the Windows 10 activation message permanently? This is possible if you activate the Windows operating system with a genuine product license key. This is the most reliable way.
Users should keep in mind that so-called “major” system updates are periodically released, during which the OS is reinstalled by updating to a new version. After installing updates, system activation settings are reset to default settings.
Microsoft is constantly releasing new changes for the Windows 10 operating system, so the methods described in this article may not always work.
How to remove the inscription Activate Windows in Universal Watermark Disabler
Using the free program Universal Watermark Disabler (UWD), you can remove watermarks displayed on the screen in the operating systems Windows 8, Windows 8.1, Windows 10.
The Universal Watermark Disabler program hides Windows activation messages, as well as other messages displayed on the Desktop. For example, Windows 10 Insider Preview displays a trial version of the product even though the system is activated. The application will remove this label, release version and build number.
Features of the Universal Watermark Disabler program:
- removing any watermarks in Windows;
- support for any operating system languages;
- the application does not change system files, all changes occur in the registry;
Download the Universal Watermark Disabler program from this link to your computer from the official website of the author of PainteR, developer of the Winaero Tweaker program.
You may also be interested in:
- 7 ways to find out your Windows product key
Follow these steps:
- Unpack the Zip archive with the program (this can be done using the system tool).
- Run the “uwd” file as administrator, in the “Universal Watermark Disabler” window, click on the “Install” button.
- A warning window prompts you to close all programs before logging out. Click on the "OK" button.
- Sign in again, and then restart your computer.
After logging in and rebooting, the Windows activation notification or other watermarks displayed by the operating system will disappear on the Desktop.
Reasons for the appearance of a watermark asking for activation
Immediately after installing Windows, it is recommended to activate the operating system and confirm your legal rights to this version. This eliminates the use of pirated Windows. At the same time, the installed product key is checked against real Microsoft keys.
If you don’t confirm anything, then, for example, the test Windows 10 will work in test mode for 30 days, and then it will stop starting. This will not happen with an activated licensed version.
However, if the activation procedure is not completed, then every time you start the non-activated operating system will remind you of itself. A pop-up window with a test will definitely appear in the lower right corner of the computer monitor. The notification looks like a watermark. You can delete the reminder.
Reasons for the appearance of watermark:
- Test Windows is running;
- a pirated copy has been installed;
- The computer user forgot to activate the licensed Windows.
An inactivated Windows version does not affect the quality of the PC. However, if a reminder window regularly pops up and annoys users, the watermark can be removed. If you remove the watermark incorrectly, problems may occur.
Nuances that are recommended to be taken into account when disabling reminders:
- first create a restore point (to roll back to the previous configuration);
- transfer the necessary files to the flash drive;
- remove the watermark using the recommended methods.
Important! If you don't follow these recommendations, deleting a small reminder can lead to big problems.
How to remove the inscription Activate Windows in My WCP Watermark Editor
The free My WCP Watermark Editor program was developed to remove watermarks on Windows 8 and Windows 8.1 operating systems. The program can not only delete inscriptions, but also edit watermarks displayed on the Desktop.
Follow these steps:
- Download the My WCP Watermark Editor archive to your computer from here.
- Unpack the archive and then run the program.
- In the “My WCP Watermark Editor” window, check the box next to “Remove all watermark”.
- Click on the “Apply new setting” button to apply the settings.
- Restart your PC.
In the Windows 8 or Windows 8.1 operating system, watermarks will disappear from the Desktop.
Getting the key
If you see the message “Activate Windows 10”, the most reliable option is to enter the license key. There is no need to buy it; there is a free application to solve this problem - KMSAuto. After installing this software, you should set a schedule and at certain time intervals it will select the key and enter it into the operating system. You can also activate office programs.
So, to remove the “Windows 10 Activation” message, install KMSAuto.
After installation, open the program.
On the “System” tab, you have access to the task scheduler, where you will need to create a new task and indicate what needs to be activated.
In the main window, click “Activation” and select the type of software product.
Wait until the operation is completed and restart your computer.
This is the most reliable way to solve the problem: “Windows 10 Activation” - how to remove the inscription. Thanks to it, you will forget about many situations related to the restrictions of using an unlicensed operating system and get the professional version with all its capabilities.
We advise you to further read the article about the Windows 10 Upgrade Assistant - a special program that helps users install the latest system update.
Disable activation notification in Windows settings
You can try disabling the activation requirement message in Windows 10 settings:
- Right click on the screen.
- From the context menu, select Display Options.
- Enter the Notifications and Actions section.
- In the Notifications option, uncheck the boxes next to “Show the Windows Welcome screen after updates and sometimes when you sign in to tell you about new features and offers” and “Receive tips, tricks, and tricks when using Windows.”
How to remove the activation window and disable pop-up notifications
You can remove the activation window and turn off notifications in Windows 10 using the built-in Notifications and Actions service.
This service includes the following features:
- Allows and disables pop-up notifications from Windows 10 and third-party programs;
- allows you to show the system alerts about various events and updates received from the network;
- Using pop-up menus, it speeds up the process of removing removable media, activating and disabling various adapters.
Using this service, you can turn off annoying notifications, block them, and turn off the notification center.
Disable Action Center
In Windows 10, you can disable the Action Center in three different ways:
- using changes to Windows 10 settings;
- by editing the Windows 10 registry;
- changing system group policies.
Disable notifications by changing the settings
This is the fastest way to prevent unnecessary notifications from appearing on your display. It is performed in several stages:
- In the Start menu, click the Settings icon or line.
- In the window that opens, go to the “System” tab. In the “Options” panel, open the “System” tab
- Click on the “Notifications and Actions” setting.
- Set the switches to the off position for those items that you consider unnecessary. Turn off notifications on the lock screen, messages about new options, offers and tips, etc.
In the tab we turn off unnecessary notifications
- In the “Notifications” sub-item, be sure to toggle the “Show notifications from applications and other senders” switch.
Be sure to disable the line “Show notifications from applications and other senders”
- This should cause the Windows 10 activation reminder to stop popping up when you start your computer.
Video: Disabling notifications by changing Windows 10 settings
Disable pop-up notifications using the Registry Editor
This method is suitable for users who already feel quite confident working in the Registry Editor. Changes that need to be made to the registry and disabling alerts require the following steps:
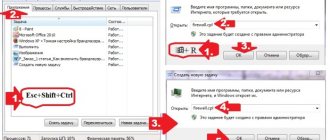
- Right-click the "Start" button and select "Run".
- In the “Run” panel that opens, type the “Regedit” interpreter, which launches the editor. Click OK. In the panel, enter the command “Regedit”
- Using the standard registry editor, go through its branches to the HKEY_CURRENT_USER\Software\Microsoft\Windows\CurrentVersion\PushNotifications branch.
- In the frame on the right, using the right mouse button, in the drop-down menu, select creating a section “DWORD Value (32-bit)” for the 32-bit version of Windows 10 or “QWORD Value (64-bit)” for the 64-bit version.
- Name the used setting parameter "ToastEnabled".
- Enter “0” for the value in brackets. In the “Registry Editor” we set new parameters
- Restart Explorer.
Pop-up notifications are now disabled.
It should be taken into account that in the latest versions of Windows 10 developed, regardless of the user’s wishes, the settings for turning off notifications in the registry may already have been created. This can only be tracked during a clean installation from a licensed distribution.
Disable notifications when general group policy changes
- In the “Run” panel you need to write “Gpedit.msc”. In the “Open” field, enter the command “Gpedit.msc”
- In the “Local Group Policy Editor” that opens, go to the “User Configuration” - “Administrative Templates” directory.
- In the “Start Menu and Taskbar” directory, select the “Remove notifications and action center icon” option and open its “Properties” with the right mouse button.
- Select "Enabled" and save changes. In "Properties" delete notifications and the notification center icon
- Restart Explorer. The activation message should disappear.
Video: Disable Notification Center and Toast Notifications
Removing watermarks and notifications in Windows 10 is a fairly easy process. At the same time, it is necessary to clearly understand that they were not developed by chance. It is quite possible that activation for some reason did not go through or there was a failure in the system files. A watermark that was previously removed as annoying will not appear. This may lead to the fact that at the most inopportune moment you will not be able to start the system and will see a warning on the display about the end of the period allotted for activating Windows 10. You will need to waste time searching for the key, which, as always, will not be at hand. Therefore, you need to think carefully about whether it is worth removing watermarks and inscriptions about the need for activation.
How to remove the Windows 10 activation watermark in the Registry Editor
Making changes to the system registry: one of the ways to remove the OS activation message from the PC screen.
Do the following:
- Press the "Win" + "R" keys.
- In the Run dialog box, type "regedit" (without the quotes), and then click OK.
- The Registry Editor application will launch.
- In the Registry Editor window, follow the path:
HKEY_LOCAL_MACHINE\SOFTWARE\Microsoft\Windows NT\CurrentVersion\SoftwareProtectionPlatform\Activation
- Right-click on the “Manual” parameter and select “Edit...” from the context menu.
- In the “Change DWORD (32-bit) parameter” window, in the “Value:” field, set “1” (without quotes), click on the “OK” button.
- Similarly, change the value from "0" to "1" (without quotes) for the "NotificationDisabled" parameter.
- Enter the registry key:
HKEY_LOCAL_MACHINE\SOFTWARE\Microsoft\Windows NT\CurrentVersion\SoftwareProtectionPlatform
- Change the value of the "SkipRearm" parameter to "1" (without quotes).
- Open the registry branch:
HKEY_CURRENT_USER\Control Panel\Desktop
- Change the value in the "PaintDesktopVersion" parameter from "1" to "0".
- Enter another registry branch along the path:
HKEY_LOCAL_MACHINE\SYSTEM\CurrentControlSet\Services\svsvc
- In the "Start" parameter, change the value to "4" (without quotes).
- Restart your computer.
Standard method
Let us immediately note that the standard method of removing the activation message may not work on some computers. It all depends on the Windows build. If this is some kind of amateur assembly (of which the Internet is full today), the method may not work. But it’s worth a try - it’s not difficult and doesn’t take long:
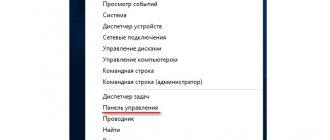
- Go from the Start menu to Control Panel. If you have Windows 10, enter the query “Control Panel” in the system search bar (located next to “Start”), then click on the icon that appears.
- Go to the "System and Security" section.
- Then open the System and Security section.
- In the left part of the window, click on the link “Change settings for the Security and Maintenance Center component.”
- In the "Security Messages" section, uncheck the "Windows Activation" box.
As you can see from the image above, the “Windows Activation” item is not active, i.e. it is impossible to click on it. This is usually observed in already activated (i.e. purchased) systems. But it also happens in cases where amateur builds of Windows are used. If in your case it is impossible to uncheck the box, proceed to the next section of the article.
Where to view system data
The problem has a solution, since it is not difficult to find out the validity period of a Windows 10 license, which means you can take timely measures. For information, minimize all windows and open the “This PC” icon windows.
In the area below you will see all the information, including when the legitimacy of using the OS expires or its absence as such.
We have already told you what to do if your Windows 10 license expires. It should be remembered that the home version does not expire, and problems arise for corporate and illegal users. If you want to know how to turn off notifications on Windows 10, read our other article on the site.
In this situation, we can give advice: if your Windows 10 license expires, the easiest way is to purchase a new one. This is especially true for organizations. Remember that fines for using unlicensed software are much higher than the cost of the key. In addition, you may lose access to your folders altogether due to sanctions or a low-quality homemade hack.
One of the common tips on how to remove a message is to update to ten for people with disabilities. This was valid until the last day of 2022. On the first day of 2022, the promotion was closed, which continues until June.
How to hide the activation message via the command line
- Launch the command line in the same way as in the previous option, or by simultaneously holding down the “Win + R” buttons and enter service.msc in it.
- In the drop-down list, find the “Software protection” item, right-click on it and select “Stop”.
- Open Explorer and go to the Windows directory, and then to system32. In this directory, identify and delete all files of the form C7483456-A289–439d-8115–601632D005A0.
- Return to the “Software protection” item, right-click to bring up the menu and click “Run”.
- Reboot the system.
