Method 1: Physically checking the headphones
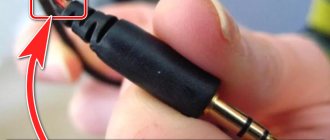
The first priority is to check the wire, plug and headphones themselves. Make sure that the cable, headphones and their speakers are not physically damaged. After this, inspect the connectors on the wire and clean them of any debris or dust, if present. Do the same with the port where you connect the equipment. Even slight contamination can lead to noise and interference due to improper connection of contacts.
If, after a visual check and cleaning of the connectors, the noise still does not go away, proceed to the next test method, which will avoid the need to edit system parameters.
Recommended Precautions
Using headphones is not a completely safe activity. In some cases, they can pose a risk to health and even life. Read below about what not to do.
- Excessive listening to music through a headset at high volume can lead to hearing loss, both temporary and permanent.
- Also, poor sound quality has a negative impact on the hearing organs.
- Using a headset while walking or driving can result in injury and injury in the event of various road accidents, since the headphones interfere with timely reactions due to dull hearing.
- Tangled wires increase the likelihood of your smartphone being lost or damaged while traveling.
So, in order to protect yourself physically and financially, when listening to music (other audio files) through headphones, you should be vigilant and control the situation, especially when it comes to the street. In addition, to preserve hearing and health, you should limit the time such stress on the body and choose a high-quality headset . What to do if extraneous noise appears in your devices while listening to audio content from a computer was described step by step and in detail above.
Method 2: Changing the headphone port
This test method only applies to computer owners, since laptops have only one headphone jack. If you connected the playback device through the port on the front panel of the case, try plugging it directly into the motherboard, and vice versa. This action will help you understand whether the noise is a problem solely with the connector.
Method 3: Run the troubleshooter
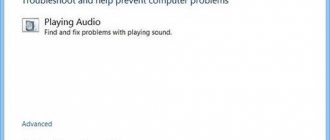
Sometimes problems with the playback device are associated with problems with the operating system. This may be the lack of a driver update or the functioning of virtual hardware that was manually added by the user. It is difficult to find the cause of noise in headphones on your own, so it is recommended to run the troubleshooter first.
- To do this, open the Start menu and go to the Settings application.
- Click on the tile called "System".
- In the new window, go to the "Sound" section.
- Under the speaker volume control slider there is a “Troubleshooting” button, which you should click to start this process.
- Wait for the scanning of all connected devices to complete.
- The next step is to select the speaker that is having problems. If the headphones are selected as a separate device, mark them with a marker and proceed further.
- Wait for information about the errors found and follow the recommendations to see if this will somehow affect the elimination of noise in the headphones.
How to remove background noise in wireless headphones
Before you remove the hiss in your headphones, you need to study all the points characteristic of a wireless headset. Many models produce background noise. In this case, the game or music will sound quiet or completely absent.
This phenomenon cannot be called a breakdown, but rather a characteristic feature. This will help you check:
- checking headphones on other devices;
- studying reviews of other users about a specific model.
To stop the device from making noise, connect wireless headphones to the audio codec. For this:
- find out the type of codec supported by the headset;
- activate it using a proprietary application;
- activate the “Developer Menu”;
- make a choice in favor of a suitable codec.
This will help eliminate white noise in the headset.
Method 4: Disable enhancements
One of the most common causes of noise in the playback device is the huge number of activated enhancements or their incorrect operation. If the enhancement was manually configured, it is likely that this is what caused you to hear the noise.
- In the same “Sound” menu, this time click on the “Device Properties” line in the “Output” block.
- Find the “Related settings” block and call “Advanced device properties”.
- Go to the Enhancements tab and check which effects are currently enabled. Disable them all by unchecking the boxes next to them.
- Instead, you can use the “Disable all sound effects” option.
We will separately analyze the instructions for users who have installed third-party software on their computer to control headphones or who are working with software from peripheral or sound card developers. Let's do this using the example of a graphics application from Realtek.
- Launch the sound control program through the taskbar if it is minimized, or through the executable file by finding it in the Start menu or in Explorer.
- Select the tab with the speaker you are using and go to Sound Effect.
- Make sure there are no EQ or Ambient profiles. If the program supports other effects, reset them too, and then check the operation of the headphones.
Name the parts of the computer that light up
This can also happen: crackling noise in the headphones from PC components . We turn off everything that can be turned off one by one so that the computer can work. We start with DVD drives (and the like), hard drives (except the system drive). You can disable the video card if the processor has a video chip (switch video processing to it and check). Or we start some sound and listen with the “picture” turned off.
This may also be due to poor connections, grounding and many other reasons. If there are wires “hanging” inside the case near the boards, try to move them away. Perhaps they are phoning because of the “Chinese” isolation.
Method 5: Changing the sample rate
In the sound card driver settings for the speaker, you can set one of the sampling rates. This option controls audio processing and may not work correctly if you select an option that is not compatible with your hardware. This theory can only be tested by changing the parameter, which happens like this:
- Go to the “Device Properties” menu (how to do this is shown in the first step of the previous method) and open “Advanced device properties”.
- In the new window, switch to the "Advanced" tab.
- Expand the drop-down list with all available default format options and select one whose sample rate is slightly lower than the current one.
Sound problem on laptop: possible causes and how to fix them
Clear sound when using a laptop is an important element, as it provides the ability to watch movies, TV shows, and listen to music. If there is hissing or wheezing, this indicates a serious audio problem on any laptop, which can be dealt with in several ways.
What actions to take in case of sound problems
Why does the sound wheeze?
If there are problems with sound, you need to analyze them first. You should eliminate all possible causes of such wheezing, for example, turn off and turn on the speakers or connect the equipment to third-party gadgets.
Methods for disabling audio effects and additional audio tools
Volume mixer
In the presence of annoying sounds, it is important to get rid of elements that may cause interference - effects for audio transmission. This process is carried out in the following way:
- You need to use the mouse to use the sign indicating sound in the lower right panel.
- In the window that opens, select the “Sounds” section in the new OS version or “Playback device” in the old OS version.
- After identifying the device that transmits sound, you need to right-click on the picture with the corresponding device and select “Default Use” in the pop-up window. This action alone should fix the problem.
- If there is no result, you need to turn off “Additional sound tools” in “Properties”.
- If there are “Additional features”, click “Turn off all effects” and then fix the adjustments.
Specifics of changing communication parameters in the audio parameters of Windows 10
Adjusting the sound using the control panel
It is also important to exclude the moment when hiss appears from audio effect sources; you need to turn them off. To do this, follow a few simple steps:
- by clicking on “Start” with the mouse button, select “Control Panel” from the pop-up list;
- then select the “Sound” section in the parameters;
- After this, a window will appear, in the top panel of which you need to enable “Communication”, and then “No action required” and apply “Ok”.
When the changes are saved, you can check the result of the work; if the wheezing sound on the laptop does not disappear, you need to try another option.
Invalid playback format as a result of Windows 10 audio problems
Audio playback tab
If your laptop has an outdated built-in sound card, then you need to perform several steps to resolve the problems. To go to the playback format settings:
- use “Sound” in the control panel;
- go to the properties of playback devices;
- in the pop-up window, go to device properties;
- Next you need to apply the additional settings section;
- after that, the "Default Format" is embedded in 16-bit, 44100 Hz CD;
- As a result, all adjustments are recorded.
Important! This process can be performed on any device with an old sound card, since support for the corresponding program exists on almost every one.
– sound wheezes, sound problems on Windows 10
Search for drivers
If the sound notes start to wheeze on Windows 10, you need to replace the drivers or use the window behind “Sound Devices”.
When going to the panel you need to select:
- default format;
- uncheck all the boxes regarding access to the exclusive mode;
- Click on “Ok”.
Important! Such actions help, but not always for a long period.
Solving the problem with crackling sound by updating drivers
Driver Update
After installing a new operating system, the sound often crackles, which means that appropriate drivers are needed to reproduce it properly. To solve the problem, you should follow the following sequence of actions:
- use the right mouse button to go to “Start” and “Device Manager”;
- then double-click the same key to open the “Sound, gaming and video devices” section;
- a list of sound devices will pop up, you need to mark the desired name and apply “Update drivers” in the pop-up window;
- in the new window that opens, it is important to use the line “Search for drivers on this computer”;
- if the problem arose precisely as a result of installing the OS, then you do not need the previous section, but “Select a driver from the list of already installed ones”;
- click “Next”;
- an instrument with High Definition Audio support is determined;
- As a result of all actions, the laptop reboots and all completed operations are checked in action.
Sound hisses and crackles in Monopoly mode
Checking the Exclusive Mode Section
Sometimes, even after using the necessary drivers from the manufacturer’s official website, the sound on the laptop disappears. To understand this problem, you should initially examine the relevant section “Monopoly Regime” and see if permission has been given for its use.
To perform the check you should:
- enable the “Sound” column in the taskbar;
- in the window that opens, use “Playback device”;
- then use the left mouse button to display the device name and smoothly go to the “Properties” window;
- in the “Advanced” tab, check “Exclusive mode”;
- If available, uncheck all the boxes and click “Ok”.
Review of sound enhancement programs
Working with programs
In addition to independent actions, you can use developed programs that provide excellent audio sound to correct distortion of sound data.
Some of the most popular ones include:
- Sound Booster is the simplest and most convenient utility that works automatically after a user command. You need to enable “Autostart” for the program to start loading from the operating system. Additionally, you should adjust the volume to the required range.
- SRS Audio SandBox is a fairly simple program consisting of modules: 3D balance, 3D space, volume, optimization, speaker frequency.
- Audio Amplifier is one of the most popular programs for adjusting sound quality; to make adjustments, you should use Load File and move the slider to the required position. Based on the results, save the new data.
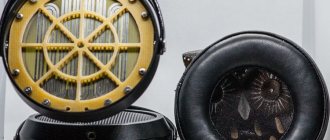
- Razer Surround - this program makes it possible to create surround sound; it can be used when setting up speakers for a cinema. Using it, the user can achieve various special effects from low-pitched bass to adjusting the sound and volume of the interlocutor.
To install the utility, you need to perform the following steps:
- in the browser field, search for the “Razer Surround download” program;
- go to the official website of the developer;
- press a special button that allows you to download the program for Windows;
- save the installation file in the desired folder, for example, on the “Desktop”;
- then launch the downloaded file in a convenient way using the left mouse button;
- Please note that all terms and conditions have been read;
- click “Next”;
- wait for the installation process to finish;
- After installation, create an account in the window that opens on the official website to use the program.
To create a program you need:
- go to the official website using the link provided by the utility;
- when you get to the site, you can configure its interface in a convenient language background;
- fill in the registration data in a special window and click on “Start”;
- select the appropriate item, click “Next”, apply the conditions;
- Confirm registration in your personal email by clicking on the link from the letter;
- after which you can log in to your account.
To work with the utility, you should perform the following steps:
Rules for using the program
- When starting to work with the program, you need to use “Start”.
- The program will instantly create a list of utilities connected to the laptop. The user must decide on the device due to which the sound is jamming.
- After creating the calibration process, you need to start it using the “Calibrate Now” button, and it is important to make sure that there are no sounds around the device.
- Next, you should test the installation in action using the “Test” program.
- After this, the connected audio tones playback device will work in the required range.
Important! The listed programs can be used as editing equipment, for example, adjusting bass, changing sound effects, trimming tracks.
– fix bad sound on a laptop
In this video, you can clearly view and listen to all the features of the described methods and the results of using new drivers or programs. The example given by the author can be used to enhance sound, get rid of inaccuracies and unspoken phrases.
Everything is done extremely quickly if the problem is only in adjusting the format or installing drivers, that is, in correcting OS settings.
Conclusion
When understanding the reason why the sound stutters, the owner of the equipment must initially identify the device that distorts the tonality and clarity. Take into account all the latest operations performed on the laptop.
Use installation of new drivers or adjust the settings format.
You can also use programs that will automatically adjust the process and provide the equipment with a deeper and more tonal sound.
Source: https://TechnoSova.ru/cifrovaja-tehnika/notebook/pochemu-iskazhaetsja-zvuk-na-noutbuke/
Method 6: Disable unused headset components
Windows supports connecting completely different speakers and headphones, so for all peripherals it provides a huge number of settings for their components, including a microphone, line-in and speakers. None of this is used in the headphones, so it's best to turn them all off to avoid annoying noise.
- Through the already familiar “Sound” section, you can go to the “Sound Control Panel” menu.
- Double-click your default speaker to open its properties.
- Go to the “Levels” tab and disable all additional components that are not used in this equipment.
Method 7: Disable microphone listening
This method is only suitable for those who use a microphone with headphones. The device's listening feature may affect noise as the microphone is active and picking up all sounds. You need to turn it off so that sounds from the microphone are not heard in the headphones.
- To do this, open the “Sound Control Panel” again.
- Switch to the "Recording" tab.
- Double-click on the line with the microphone you are using.
- On the “Listen” tab, find the “Listen to this device” item and uncheck it.
We are glad that we were able to help you solve the problem. In addition to this article, there are 12,719 more instructions on the site. Add the Lumpics.ru website to your bookmarks (CTRL+D) and we will definitely be useful to you. Thank the author and share the article on social networks.
Describe what didn't work for you. Our specialists will try to answer as quickly as possible.
Special programs for noise reduction
To make it easier to configure programs, you can use the user manual available on the website.
After the user has figured out why the microphone is noisy, you can install programs that support the function of eliminating background noise. Manufacturers of multimedia cards implement filtering of extraneous noise at the driver level. There are special shells that allow you to further adjust the parameters of the reproduced sound, or combine several streams into a single signal.
Reaper
The professional Reaper system is intended for studio use and is distributed on a commercial basis. The shell supports equalizer, tempo adjustment in the entire track or in part. The user can connect a synthesizer or a special Midi keyboard, scripts are provided (standard and written by the user). The shell is not suitable for domestic use and requires advanced qualifications from the user.
Realtek HD Audio
The package includes the drivers necessary to play music content recorded in various formats. The HD Audio utility is designed for built-in Realtek controllers and is adapted for Windows operating systems from version 7 and higher. Software noise reduction algorithms are supported, an equalizer function is implemented, the user can select several signal broadcast modes with the application of acoustic filters.
Voicemeeter
Voicemeeter, a free utility, allows you to combine multiple audio streams for subsequent transmission through VOIP applications. The shell automatically detects the equipment connected to the PC; a graphic multiband equalizer with support for channel management is provided. The utility provides signal capture, but recording through a microphone is not supported. The user can eliminate noise in the playback stream by suppressing a number of frequency ranges or turning off channels.
Samson Sound Deck
Samson Sound Deck software is based on military noise reduction technologies. The utility cuts off extraneous signals and ensures high-quality signal recording using budget acoustic equipment. The software works in the background, reducing the load on the computer's central processor and memory; the user expands the window to change settings. The utility is compatible with various headphone models, but maximum results are achieved when using Samson brand equipment.
What other reasons cause sound distortion in headphones and how to remove noise in budget ways without resorting to disassembling the equipment?