When working on systematizing and organizing text, the question often arises of how to create a table break in Word. This question is relevant when it needs to be done directly in a text file.
For long-term and convenient work with tables, it is easier to use MS Excel (Microsoft Excel), a program specially designed for this.
It is possible to continue dividing the table as long as there are at least two rows left in it. If there is only one left, you can add new ones, or not separate them, but create a new sign.
How to split a table in Word
Any version of Word has a universal way to break tables - through the menu.
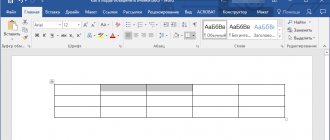
- Before breaking it, select an empty line in it using the left mouse button or position the cursor in front of the first word in the line.
- From the top menu, open Layout-Merge-Split.
You will receive a form divided into two parts, and the selected line (where the cursor was placed) will become the first line in the new table.
In some versions of Word, the names of the menu tabs may be different. For example, Table-Break or Layout-Breaks-Next Page. But the general meaning of how to do it will remain clear, the result will not change.
Full-featured PDF solution
The rise in popularity of PDF can also be attributed to the emergence of PDF editors. Working with PDF files and converting them to other formats has become much easier. One of the PDF editors that made this possible is PDFelement. It is an all-in-one PDF editor that allows users to easily perform all the necessary actions on PDF files. When it comes to a PDF editor, most people think of Adobe first, but unfortunately, it is quite an expensive program that is out of reach for many users. PDFelement is a top-notch editor that has all the features and quality of Adobe, but costs much less, making it the most cost-effective PDF editor available today. Let's look at the features of PDFelement.
PDFelement gives you complete control over your PDF files. This gives you a lot of options to work with your PDFs. You can create PDF from scratch, convert it to other document formats such as Word, Excel and others. Among many other tools, the program is equipped with an optical character recognition function that allows you to convert scanned PDFs into editable, searchable files. Other features:
Split using Word keyboard shortcuts
We learned how to split a table in Word using the menu. The same action can be performed using the keyboard key combination CTRL+SHIFT+ENTER:
- Place the cursor on the line that will be the first in the new table.
- Press all 3 keys together.
- The result will be a division into two parts, between which there will be an empty line.
- In versions of Word from 2007 to 2016, it is convenient to use other hotkeys.
- Place the cursor on the line before which you want to split the table.
- Press Ctrl+Enter. A gap will appear.
The peculiarity of this key combination is that the first part will remain in place, and the second, after division, will move to the next page. Therefore, use the method when you need to divide parts of the table into different sheets. It's faster and more convenient than moving objects with the cursor.
Benefits of PDF documents
Anyone who downloads, uploads or distributes documents online will encounter PDFs sooner or later. If you work in an office, it is almost impossible to do without using PDF files, because... Due to its properties, this format is used very often in work. PDF offers unprecedented benefits to users with a wide variety of needs. Let's start with the excellent security features that keep your PDF safe. For example, a PDF file, unlike Word documents, cannot be edited by an outside user. This feature is very useful - especially if you publish legal documents or scientific articles and transmit them over the Internet. In addition, they are not infected with Trojans or viruses.
Another important quality of PDF is that it can be viewed in most browsers. Clicking a PDF link will easily open it in any browser, which is another reason why many users choose this format.
How to split a table in Word 2003
In Word 2003, the menus and tab names are different from younger versions. To split a table into two parts, follow the algorithm:
- Point the cursor at the line that will become the first line after the division.
- Expand the Tables tab. Find the Split option.
- Apply the command.
Now you know how to break a table in Word 2003.
Crop an image in the office
Crop image margins
- Use Insert
>
Picture
to add a picture to an Office file (such as a Word document, PowerPoint presentation, or Excel workbook). - Right-click the image. A pop-up menu appears with two buttons directly above or below the menu. Trimming
- one of the buttons.
- Select harvest button.
Black crop marks appear at the edges and corners of the image.
- Crop the image by doing one of the following:
Pull inward on the side trim handle Trim two adjacent sides at the same time Pull inward on the corner trim handle Uniform cutting on two parallel sides at once Hold down Ctrl and drag the side crop handle inward You can also expose the image or add margins around the image by dragging the crop handles outward rather than inward.
- (Optional) To change the position of the cropping area, either change the cropping area by dragging the edges or corners of the cropping rectangle, or move the image.
- When you're done, press Esc or click anywhere in the document outside of the image.
Note.
Crop tools are not available for shapes, but in Office 2010 and later, you can resize a shape and use the
Edit Points
to achieve a crop-like effect or to customize a shape. For more information, see Using Edit Points to Edit or Crop a Shape .
Trim to a shape, such as a circle
See Crop an image to its shape.
Other types of crops
Select a title below to open it and view detailed instructions.
Cropping an image to a standard photo size or aspect ratio makes it easy to fit into a standard picture frame. You can also use this tool to preview how an image will fit a specific aspect ratio before cropping.
- Use Insert
>
Picture
to add a picture to an Office file (such as a Word document, PowerPoint presentation, or Excel workbook). - Click on the picture.
- Click Picture Tools
>
Format
and in the
Size
, click the arrow under
Crop
. - From the menu that appears, select Aspect Ratio
, then click the ratio you want.
A crop rectangle will appear showing how the image will look when cropped at the selected aspect ratio.
- If desired, adjust the crop area using the crop handles as described in the "Cropping an Image" section.
- When you're done, press Esc or click anywhere in the document outside of the image.
After you crop an image, the cropped areas remain part of the file and are hidden from view. You can reduce the file size by removing the cropped areas from the image file. This also helps prevent other people from viewing parts of the image that you have removed.
Important:
If you delete the cropped areas and later change your mind, you can click
the Undo
button to restore them. The deletion can be canceled until the file is saved.
- Select the image or images from which you want to remove cropped areas.
- Click Working with drawings
>
Format
, and in the
Customize
click
Compress Images
. A dialog box with compression options will appear.If you don't see the Picture Tools
and
Format
, make sure you
select
an image. You may have to double-click the image to select it and open the
Format
.
Also, if your screen size is reduced, you may only see the Compress Images
. - In chapter Compression options
Make sure the
Remove cropped areas from images
.To remove crops only for the selected image or images, rather than all images in the file, select the Apply to this image only check
.
If necessary, select Resolution
.
- Click OK
.
See also
Insert pictures
Add a picture to a Word document
Reduce image file size
Use Word Layout Options to Move Images
Wrap text around images in Word
Crop image margins
- Use Insert
>
Pictures
to add a picture to an Office file (such as a Word document, PowerPoint presentation, or Excel workbook). - Click the image, then click the tab Image format
on the toolbar ribbon.
- On the tab Image format
select
Crop
.Black crop marks appear at the edges and corners of the image.
- Crop the image by dragging any crop handle inward. If you drag one of the corner handles, it will trim two adjacent sides at the same time.
- Click to the side of the image to see the cropped image.
Note.
Once you crop an image, the cropped portions are hidden but remain part of the image file. To permanently remove the cropped portion and reduce the image size, see the section below on this page called Removing cropped areas from an image.
Trimming to a specific shape
See Crop an image to its shape.
Remove cropped areas of an image
Even after parts of an image are cropped, the cropped parts remain as part of the image file. You can reduce the file size by removing crops from the image file. This also helps prevent other people from viewing parts of the image that you have removed.
Important:
Deleting cropped areas of an image cannot be undone. Therefore, you should only do this after you are sure that you have made all the necessary crops and changes.
- Click the image or images from which you want to remove cropped areas.
- On the tab Image format
Click
Compress Images
.(If you don't see the Image Format
, make sure you select an image.)
- Check the box Remove cropped areas of images
.
To remove crops from only the selected image or images, rather than all images in the file, select Selected Images Only
.
See also
Insert images in Office for Mac
Move, rotate, or group an image, text box, or other object in Office for Mac
Change the size of a picture, shape, text box, or WordArt
Control text wrapping around objects in Word for Mac
In Word for the web and PowerPoint for the web, you can perform a simple image crop—cut off unwanted areas of the image. However, only desktop applications can remove cropped areas from an image.
Crop image
- Right-click the image and select Trim
in the toolbar floating above the image.
Crop option in Word
Crop option in PowerPoint
- Hover your mouse over one of the black crop handles that appear around the edges of the image.
When you do this, your mouse pointer will look something like this:
- Corner trim handle:
- Side trim handle:
- To trim each side, drag the black crop handle inward.
- When you're done cropping, right-click the image again and select Trim
to save changes.
.
Universal sophisticated separation method (2)
Users who want to master all Word tools will find a more complicated method useful. Sequence of how to make a table break:
- Place the cursor on the line that should be the first after the division. If the cells are already filled, the cursor should be positioned before the first word.
- Open the Insert-Pages tab and apply a page break.
The table will be divided in Word with parts on different pages.
How to write a continuation of a table on the next page
In order for the two parts of the plate to be on different sheets, you need to use the already mentioned keyboard shortcut ( Ctrl
+ Enter
).
You can insert a break and move it to a new page in another way: in the tab "Insert"
In the
“Pages”
, click
“Page Break”
.
Typically this method is used to start a new section in the text. If after this you need to return the second plate to the previous sheet of the document, use Backspace
or
Delete
.
Method No. 2
Using the clipboard in Word
- On the second table, you need to move the cursor over the cross for moving the table.
- Right-click on it.
- Select the “copy” or “cut” menu item.
- Place the cursor under the first table.
- Click the right mouse button.
- Select the “paste” menu item.
Note! For the same method, you can use keyboard shortcuts instead of mouse buttons:
- (Ctrl + C) - copy;
- (Ctrl + X) - cut;
- (Ctrl + V) - paste.
Important! If the number of columns of the second table is equal to the number of columns of the first table, then the table will be adjusted to the size of the first table.