Automatic screen dimming is a useful computer feature that helps you adjust the brightness depending on the lighting level indoors or outdoors without any human intervention. Sometimes this is very annoying, so users are looking for instructions on how to disable auto-brightness in Windows 10 once and for all, so that turning the lights on and off or moving the laptop screen does not in any way affect the set brightness level of the monitor. It is necessary to take a closer look at what to do if the screen changes brightness automatically (Windows 10) and how to deal with it.
Why doesn't the brightness change on the computer?
If the brightness does not change with hot keys (for example, fn+F5 or fn+F6), but it can be changed in the power settings, then most likely your laptop does not have a special application installed that activates special hot keys specifically for your laptop model.
Interesting materials:
When is the last day of work upon dismissal? When are we open in December 2022? When does Vieta's theorem work? When people are laid off at work, how much do they pay? When is a permit issued for working at height? When do we go back to work after the New Year holidays? When do we go back to work after New Year's? When do we start work in January 2022? When to go to work after the New Year holidays 2020? When are the days off for work in May 2022?
How to remove screen dimming in Windows 10
As has already become clear, some computers running Windows can automatically configure and adjust the brightness setting of the screen or monitor. This will depend on the specific lighting conditions in the room. In complete darkness, the display can glow more dimly, and when exposed to bright light, it will automatically increase the brightness. Perhaps the function will work the other way around: when the lighting brightness increases, the screen will become brighter, and when it decreases, it will become dim.
How to remove screen blur in Windows 10 - description of methods
To find out if your PC or laptop supports this function, you need to:
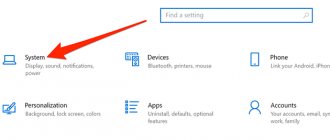
- Go to the “Options” section (“Win + I”).
- Find the “System” section and the “Screen” subsection.
- In the “Brightness and Color” section, check for the “Automatically change brightness when lighting changes” setting.
Important! If the parameter exists, then you simply need to disable it by applying and saving the settings. Sometimes you may need to restart the operating system and the entire computer for them to take effect.
You can change the auto-brightness setting in the “Control Panel”
Fix 3 - Rollback/reinstall display driver
Outdated, corrupted, or incompatible graphics drivers can cause the screen dimming issue. Users have noticed that rolling back, updating, or reinstalling drivers helped them resolve this issue.
Rolling back the graphics driver
1. Open Run (Windows + R). Type devmgmt.msc to open Device Manager.
2. Expand Display Adapters.
3. Right-click the graphics driver and select Properties.
4. Go to the Driver tab, click the Roll Back Driver button and follow the instructions to roll back the driver.
5. Reboot your system and check if the problem is resolved.
Update your graphics driver
Option 1: Manually using optional Windows updates and driver updates.
1. Press Windows + I to open the Settings window.
2. Select Update & Security.
3. On the left, you can see the Windows Update option. Check to see if any driver updates are available for your system.
4. Make sure there are no pending updates. Check if this solves the problem at hand.
Option 2: Update the driver using Device Manager.
1. Open Run and type devmgmt.msc to open Device Manager.
2. Find "Display Adapters" and double-click it to expand it.
3. Right-click the video adapter and select Update Driver. Follow the onscreen instructions to complete the update.
4. In case you are unable to load the appropriate drivers, determine the installed Nvidia graphics driver, AMD ATI or Intel HD graphics card.
5. Go to the manufacturer's website and find updated drivers in the downloads section.
Intel - Graphics Driver Downloads - Drivers and Software - https://downloadcenter.intel.com/product/80939/…
Nvidia – https://www.nvidia.com/Download/index.aspx
AMD ATI – Download Drivers – AMD Support – https://support.amd.com/en-us/download
6. If you have an OEM update utility, then use it to update your drivers.
7. After updating, check if the problem is resolved.
Reinstall the graphics driver
1. First download the latest graphics driver from the OEM website.
2. In Device Manager, right-click the graphics device and select Uninstall Device.
3. Then select the Uninstall driver software for this device checkbox and click Uninstall.
4. Follow the instructions to complete the removal process. Reboot your system.
5. When rebooting, if Windows has a default graphics driver, wait until it finishes and check if the problem is resolved.
6. If not, install the latest driver downloaded in step 1 above and check if the problem is resolved when playing full screen games.
Fix 1 – Change Monitor Settings
If your monitor settings are not set correctly, the screen may become dark when playing games. The settings vary from one monitor to another, and you need to find the equivalent setting in your monitor's menu for it to work.
Disable Magic Bright in Samsung TV settings
1. Open your monitor's OSD menu and select Picture.
2. Then turn off Magic Bright and select Custom Brightness Level.
3. Exit the OSD menu and check if this solves the problem.
4. If not, open the OSD menu and select System.
5. Select Reset All and confirm to reset the monitor. Check if this solves the dimming problem.
Disable Smart Contrast in your Dell monitor settings.
1. Launch the OSD menu and go to the Picture tab.
2. In Display Settings, disable the button next to Dynamic Contrast (or Smart Contrast) and check if the problem is resolved.
3. Otherwise, check if changing the monitor's preset mode from gaming to another solves the problem.
Fix 6 – Disable Dynamic Backlight Control in BIOS Settings
1. Boot the system into BIOS and expand Video in the left pane.
2. On the right side, under Dynamic Backlight Control, select the Disabled option.
3. Save the changes and reboot the system. Check to see if the screen dims when playing full-screen games.
Fix 4 – Disable Windows Game Mode and Game Bar
Users have noticed that if Windows Game Mode or Game Bar is enabled, the screen dims while playing games.
1. Press Windows key + I to open Settings.
2. Select Game Settings.
3. Disable the Game Bar in the XBox Game Bar tab.
4. Then go to the Game Mode tab and turn off Game Mode.
5. Check if the screen dimming problem is resolved. If not, go back to Settings and select System.
6. Disable Night Light if it is enabled and check if it solves the dimming problem.
Workarounds
1. Try repairing Windows Update if this problem occurs after a new update.
2. Press the Windows, Ctrl, Shift and B keys simultaneously to restart the graphics driver.
3. Check if disabling and enabling the video card in Device Manager solves the problem.
4. If you are using a separate monitor, try using a different display port or cable.
5. Disconnect the charger from the system, launch the game and connect the charger again to see if it helps.
6. Check if disabling HDR solves the problem.
Fix 7 – Clean Boot PC and Disable/Uninstall Problematic Apps
There may be some apps on your system that are interfering with games and in turn causing the screen dimming issue.
Disable/remove problematic applications
1. Clean boot your system and check if this fixes the blackout issue.
2. If the problem is resolved, enable services/processes/applications one by one (that were disabled during clean boot) until you find the one that caused the problem.
3. If you find a problematic application/service, disable it in the system startup settings or uninstall the application.
Most users reported apps that caused them problems:
- ATK package (Hcontrol.exe)
- Igfxpers
- Tobii eye tracking
Problem with Intel video cards
If your laptop has a built-in Intel 4000/530 or other video adapter, and the first method did not help, then do the following. Right-click on the desktop and select “Graphics characteristics”
The Intel HD Graphics Driver Control Panel will open. If this is not the case, then write “intel” in the search bar of the Start menu and select “Intel(R) Graphics and Media” from the results.
In the driver panel, select “Power Options”:
Next, turn off the display energy saving technology and set it to maximum quality:
The second option is to disable “Extended battery life for gaming applications”. Surprisingly, this can affect the floating brightness on the desktop.
Check the list of startup programs
If your Windows 10 screen dims a few seconds after your computer boots, the startup program could be the culprit. Your system loads a lot of programs at startup, and it's worth checking this list of programs to look for any suspicious items.
- Open the Start menu, search for Settings, and select Settings from the search results.
- Select Applications in the Settings window.
- From the left sidebar, select Launch.
- On the right, all programs with the switch enabled can start when your computer boots.
- Disable all or only suspicious programs in this list. A suspicious program is basically a program that you recently installed before the screen problem occurred.
- Restart your computer and see if the problem goes away.