11/28/2016 windows | for beginners
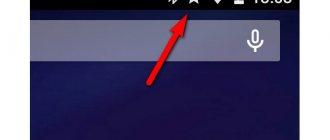
Some users are faced with the fact that “Test mode” appears in the lower right corner of the Windows 10 desktop, further containing information about the edition and build of the installed system.
This instruction provides details about why such an inscription appears and how to remove Windows 10 test mode in two ways - either by actually disabling it, or by removing only the inscription and leaving test mode enabled.
How to disable test mode
In most cases, the test mode message appears as a result of manually disabling driver digital signature verification; it is also found that in some “assemblies” where verification was disabled, such a message appears over time (see How to disable driver digital signature verification in Windows 10).
One solution is to simply disable the test mode of Windows 10, however, in some cases, for some hardware and programs (if they use unsigned drivers), this can cause problems (in such a situation, you can turn on the test mode again, and then remove the message about this on the desktop table in the second way).
- Run Command Prompt as Administrator. You can do this by entering “Command Prompt” into the search on the taskbar, right-clicking on the result found and selecting Run Command Prompt as Administrator. (other ways to open command prompt as administrator).
- Type bcdedit.exe -set TESTSIGNING OFF and press Enter. If the command cannot be completed, this may indicate that you need to disable Secure Boot (once the operation is completed, you can enable the feature again).
- If the command is successful, close the Command Prompt and restart your computer.
After this, Windows 10 test mode will be disabled, and a message about it will not appear on the desktop.
How to remove the “Test Mode” sign in Windows 10
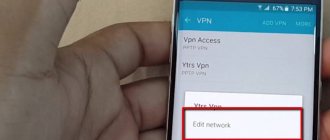
The second method does not involve disabling test mode (in case something doesn’t work without it), but simply removing the corresponding inscription from the desktop. There are several free programs for these purposes.
I have tested and successfully worked on the latest builds of Windows 10 - Universal Watermark Disabler (some users are looking for the popular My WCP Watermark Editor for Windows 10 in the past, I could not find a working version).
Once you launch the program, just follow these simple steps:
- Click Install.
- Agree that the program will be used on an untested assembly (I tested on 14393).
- Click OK to restart the computer.
The next time you log into the system, the “test mode” message will not be displayed, although in fact the OS will continue to work in it.
You can download Universal Watermark Disabler from the official website https://winaero.com/download.php?view.1794 (be careful: the download link is located under the advertisement, which often has the text “download” and above the “Donate” button).
And maybe this will be interesting:
Why not subscribe?
Distribution of new, sometimes interesting and useful, materials from the site remontka.pro. No advertising and free computer help for subscribers from the author. Other subscription methods (VK, Odnoklassniki, Telegram, Facebook, Twitter, Youtube, Yandex.Zen)
Alas, Dmitry - the recommended second method to remove the Windows activation watermark from the screen did not help - the Universal Watermark Disabler program does not remove this message. Maybe there are some other options?
Strange. I personally experienced when writing an article on the date that is in the notification area screenshot, everything worked successfully. But I don’t recommend any additional methods. Methods are searched for in queries like Remove Test mode Watermark Windows 10 (or you can search for Windows 8, there are more options), but here you need to study the options: the ones that I quickly found now I can’t recommend (one changes important system files, the other may break the system boot).
You need to write to run the com stack as administrator. And thank you very much for the article, everything is ok. At first I couldn’t either until I ran it as administrator.
Everything works great with half a kick. Thank you!
Thanks a lot! Using the Universal Watermark Disabler program, I was able to remove the inscription.
1st method is working. Thank you!
Thank you very much the command line helped
Thanks, all worked well!
Thank you! The first method (via the command line) did not help, but the program (Universal Watermark Disabler) did... Thank you.
Thank you, the first method helped. The inscription appeared after installing the driver “QDLoader HS-USB Driver_64bit”
Everything works, it starts with half a kick - method 2 helped me a lot - I just had to remove the inscription, test mode is necessary
Thank you, the first method helped. The inscription appeared after installing the driver “QDLoader HS-USB Driver_64bit”
Repair, Thank you!! I always turn to your site, you are the best.
The second method worked, it removed the inscription from the desktop that was annoying in its appearance. (Windows 10 Insider Preview build 19559.1000). Thanks for the help.
Hello. I have a laptop OS Windows 10 Home version 1909. I live in Russia. I found information that in the “Fonts” folder (c:\Windows\Fonts) you can delete unnecessary fonts. Please let me know your recommendations for cleaning the specified folder in the above version of Windows. I think this will be useful to others too. Thank you.
OC Windows 10Pro 2004 build 19041.450 both methods work, thank you.
Source
How to disable Test Mode in Windows 10
Initially, installing unofficial drivers in Windows is impossible due to the high chance of the program being incompatible with the hardware. A mismatch between the driver and the device leads to unstable operation, crashes, or sudden restart of the OS. Test mode allows you to bypass restrictions and install unauthenticated drivers. Its activation is indicated by a mark on the desktop.
Let's look at ways to disable and enable test mode in Windows 10 using standard and third-party tools.
Reasons for license expiration
Over time, a warning appears regularly at the bottom that the license has expired. In this case, the timing of the OS update does not play a role.
In addition to the legitimate reason, the expiration of the trial version, there may also be other reasons unrelated to it. For example, a full-fledged activator is installed, but the message pops up again. This may happen:
- due to a system failure;
- due to installing a pirated version.
Notice of license expiration
In the latter case, Windows could revoke the license or it was not activated.
Interesting! The free version installed before June 29, 2016 was valid for 12 months. After a year, the notification appears again. Unfortunately, it cannot be removed with the “Cancel” command.
Use the command line to disable test mode
As mentioned above, Test Mode Windows is accompanied by a permanently pinned notification at the bottom of the screen near the taskbar. It contains information about the current OS version and service pack. The easiest way to return the system to its previous state and erase the inscription that is unpleasant to the eye is to use the command line.
Important!
The above methods for managing the testing mode apply similarly to all modern Windows releases, including the 7th and 8th generation. To do this you need:
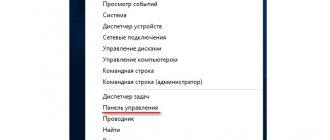
- Right-click on the Start menu symbol and open “Windows PowerShell (Administrator)” or “Command Prompt” (depending on the OS version);
In the input area, type: “bcdedit.exe –set TESTSIGNING OFF”, confirming the action with the Enter key;
Reboot the system - the computer should now start normally.
- If entering the command and restarting the system does not produce results, and the watermark does not disappear from the screen, you need to restart the PC again and go into the BIOS (UEFI) of the motherboard. In it you need to find the “Secure Boot” parameter, set it to “Disable”, save the changes and restart Windows. Next, go to PowerShell and repeat the steps from the first and second steps.
If the previous paragraph did not help resolve the problem, write sequentially in the console
: "
bcdedit.exe -set TESTSIGNING OFF
" "
bcdedit.exe -set loadoptions ENABLE_INTEGRITY_CHECKS
" "
bcdedit.exe -set TESTSIGNING OFF
"
After completing operations with the console (or PowerShell), do not forget to restart the computer.
Via Universal Watermark Disabler
In addition to the classic “console” option, system owners have a second option - through the Universal Watermark Disabler software. It is useful for people who intend to continue using the test mode, but want to remove the annoying notification. Thus, this software does not turn it off, but only masks it.
To use the utility, you need:
- Download the file from the official website, we provided the link above;
Return to original state
Despite the vulnerability of the operating system, some components and devices cannot work properly without unsigned drivers. This applies to products from Chinese little-known manufacturers and outdated models that are not supported by modern OS editions.
Therefore, we have to remove the restrictions originally set by Microsoft developers. After looking at how to disable Test Mode in Windows 10, you need to know a way to get it back.
The testing mode is started in the following order:
- Open the command console in the already known way and enter: “bcdedit.exe -set TESTSIGNING ON”;
By pressing the “Enter” key, restart the computer. Now the corresponding message will be fixed at the bottom of the desktop again.
Source
How to disable test mode in Windows 10
Sometimes it happens that the following message appears on the desktop:
The most common cause is the installation of unsigned drivers on the computer or accidental disabling of the digital signature verification function. Spontaneous shutdown after the next update is not excluded. The functionality of the equipment is not reduced, but the inscription may be distracting and disturbing.
There are options to both disable the testing mode and just remove the inscription from the screen. You can disable this feature if you do not have software with unsigned drivers installed on your computer. It happens that Windows 10 test mode starts without user interaction. It must be removed to avoid reducing the security level of the system.
What happens if you ignore the message
How to check Windows 10 license - find out expiration date
Is it possible to ignore the warning “Windows 10 requires activation, license has expired”?
At first glance, a non-renewed license does not affect the operation of the system. It continues to work, but is no longer able to receive virus detection updates. Infection levels are comparable to what it would be if the computer was running without any antivirus at all.
If you do not install a licensed program, at a minimum, a warning about the expiration of the license will be visible. In addition, personalization of the system will become impossible, and some parameters will disappear. For example, it will not be possible to change the desktop interface. Also, at the most inopportune moment, the computer will reboot on its own.
The easiest way to turn off
If the question arises: how to remove Windows 10 test mode, then you need to take into account that this program does not have a command line in the “ All programs ” section. Therefore, the easiest option is to click on “ Start ” with the right mouse button or simultaneously press W + X on the keyboard. A window will open in which you need to pay attention to 2 points:
You must click on any of them to open a black window. The command bcdedit.exe -set TESTSIGNING OFF is copied into it
Then you need to press the button on the keyboard Enter to determine whether the operation has completed. If everything is in order, the picture will look like this:
The final stage is to reboot the device.
How to find out the Windows version and license expiration date
Your copy is not genuine Windows 7 7601 - how to remove
To protect your PC and not deal with annoying notifications about the termination of the license period, it is recommended to find out the duration of its activity. In order to clarify this (at the same time as the Windows version) you need:
- Press Win + R to activate the “Run” option.
- Set the command "winver.exe".
After these steps, a window will pop up with information about the operating system version and the license deactivation date.
How to find out the Windows version and license expiration date
You can also find out the information you need in the “This PC” section. The required information will be displayed at the bottom of the window, including the presence or absence of an operating system.
Software experts recommend not using a computer without licensed software. Penalties for using pirated versions can exceed the price of the key many times over. In addition, personal data may be lost due to sanctions or a bad pirate program.
Alternative options
There are other options to accomplish this task. For example, press W + S to open the following window:
You must enter “ Command Prompt ” in the line below; the same window will open as when using the first option.
Another way to find the command window is to press W + R. In the input line you need to enter “ cmd ” and click on OK. And in this case, a command window insert will open.
A rare user knows that in order to open Command Prompt , just go to any Explorer and right-click while holding Shift. In the menu you need to click on “ Open command window ”.
Next, the previous command is copied.
But this method does not always allow you to turn off Test. the Command Prompt again (by any method) and paste the same text bcdedit.exe -set TESTSIGNING OFF adding one more: bcdedit.exe -set loadoptions ENABLE_INTEGRITY_CHECKS
It will look like this:
After rebooting again, the problem of how to disable Windows 10 test mode should be completely resolved.
Activating Windows 10 LTSC via KMS server
You can activate Windows 10 LTSC on your KMS server. To do this, just specify the GVLK activation key for Windows 10 LTSC (M7XTQ-FN8P6-TTKYV-9D4CC-J462D) and the KMS server (see FAQ on KMS activation). Run the following commands on the command line (replace the KMS server address with yours):
slmgr /ipk M7XTQ-FN8P6-TTKYV-9D4CC-J462D slmgr /skms kms-server.winitpro.ru:1688 slmgr /ato
If error 0xC004F074 appears when activating Windows 10 LTSC on the KMS server, this means you need to install updates on your KMS server to support Windows 10 LTSC 2022, Windows 10 1809 and Windows Server 2022 (see article).
How to delete text from your desktop
If for some reason Test cannot be disabled, but the text is in the way. I need to solve the question: how to disable the “Windows 10 Test Mode” message on the screen. You won't be able to do this using the settings. You will have to download a free application to your computer, for example, Universal Watermark Disabler (https://www.softportal.com/software-41127-universal-watermark-disabler.html).
You need to download and run the program.
After clicking Install, a window will appear.
You should click on Yes and restart your computer. This will remove the inscription and the device will continue to operate as before.
How to remove the “Windows activation” message from the screen in service options
You can try hiding the annoying message in the service settings. To do this, open the classic Control Panel. Launch the Security and Service Center applet...
Click on the “Change component settings...” link on the left.
In the next window, if available, uncheck the “Windows Activation” checkbox.
And it should be available on non-activated systems... After which you need to restart the computer...
Features of the Windows 10 pro program
This version is professional, developed for small and medium-sized businesses. It works well with business applications, but is also suitable for home use. It is chosen by those who want to use additional functions and applications.
If the text “ Test mode Windows 10 pro ” appears on the screen, then in order to remove it, the same steps are used as for the home version. That is, you need to use any of the above methods to find the Command Line and use the command bcdedit.exe -set TESTSIGNING OFF and immediately press Enter on the keyboard, and then reboot the device.
To test some applications, use unsigned drivers, or remove security restrictions, sometimes it is necessary to perform the opposite operation - activate the device in a trial version. The sequence of actions is unchanged: search for the Command Line, enter bcdedit.exe -set TESTSIGNING ON into it and press Enter. After rebooting, the computer will work differently. If you need to change the operation of the professional version, the sequence of actions is the same.
This article has covered several options to disable Test Mode in Windows 10. We hope that the above methods helped you resolve this issue.
How to download Windows 10 LTSC trial version?
Any user can download an ISO image with a trial version of LTSC absolutely free from the MIcrosft Evaluation Center website (https://www.microsoft.com/ru-ru/evalcenter/evaluate-windows-10-enterprise).
Just select an ISO image of the ISO edition - LTSC (x86 and x64 edition of Windows 10 Enterprise LTSC is available), fill out the registration form and receive an installation ISO image with Windows 10.
To install the Evaluation version, you do not need to provide a Windows activation key. You can use the trial version of LTSC for 90 days, after which you need to activate it with a key (or on the KMS server), if this is not done, the screen background will change to black, and the computer will reboot every hour.