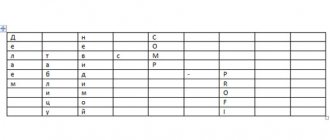
Situation: you made two tables in one Word document. For various reasons, you need to connect them together.
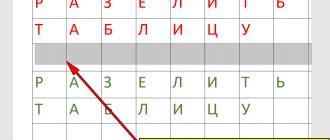
The photo below shows just such an example. There is a gap between the tables.
How to join a table after a break in Word
If you take and drag the lower table onto the upper table, we warn you that this is a bad solution to the problem. As a result, the table may become even more torn apart, something will change places, words in the tables may disappear, and many more problems may arise.
But if you have already done this, then simply return everything back using the small blue arrow in the upper left corner.
Cancel action
Method No. 1
Using the “show all characters” tool
You can correct the division of tables using the “show all characters” tool. Indicated by the symbol (¶).
This tool can be found in the toolbar in Word as shown in the image below. Or press the key combination (Ctrl+*).
In order to get acquainted with the toolbar and other functions, you can read the article - “How to work in Word...”.
Show paragraph marks and other hidden formatting characters
Click on the icon (¶) and see the text transformation. New icons have appeared in the text and table. We are interested in the completed paragraph mark. It is hidden imprinted when we press the Enter key.
Between the tables we see that there is one such icon.
Complete paragraph mark between tables
If you press the Enter key under this icon, you will see that another similar sign appears below the previous one.
Two complete paragraph marks between tables
So, to remove the gap between the tables, you need to connect the paragraphs, that is, remove their ending marks.
Click the Delete or Backspace button and simply delete these icons.
You should end up with something like the picture below. The tables have merged.
Joining tables
To return to normal operation, click on the tool (¶) in the toolbar again.
And now your signs are connected.
Return to normal formatting mode
Note! It often happens that the tables do not match in size and are not connected evenly. To fix this problem, you need to stretch a small table or shrink a large one. Be guided depending on your situation.
Tables do not match in size and do not connect smoothly
Our video on how to join a table after a break in WORD
How to create a table break in Word
Hello, friends! A table in Word is created by many users of the Word program. Basically, it is needed for maintaining any accounts or records. For example, if a person earns money via the Internet, he will soon begin to keep track of his income. This tool is simply necessary, since not all people are able to remember a large amount of information.
But sometimes there is a problem when you have to create gaps between two tables. Unfortunately, not all beginners know how to do this. Therefore, I will give below an effective option that will show you how to create a table break in Word.
To begin, you select a separate area in the table by clicking the left mouse button. Then go to the section for working with tables, which is called layout, and click on the split table function. (Picture 1).
After which your table will be divided into two parts. I'm sure everything worked out for you. Next, you will learn how to connect a broken table in Word.
Method No. 2
Using the clipboard in Word
- On the second table, you need to move the cursor over the cross for moving the table.
- Right-click on it.
- Select the “copy” or “cut” menu item.
- Place the cursor under the first table.
- Click the right mouse button.
- Select the “paste” menu item.
Note! For the same method, you can use keyboard shortcuts instead of mouse buttons:
- (Ctrl + C) - copy;
- (Ctrl + X) - cut;
- (Ctrl + V) - paste.
Important! If the number of columns of the second table is equal to the number of columns of the first table, then the table will be adjusted to the size of the first table.
How to combine two tables into one in Word 2016
You can merge multiple tables into one by removing all the characters between them. To do this, follow these steps:
- Click “Show all icons” to make the spaces visible.
- We place the cursor at the beginning of the second table, which needs to be joined to the first, and remove the empty rows.
- The elements will be automatically combined.
This is the easiest way to combine multiple elements with cells and columns into one. And if something doesn’t work out, ask questions on the forum.
Ask a Question
Introduction
Using the convenient Microsoft Office Word software application, which has a clear intuitive interface, even a novice PC user can convert any document. The program allows you to format data, highlight it with color, color the space around a certain block, and also create various kinds of tables. The product's multifunctional tools have enormous capabilities that are necessary to beautifully and competently manage tabular data stored in several formats. Using a text editor, you can create, merge, or split any tablespace. Although all of the above steps are simple, some people may have difficulty putting these steps into practice. In this article we will look at ways to help you create a table break or connect several separate fields with cells.
Most often, the need to combine graphs divided into several parts is required as a result of subsequent data formatting when the document boundaries increase or decrease. This kind of manipulation leads to a complete discrepancy between the previously created page breaks and their endings. The user has to re-combine everything and then split it in accordance with the new rules.
In this article we will talk about simple “horizontal” division and union relative to rows. The software features of the Word application are such that in practice, vertical division or standard merging relative to columns simply will not work.
Method four: page break
In addition to the previous one, there is another universal method. Now we will talk about it.
To make two tables from one table using a page break, you need to do the following:
- Place the mouse on the line that will be the first in the second table. Please note that you do not need to select the line.
- Go to the "Insert" tab.
- In the “Pages” tool group, click on the “Page Break” icon.
After all this has been done, the table will be divided. However, in this case it will be placed on the new sheet permanently, that is, you will not be able to place both halves on one sheet.
Installing and downloading Windows OS
Word | Break and join table
It works and will always work. This is tested on Word 2003, Word 2007, Word 2010 and Word 2013. It will work in any version of Word up to 2100, because the principle of breaking and joining tables in Word is as stable and flawless as Word itself
Breaking and joining tables in Word 2003 - 2013 (until 2100)
Tables in Word are divided and joined quite easily and simply - by simply placing the cursor in the desired place on the page and pressing the “ENTER” and “DELETE” keys. Provided, of course, that the tables being joined are absolutely identical in the number and width of columns, and the Word file itself is not damaged.
Unprintable characters
Breaking and joining tables in Word is the work of the user (user) with non-printable characters of the office program. Without unprintable characters, alas, nothing (or almost nothing) will work. When working with non-printable characters in Word, it is highly advisable to enable their display on the screen. Because, in its normal state, unprintable characters are not displayed. They are invisible to the personal computer (PC) operator.
What are “non-printing characters” In the Word office application, all characters are divided into printable and non-printable. Printed characters are the characters that we actually see on the page. Non-printing characters are program service characters that are not normally displayed (printed) on the page. Non-printing characters include, first of all, paragraph and page break marks.
To see non-printing characters, they need to be displayed on the page. To do this, you need to press either the key combination Ctrl+Shift+8, or – on the icon for displaying non-printable characters in the main (top) menu. When using the key combination Ctrl+Shift+8, you need to press the number 8 on the main keyboard, not on the secondary keyboard. Eight pressed on the auxiliary keyboard (num) does not work in this key combination.
Icon for displaying non-printing characters in Word
The result of such an operation will be as in the picture below. (To see all the details, you need to turn on non-printable characters.)
Features of merging tables after partitioning
If two tables are separated by a page break, you can combine them back together as follows:
- Add a blank line before the second table. To do this, place the cursor in front of it and press the Enter key.
- Select the first table and cut it by pressing Ctrl + X on your keyboard.
- Place your mouse cursor on the line before the second table and press Ctrl + V. As a result, you will get the following:
How else to merge tables in Word 2010 or other versions after a break
Select the entire bottom table. To do this, you can use a tool with a black arrow, which appears automatically when you hover your mouse over the table.
When you make a selection in Word, a small square will appear in the upper left corner of the plate. Carefully grab this icon with your mouse, holding down its left button, and drag it to the desired location. You will see that the entire table that you selected moves after it. Bring the tables close together and glue them to each other by simply releasing the mouse cursor.
Expert opinion
Popov Anton Valerievich, Word consultant
If you have any questions, ask me!
As a result of the described actions, Word tables are combined into one while maintaining formatting. Any tables of any size can be joined this way. There will be a slightly thicker border between them than between the other parts, but this can be easily fixed with a simple edit. If something doesn’t work out, contact me, I’ll help you figure it out.
How to merge tables vertically: instructions for Word
Sometimes you want to merge vertical tables so that they are connected at the sides rather than at the top and bottom. This can be done using copy-paste. Here's how it works:
- Copy the second table to the clipboard.
- Place the cursor behind the first sign where the first line ends.
- Paste an object from the buffer in any convenient way. Automatic merging will occur immediately. If necessary, remove the duplicate row or column.
This was the last method of unification. Now you can quickly select and use a working method on any computer and with any version of Word.
How to unlink a table again
To split a table again into two or more parts, you need to follow these steps:
- Place the mouse cursor at the beginning of the table row where your second table should begin.
- Press the key combination (Ctrl+Shift+Enter).
The table is again divided into parts.
Video - How to merge tables in Word?
Did you like the article? Save so you don't lose!
This article talks about how to connect a broken table in Word. This information will be useful for both beginners and users who are familiar with computers. Using the instructions below, you can do everything correctly and make sure your actions are correct.
How to insert empty space in Word?
To add a blank page to a Word document, place the cursor where you want the page to start and click Insert > Blank Page. A blank page will open, ready to go. If you need to expand the available space, you can also insert a page break.
Interesting materials:
How much does it cost to replace a hose on a washing machine? How much does it cost to wash a car at a car wash? How much does it cost to wash a car at a self-service car wash in Kyiv? How much does it cost to wash a car in Kyiv? How much does the cheapest Tesla car cost? How much does the slowest car in the world cost? How much does the heating element for an LG washing machine cost? How much does it cost to import a car from Germany? How much does it cost to replace a bearing in a washing machine? How much does it cost to replace the motor on a washing machine?
