Despite the fact that the Windows operating system has relatively (for example, when compared with the capabilities of GNU/Linux) scant possibilities for customizing the graphical interface, some of its elements can still be changed. In particular, it is possible to change the size of icons on the desktop. But some PC users who are not aware of the existence of the corresponding function may be perplexed when the icons on the screen become huge. In this regard, they open a search engine or go to a forum and ask why the icons on the PC desktop have become large.
How to change shortcut icons
If you are not satisfied with the standard shortcut icons, you can change them.
How to reduce or increase the size of a shortcut
The same icon size will look different at different screen resolutions. There are two ways to change the scale.
The first is through the desktop settings:
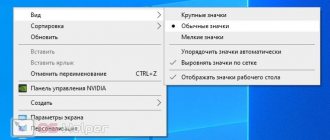
- Right-click on any free part of the screen.
- Click "View".
- Select the desired option (large, medium or small icons).
Changing the shortcut size through desktop options
With this method, the icons may automatically align to the grid and will have to be sorted again.
The second way is to hold down the Ctrl key and roll the mouse wheel up or down, the icons will increase or decrease accordingly.
How to remove the arrow from a shortcut
By default, each shortcut is marked with a small arrow to make it clear to the user that it is a shortcut. But not everyone likes this appearance of the icons. The operating system developers did not provide any quick solutions to the problem, and it can be fixed by making changes to the registry or using a special program.
How to return desktop icons to normal size
Why have my desktop icons gotten big? As we found out, the reason for the phenomenon in question is quite trivial. Actually, that’s why the “problem” can be fixed very easily.
The first option , how to return the desktop icons to their normal appearance (size), involves:
- Activating the desktop area (minimize/close all windows and click on any empty space on the desktop);
- Holding down the CTRL key;
- Scroll the mouse wheel down (to reduce the size of the icons) and up (to increase them).
Another option for changing the size of icons on the Windows desktop involves doing the following:
- Right-click (left for left-handers) on any empty (not icon) area of the desktop;
- Selecting the “View” item in the context menu;
- Select “Regular icons” (standard size) from the pop-up submenu.
After this, the desktop icons are guaranteed to change their large size to the one specified by the user. The actions described in both instructions lead to the desired result in all modern versions of Windows (10, 8, 7 and even Vista).
You should be aware that after changing the size of the icons, they may change their location slightly. For example, if the trash icon was in the lower right corner, right next to the taskbar, it may move a little to the left and up. This applies to all icons. To return them to their original location, you just need to drag the icons to the areas where they were previously located.
There is another case when the icons on the desktop have increased - low screen resolution. However, here the user complains not only about the enlarged icons, but also about the cumbersomeness of the entire interface. If this is the case in your case, then:
- Click on the desktop;
- Select "Screen Resolution";
- In the window that appears, find the “Resolution” item and tighten the slider there to the maximum value.
How to remove shields from labels
If all shortcuts are marked with arrows, the shields indicate that the program can make changes to the system and works with administrator rights. If you remove the shield, the computer will consider the utility being launched to be a simple application. For computer safety, inexperienced users are advised not to expose the computer to danger and leave the guards in place.
If you still want to remove the shields, then to do this you need:
- Write “msconfig” in it.
- Launch the “Run” line (Win + R).
This command runs the system configuration - Select “User Account Control Settings”.
To select a line, click on it once - Click “Launch”
- In the window that appears, move the slider to the very bottom.
The shield on the label will disappear if you move the slider to the bottom position - Save changes.
- Restart the system.
The shields will disappear. To return them back, we do the same steps, only we return the slider to the middle.
How to resize xp shortcuts windows xp
Windows XP offers the user three sizes of shortcuts: large, regular and small. By default, the system uses the normal label size. In order to make icons larger or smaller, you must right-click anywhere on your desktop. In the context menu that appears, select the “Properties” line and the window of the same name will open.
Next, go to the “Design” tab and click the “Advanced” button at the bottom of the window.
In the “Advanced Design” window, find the “Element” drop-down list. In this list, select “Icon” and to the right of it set the required size.
The default value is 32 - this is the standard size of Windows XP shortcuts. You can set any value of your own, or choose from the list offered by the system: 16, 32, 48 or 64. The size of shortcuts in Windows XP can only be selected from those preset by the system itself.
How to remove and hide shortcuts
If you need to hide shortcuts for a while, then:
- We move the cursor to “View”.
- Right-click on any empty space on the desktop.
After unchecking "Show desktop icons" the shortcuts will disappear - Uncheck “Display desktop icons”.
All icons will disappear from the screen. It is worth noting that all files that were on the desktop will be hidden: documents, folders, images. To return everything to its place, you need to check the box “Show desktop shortcuts”.
To delete, select an icon (or several) and press Delete. Or simply drag the files to the trash.
What to do first
Before enlarging the icons on the Windows Desktop, make sure that the screen resolution is set correctly. Right-click on it (RMB), then select “Options”. Go to the “Display” tab and select the resolution recommended by the system. She will determine the optimal settings herself.
How to Enlarge Icons on the Windows 10 Desktop
As in the method discussed above, press RMB on the screen, then find the “View” item. Use one of three options. As in the picture.
There are only three options available; setting a different icon size will not work using this method.
How to resize to any size
Perform the following sequence of actions:
- Minimize all applications by pressing and holding the Ctr key;
- Scroll your mouse wheel. If it is not available, for example, on a laptop, use a touchpad.
How to zoom using explorer
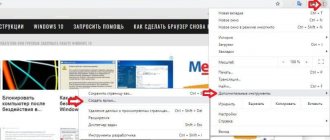
Open File Explorer and press RMB. The “Huge” item will be added to the “View” menu.
Using this method, only the icons in the current folder will change.
To change the sizes for the others, do the following:
- When you set the desired size in Explorer, click “View” - “Options” - “Change”;
- Next “View” - “Apply”.
Now the icons will be displayed as in the configured directory.
Scaling
- Right-click on an empty space on the screen and select “Options”;
- In the “Scale” section, select the desired value from the list, or configure it using the “Settings” link;
- Log out and log back in to apply the changes.
If you need to enlarge part of the screen, use a screen magnifier.
How to Enlarge Desktop Icons in Windows 7
In the “Personalization” section (available by right-clicking), click the “Screen” link at the bottom left. In the new window, make the icons larger. The system suggests changing it as a percentage - from 100 to 150%. Not only icons will change, but also other elements.
Another interesting way
If you have the classic theme installed on Windows 7, set the item options.
- Right-click on the Desktop, select “Resolution”;
- Click "Make elements large";
- Go to “Change schema” - “Other”;
- Select “Icon” and define its size in pixels.
Additional Information
When you change the size of icons on the desktop and in Windows Explorer 10 using the described methods, the labels for them remain the same size, and the horizontal and vertical spacing are set by the system. But this can be changed if desired.
The easiest way to do this is to use the free Winaero Tweaker utility, in which in the Advanced Appearance Setup section there is an Icons item that allows you to configure:
- Horizontal spacing and Vertical Spacing - horizontal and vertical spacing between icons, respectively.
- The font used for icon captions, where it is possible to select the font itself, different from the system one, its size and style (bold, italic, etc.).
After applying the settings (Apply Changes button), you will need to log out and log in again for the changes made to be reflected. Read more about the Winaero Tweaker program and where to download it in the review: Customizing the behavior and design of Windows 10 in Winaero Tweaker.
Every year, the resolutions of computer displays and laptop screens are becoming larger, which is why the system icons in general and the “Desktop” in particular are becoming smaller. Fortunately, there are several methods for increasing them, and today we want to talk about those that apply to Windows 10.
Screen scaling
"Eight" offers slightly fewer settings. To change the size of desktop icons, you will have to change the scale of all elements in the settings of the Display control panel applet, and then only up. On the other hand, you can set the text size of the icons - an additional measure when resizing icons in the manner described at the beginning of the article.
Windows 10 doesn’t have this either, with the exception of the first universal method, the tenth version of the system only offers upward scaling. By setting the scale to, say, 150 percent, you will increase the size of all interface elements, not just shortcuts on the desktop. To make Windows 10 desktop icons smaller, use the first method.
But you can easily reduce the icons on the taskbar, which is also part of the desktop. To do this, you need to open its properties and set the “Use small taskbar buttons” selector to the “On” position. This function is also supported in Windows 8.1; to implement it, you just need to go to the taskbar properties and check the “Use small buttons...” checkbox.
As you can see, making desktop icons smaller or larger in Windows 7/10 is not difficult. One thing to remember, however, is that the quality of scalable icons depends entirely on the icon's enlargement - if it is small, the enlarged icon will look fuzzy. With the taskbar, things are a little more complicated. Using the system's tools, you can only reduce the icons attached to it, but to increase them beyond the sizes provided by the system, you will probably need third-party tweaker utilities.