Despite the apparent simplicity of this standard application, you can still insert a table into a Wordpad document. As we said earlier, this application has the ability to insert almost any object created in programs installed on the computer.
You can insert Excel tables and charts, Microsoft Equation formulas and equations, presentation slides, and even a Word document into the document (about other Word Pad features).
Creating a table in WordPad
In order to insert a table into WordPad, you need another software that can create tables. For example, Microsoft Excel or Microsoft Word. First you need to launch the WordPad text editor. The easiest way to find it is by opening the Start menu and typing the program name in the Search programs and files option. Next, you need to indicate the place in the document where the table will be located (by placing the mouse cursor in a certain place).
To insert a table in WordPad, you need to select “Insert” and “Insert Object” in the menu bar (at the top of the document). A new dialog box will open, on the left side of which you need to select “Create new”, and then in the “Object type” field select a program that can work with spreadsheets. For example, select “Microsoft Excel Sheet”. After clicking the "OK" button, processing of the insert object will begin and a new Microsoft Excel window will open.
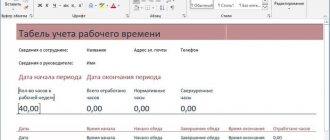
In the Excel window that opens, you can create a table of the required dimensions, fill it with data, format it here, etc. In this case, all changes in Excel will be instantly displayed in the WordPad text editor - draw a table, it will be displayed immediately, write one word - and it will immediately appear.
The table will be saved as a picture and can be moved anywhere in the document. And if there is a need to edit some data, just double-click on the table and the MS Excel window will open again, where you can make changes.
Importing a table from MS Word to WordPad is also easy. You need to select “Insert – Insert Object” in the menu bar again and select “Microsoft Word Document” in the “Object Type” field. In the MS Word window that opens, you can draw a table in two ways. The first is to select “Table – Draw Table” in the menu bar and manually draw the table. The second way is to select “Table – Insert – Table” in the menu bar, specify the required number of columns and rows, and the program will draw the table itself. There is no need to cut or copy it, since all changes are automatically saved in WordPad.
How to make a table in Word Pad
Many people believe that the most famous text editor is WordPad. In fact, this is far from the case. But you still need to devote time to it, because it is pre-installed in almost any version of the Windows operating system. Consequently, WordPad is truly one of the most popular editors. At least among those users who have enough of its functionality. Perhaps you will see each other, but today we will discuss with you one very interesting topic: from this article you will learn how to make a table in WordPad. Fortunately, this is really possible and if you do not need the frills of working with Microsoft Office Word, then you can continue to use this software.
Creating a table using WordPad
Of course, first we need to run the program itself. You can do this in the following way:
Press the "Windows" + "S" keys at the same time. The search menu built into the operating system will appear;
Now enter the phrase “WordPad” there. After finding this software, click on its shortcut;
Great, the program window has launched. This means we can continue working with him.
- Next, you should click on the “Object” button to insert information of almost any type, including tabular ones. (Attention! In earlier versions of the program, select the “Insert” menu item on the top panel, then click on the “Object” sub-item);
Instructions
Launch WordPad. It can be easily found through the Start menu on your computer. Navigate to the part of your document where you want to create the table (where it will be located) and click to select a location.
How to make a table in Wordpad? Read on. Find the Insert menu at the top of the screen and click the Insert Object command to open the dialog box.
Select the "Create New" option on the left side of the menu, and then navigate to a program capable of creating spreadsheets in the "Object Type" field. Operating systems that do not have Microsoft Excel software often come with Microsoft Works installed by default from the PC manufacturer or retailer as an optional feature. Speaking about how to make a table in Wordpad, it is worth noting that both applications (Microsoft Works and Excel) are capable of creating the necessary object for import.
Click OK to begin processing the insert object. A new window will open for you to create the specified document type.
Inserting an Excel Sheet
Open the editor. Go to:
A blank sheet of the spreadsheet editor will open. Create a table.
Changes will be displayed in real time.
After creation, save the document. Go to:
Change the size using the handles:
You cannot change the values in the application. To edit, click on the table twice with LMB. Excel will open in which you can make changes. The method works with Windows 7 OS.
How to Create a Table in Word Pad
By the way, in the Word Pad program, you can insert not only tables, charts, you can insert various formulas, equations and even presentations created in other programs.
Although the Word Pad program looks quite simple, one of the built-in tools of the Word Pad application allows you to create many complex works in this application. As a rule, Word Pad is used by those who do not have Microsoft Office installed.
Creating tables in Word Pad
To create tables, you need to launch the Word Pad program. In the program interface you need to find the “insert object” button, after clicking the insert object button, the explorer of the operating system installed on your computer will open.
In this window, you need to select an Office Excel document and click to open; at the bottom of the Explorer window you need to click the open button. After this, the Office Excel document will be displayed in the Word Pad program and will open separately from the Word Pad program.
There are two ways to create tables in Word Pad, but these two methods are directly related to Excel. In the Microsoft Office Excel window that opens, you can fill the table with the necessary numbers and make any calculations.
After filling the table with the necessary data, save the result and close the Microsoft Office Excel window. After closing Microsoft Office Excel, all data created in this application will open in Word Pad.
Everything that was created in the open Word Pad program must be saved in the resulting table using the Office Excel application.
In the Word Pad program itself, you will not be able to change any data, but if you click on the inserted table in the Word Pad program, anywhere in it, a Microsoft Office Excel sheet will open on your monitor screen. Directly in the open Excel sheet, you can make any changes and additions.
Another option for creating tables in Word Pad
If in the first option you opened an Office Excel document in WordPad and, after opening, created the table you needed, then in this option you can copy the created table directly from Office Excel or Microsoft Office Word, and use the clipboard to paste it into the newly created WordPad document.
The copied data will appear in Word Pad. In the first option, you can edit the created tables only in the Office Excel sheet window that opens.
In the second option, it is possible to carry out some manipulations with tables directly in the Wordpad application itself. That is, you can add additional columns or remove them from an already created table.
This is the advantage of the second method of creating tables in Wordpad. The only inconvenience of both methods is that the boundaries of the created tables are not visible.
But you can create the necessary presentations using the Wordpad application. Although the work of creating tables in Wordpad is an amateur job. Still, it is better to create more complete tables directly in Word or Office Excel.
After all, these office programs are created for these purposes and the most valuable work is done in these programs.
How to create a table in Word Pad, summary
So it’s up to you to choose which programs are best to work with. Moreover, now you know how to create a table in Word Pad and can use them for your own purposes.
But the office programs Word and Office Excel must be installed in your arsenal; without these office programs you will not be able to create a single table in the WordPad program, keep this in mind, since you need a program like Excel to insert or copy data from Office Excel .
For those who do not know how to launch the Word Pad program, click on the Windows icon, it is located at the very bottom of the monitor, on the left side. Click on this icon and in the window that opens, write the word Word Pad in the search bar and press search or the Enter key.
After a short time, you will see the Word Pad icon, double-click on it with the left mouse button, and the Wordpad program will launch. After that, you can try to create tables using the knowledge gained from this article, good luck in mastering the Wordpad program.
PS I am attaching a screenshot of my earnings in affiliate programs. And I remind you that anyone can earn money this way, even a beginner! The main thing is to do it correctly, which means learning from those who are already making money, that is, from Internet business professionals.
Get a list of proven Affiliate Programs in 2017 that pay money!
Download the checklist and valuable bonuses for free =>>
“Best affiliate programs of 2022”
How to work with a Word Pad document?
To open the program, enter WordPad in the search bar of the start menu or go to the “Programs” - “Accessories” tab. Click on the program icon with the mouse and a text input window will open. By switching between the “Home” and “View” tabs, you can view various program functions.
Interesting materials:
Should I use Safe Removal? Is it necessary to castrate? Do I need to change my tax identification number when changing my last name in 2022? Do I need to change my birth certificate when changing my last name? Is it necessary to wash lard before smoking? Do I need to apply cream before makeup? Do Android System WebView need to be updated? Do I need to update the software on my smart TV? Do you need education to be a librarian? Does a miner need education?
How to Create a Table in Word Pad
How to Create a Table in Word Pad
Do you want to know how to consistently earn money online from 500 rubles a day? Download my free book =>> “How to guarantee earning from 500 rubles a day”
This article will look at how to create tables in Word Pad. It will be said right away that it is not possible to create tables and graphs in the application itself.
Users of this popular application have encountered this problem many times. The Word Pad tools do not have such a table creation feature.
Therefore, we will consider in detail the process of creating tables in Word Pad for those who want to use Excel tables in the Word Pad application. You may be wondering, what does Excel have to do with it, since you need to create tables in the Word Pad application?
The fact is that without the Excel application, you will not be able to create these same tables directly in the Word Pad application.
Another way to insert a table
The second option for creating a table in a WordPad document, which we, who already have some experience in office programs, would like to use is copying and pasting the table from Word or Excel using the clipboard.
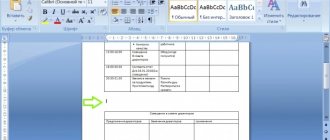
A table created in Word Office can be very easily inserted into the document in question, displaying all external and internal boundaries. Moreover, in such a table you can add and delete rows.
Adding a new line to the table is done as follows: place the cursor to the right of the line below which you want to insert a new line and press Enter (Enter button on the keyboard). To delete a table row, you need to select it and press the Delete button on the keyboard.
The experience of inserting a table copied from an Excel sheet can be called unsuccessful, since it does not display both external and internal boundaries. In this case, you can add new lines and delete existing ones in the manner described in the previous paragraph.
Speaking about inserting tables into a Word Pad document, it should be noted that in each of these methods tables were inserted from much more skillful and specialized applications (word and excel). And it is not clear why you need to create a document in a standard program when Word Office is installed on your computer. But perhaps the methods described here will be useful to someone someday.
Editing
Once you create a table, you can fill it out and change it at any time. To do this, left-click on it and go to the “Layout” panel in the main program menu.
Changing table properties
In the very left corner we see 3 points:
Using the first option, you can create a selection of the desired area for further editing. This can be 1 cell, column, row in which the mouse cursor is currently located, or the entire table.
A grid is needed if you have removed the boundaries between elements, or rather, hidden them. This is what a table looks like without lines between the columns.
And this is how it will be displayed using a grid.
Do you see the dotted dividers? Now it is easier to parse the structure of this array.
In properties you can:
Removing and adding elements
This is one of the most necessary functions when working with an array of data. Place the mouse cursor on the cell and click on the “Delete” button.
In the drop-down list, select what exactly you want to remove:
When you remove one cell, the program offers options on how to do this:
If you use the first option, then the selected row or column will have 1 less column than the others. Here's what it looks like in practice.
Adding one cell will not work; the array is expanded in rows from the bottom or top and columns to the left or right of the column in which the cursor is located.
Note: To add multiple rows, select the same number of cells horizontally or vertically.
Other settings
All these settings are in front of you, try them out to learn how to quickly edit the necessary parameters.
You can also change the location of the table. To do this, hover your mouse over it and drag the cross in the upper left corner. Another way: select the object, press the key combination “Ctrl + X”, move the cursor to the desired location and use the “Ctrl + V” buttons.
All methods with step-by-step instructions
Open the program and look at the main menu at the top of the screen. Among the list of options, we need the “Insert” tab.
I use Office 365, which has the same interface as the 2016 suite. If you have an earlier version, don't worry. Yes, the menu will look a little different, but your task is to find the “Insert” or “Paste” tab.
Then click on the word “Table”. A drop-down list will appear in front of you, with which you can:
Now we will look at each of these methods separately.
Quickly create a simple table
The easiest way is to mark a field in the drop-down menu in which the vertical squares indicate the number of rows, and the horizontal squares indicate the number of columns. Thus, if we select a 3 × 4 area, we get a table of 12 identical cells, ready to be filled.
In the future, it can be enlarged, reduced, and the sizes of rows and columns can be changed. How to do this, see the section on editing.
Second easy way
Go to the menu again and select “Insert table...”.
In the drop-down window, you can select any number of rows and columns, and also adjust the width of the cells:
If you check the box below, then next time the editor will offer to create exactly the same object, which is convenient if you need several identical arrays.
Drawing a table
In my opinion, this is the most difficult method, it should be used in rare cases when you need to create a complex table with an unusual configuration or when you have a lot of time and want to experiment.
Select the appropriate item from the menu.
Now we draw a pencil and draw a frame, and then the cells. In my opinion, it’s convenient to “draw” vertical, horizontal and even diagonal lines and create your own layout, but you can create as you want.
During the drawing process, the “Layout” tab will open in the main menu. The options on this panel allow you to quickly add identical cells, merge them, or split them. I will tell you more about all the possibilities for editing any table in Microsoft Word a little later.
Convert text to table
This function can be quite a convenient tool for those who are used to typing text quickly and do not want to waste time filling out fields. You can also use it when you transfer data from a printed sheet and book to a computer, or you simply don’t like tables, but you have to make them.
To make everything work, write the contents of each cell according to one of the principles: